⚙️ Facebook Leads Integration & Sync Addon Configurations
📘 CONFIGURATION OVERVIEW
This guide focuses on configuring the Facebook Leads Integration & Sync Addon after installation. For installation instructions, refer to the Installation Guide.
Configuration Process Overview
The configuration involves two main phases:
- Super Admin Configuration - Configure module settings and subscription plans
- Tenant Configuration - Set up Facebook integration and start capturing leads
🔧 Phase 1: Super Admin Configuration
Configure Subscription Plans
- Access Plan Management: Go to Admin > Plans & Pricing
- Edit Target Plans: For each subscription plan that should include Facebook Lead integration:
- Click Edit Plan
- Scroll to Plan Features section
- Find Facebook Lead Integration feature textbox
- Enter 1 to enable the feature (or 0 to disable)
- Click Save Plan
🏢 Phase 2: Tenant Configuration
Step 1: Access Tenant Application Settings
- Login as Tenant: Access your tenant dashboard
- Navigate to Settings: Go to Application Settings from main menu
- Find Facebook Section: Scroll down to locate Facebook Lead Integration section
Step 2: Create Meta Developer Application
🌐 META DEVELOPER REQUIREMENTS
This step requires a Meta Developer account and a Facebook Business account. Your application must be deployed on a production server with a valid SSL certificate.
Before configuring in WhatsMarkSaaS, create a Meta Developer application:
- Visit Meta for Developers: Go to developers.facebook.com
- Create Developer Account: Sign up or login with your Facebook account
- Create New App:
- Click Create App
- Select Business as app type
- Enter App Name and Contact Email
- Click Create App
- Note App Credentials:
- Copy your App ID from the app dashboard
- Go to App Settings > Basic to find App Secret
- Keep these credentials handy for next step
🔑 PERMISSIONS REQUIRED
Your Facebook app will need these permissions:
- pages_manage_metadata
- pages_show_list
- leads_retrieval
Step 3: Configure Facebook Lead Integration in Tenant Settings
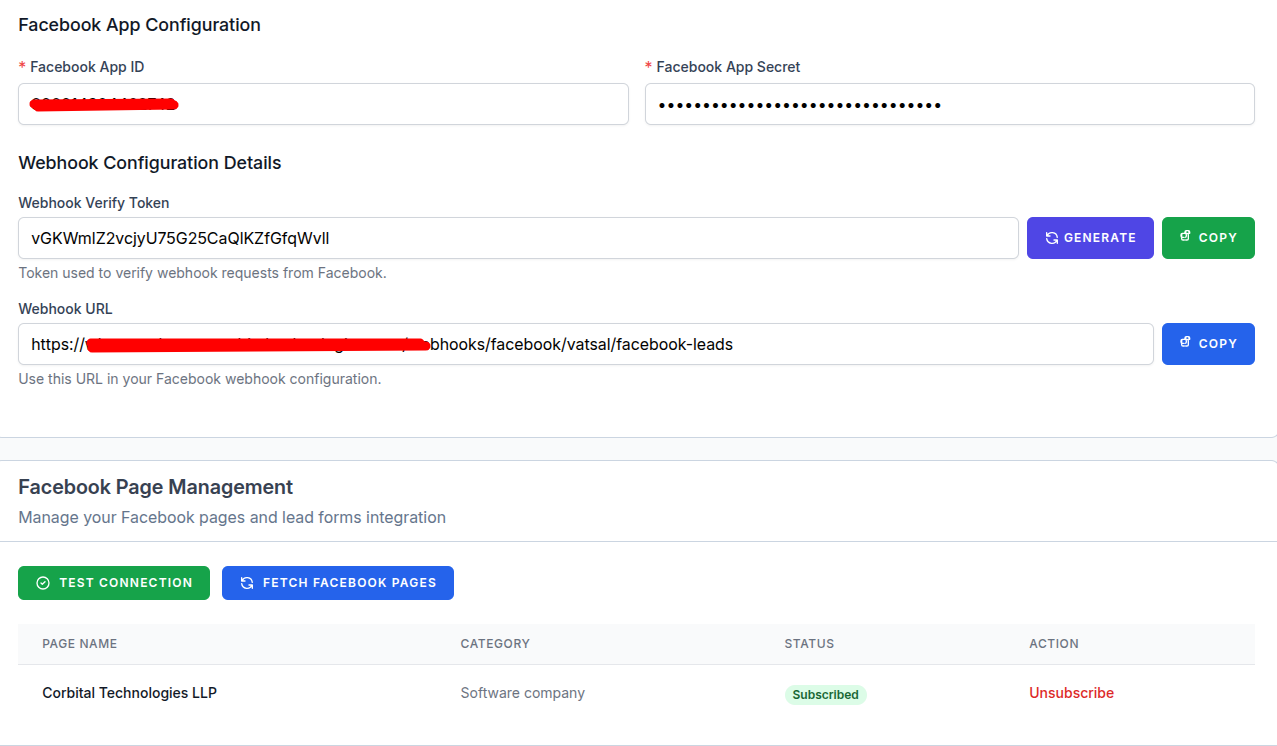
- Return to Application Settings: Go back to Application Settings > Facebook Lead Integration
- Enable Integration: Toggle Enable Facebook Lead Integration to ON
- Enter App Credentials:
- Facebook App ID: Paste your Meta app ID
- Facebook App Secret: Paste your Meta app secret
- Webhook Verify Token: System will auto-generate (note this value)
- Save Configuration: Click Save Settings
- Copy Webhook Details: Note the generated:
- Webhook URL (needed for Meta app configuration)
- Verify Token (needed for webhook verification)
Step 4: Configure Webhooks in Meta App
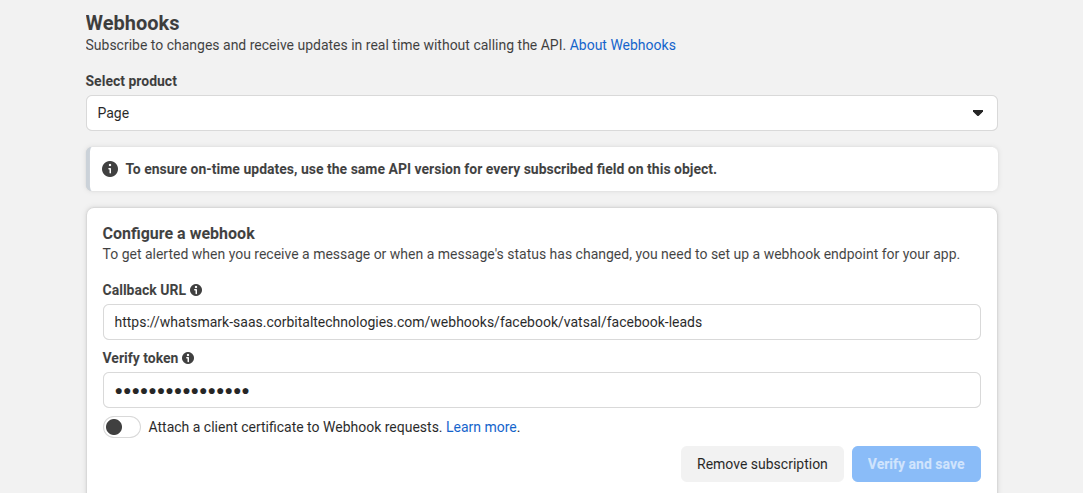

- Return to Meta Developer Console: Go back to your app at developers.facebook.com
- Add Webhooks Product:
- In app dashboard, click Add Product
- Find and add Webhooks
- Configure Page Webhooks:
- In Webhooks settings, click Create Subscription under "Page"
- Callback URL: Paste the webhook URL from WhatsMarkSaaS
- Verify Token: Paste the verify token from WhatsMarkSaaS
- Click Verify and Save
❗ CONNECTION FAILURE
If webhook verification fails, ensure:
- Your server is accessible from the internet
- Your SSL certificate is valid
- The verify token matches exactly
- Your server isn't blocking incoming webhook requests
- Subscribe to Lead Events:
- After verification, check leadgen subscription field
- Click Subscribe
Step 5: Connect Facebook Pages
- Return to WhatsMark Settings: Go back to Application Settings > Facebook Lead Integration
- Test Connection: Click Test Connection button to verify app credentials
- Confirm Success: You should see "Connection successful" message
- Enable Lead Processing: Ensure Enable Lead Processing toggle is ON
- Save Final Settings: Click Save Configuration
Step 6: Subscribe to Facebook Pages
- Fetch Pages: In the Facebook Lead Integration section, click Fetch Facebook Pages
- Review Available Pages: System will display all pages connected to your Facebook app
- Subscribe to Pages: For each page you want to capture leads from:
- Find the page in the list
- Click Subscribe to Leads button
- Status should change to "Subscribed"
- Verify Subscriptions: Ensure all target pages show "Subscribed" status
⏱️ PROCESSING DELAY
There may be a slight delay (5-15 minutes) between lead submission on Facebook and appearance in your WhatsMark dashboard, depending on your cron job configuration.
🧪 Testing the Integration
Create a Test Lead Ad
- Access Facebook Ads Manager: Go to business.facebook.com
- Create Test Campaign:
- Campaign Objective: Lead Generation
- Select your subscribed Facebook page
- Create a simple lead form with basic fields (name, email, phone)
- Set a small test budget
- Submit Test Lead: Fill out your own lead form to test the integration
Verify Lead Processing
- Access Contacts: Go to Contacts in your WhatsMarkSaaS dashboard
- Filter by Source: Look for contacts with "Facebook" as the source
- Check Lead Data: Verify all form fields are properly captured
- Review Processing Status: Confirm leads are being processed correctly
🛠️ Advanced Configurations
Customizing Lead Fields Mapping
You can customize how Facebook lead form fields map to your contact fields:
- Navigate to Facebook Integration Settings
- Go to Field Mapping Tab
- Map Facebook Form Fields to appropriate contact fields in your system
- Save Custom Mapping
Setting Up Automatic Actions
Configure automatic actions when new leads are received:
- Navigate to Actions Settings
- Enable Desired Actions:
- Automatic WhatsApp message
- Lead assignment to team member
- Task creation
- Notification settings
- Configure Each Action with desired parameters
- Save Action Configuration