Facebook Integration
Learn how to connect your Facebook Lead Ads with the Facebook Leads Integration & Sync Addon for seamless lead capture and processing.
🏢 Facebook Business Setup
Prerequisites
Before setting up Facebook integration, ensure you have:
- Facebook Business Account with admin access
- Facebook Page with admin permissions
- Facebook Ad Account with Lead Ads capability
- Active Lead Ad campaigns (or plans to create them)
Facebook Developer Account
- Create Developer Account: Visit developers.facebook.com
- Verify Account: Complete phone and email verification
- Accept Terms: Agree to Facebook Developer Terms
📱 Facebook App Configuration
Step 1: Create Facebook App
Follow these visual steps to create your Facebook app for lead integration:
Step 1: Access App Creation
Navigate to the Facebook Developers portal and start the app creation process.
- Navigate to Apps: Go to "My Apps" in Facebook Developers console
- Create New App: Click the "Create App" button
- Begin Setup: Start the app creation wizard
Step 2: Choose Use Case
Select the appropriate use case for your Facebook app integration.
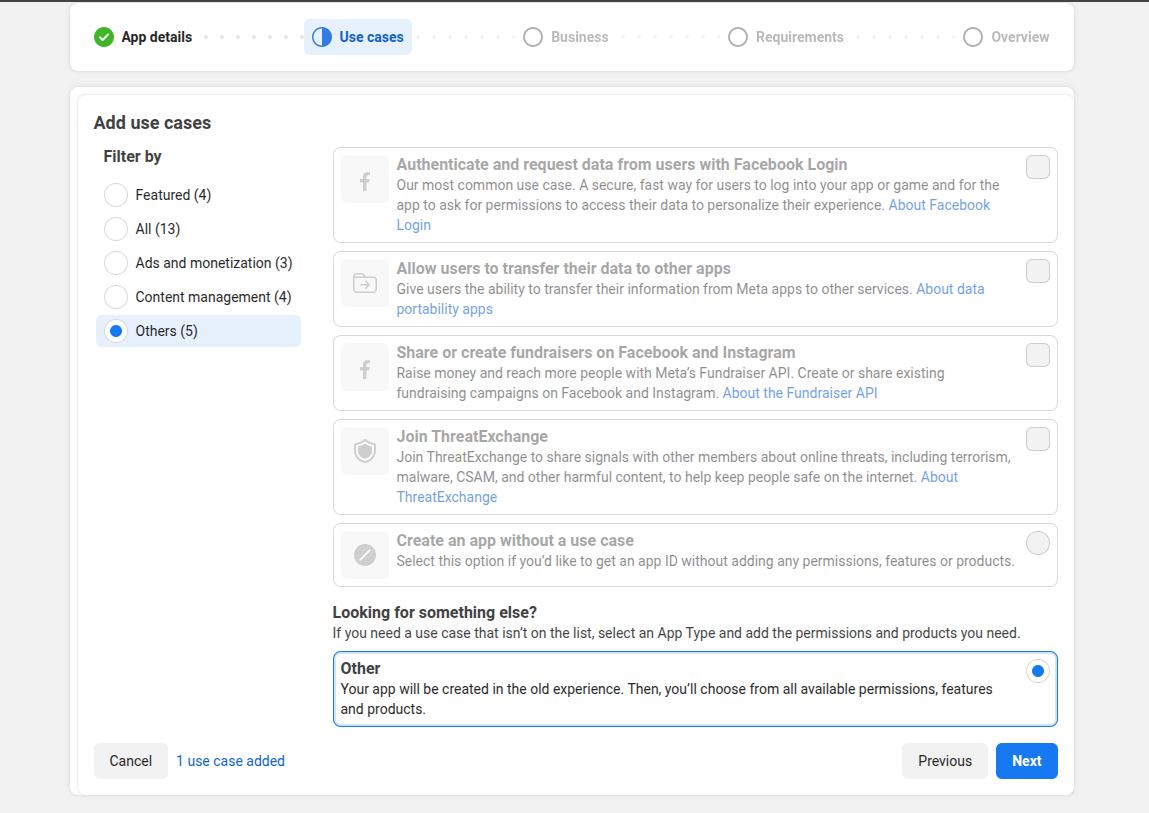
- Filter Options: You can filter by use case categories if needed
- Select Use Case: Choose "Other" from the available options (as shown highlighted)
- App Configuration: This will configure your app for custom business integration needs
- Continue Process: Click "Next" to proceed to app type selection
Step 3: Select App Type
Choose the correct app type for your business integration needs.
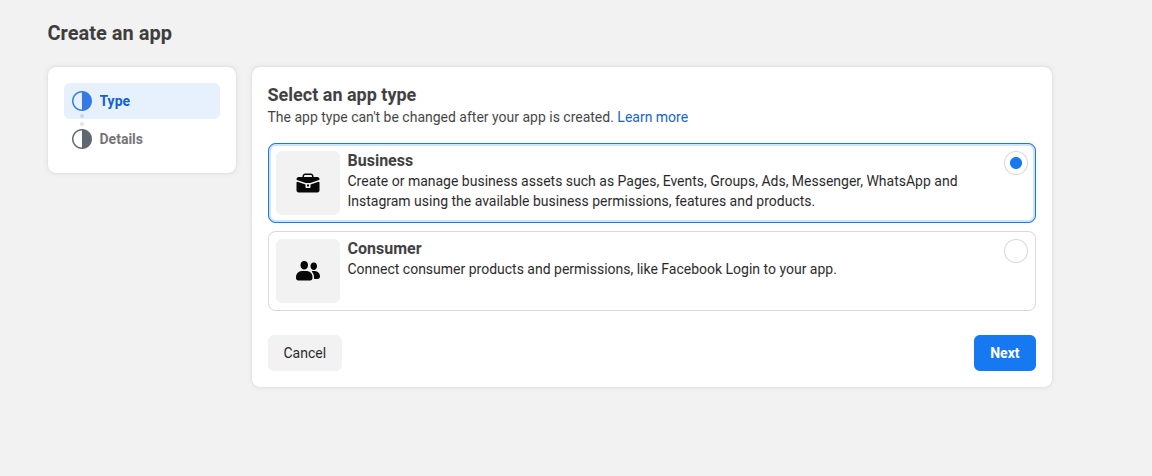
- App Type Selection: Choose "Business" as your app type
- Business Integration: This type allows you to create or manage business assets
- Permissions Access: Business apps get access to Pages, Events, Groups, Ads, Messenger, WhatsApp and Instagram
- Proceed: Click "Next" to continue with app details
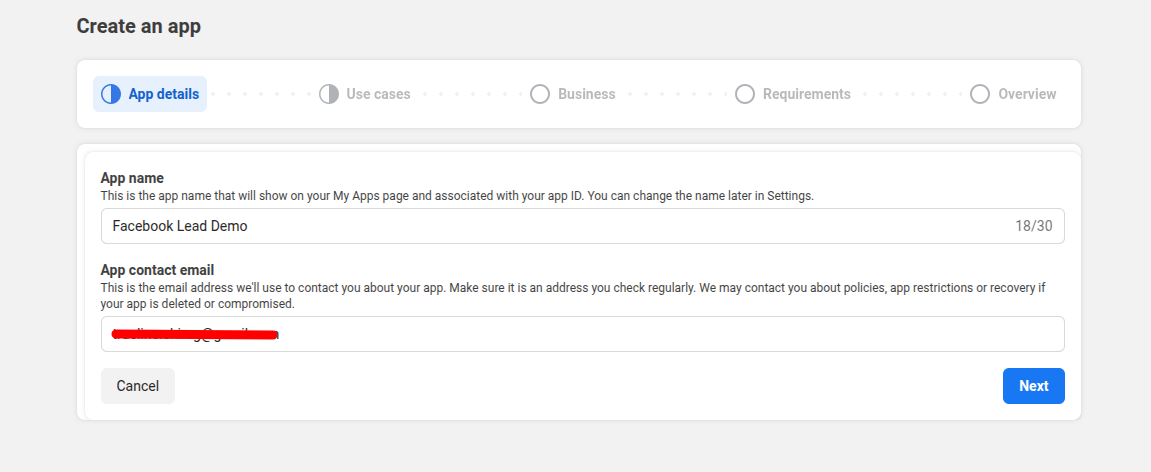
Step 4: Configure App Details
Enter your app information and complete the creation process.
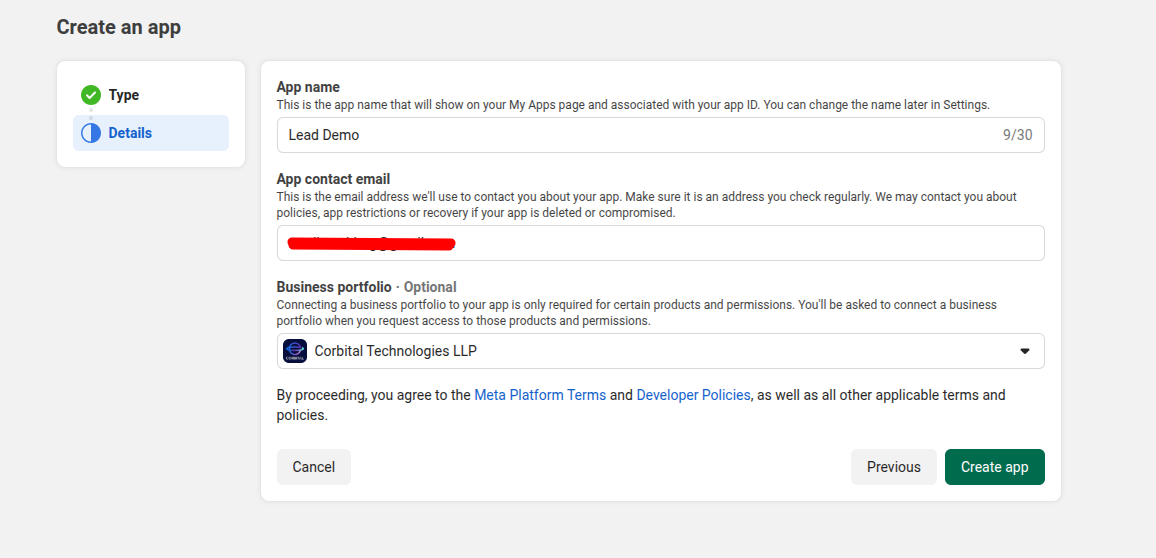
- App Name: Enter a descriptive name like "Lead Demo" or your business name
- Contact Email: Provide a valid business email address (this will be used for app-related communications)
- Business Portfolio: Select your business portfolio from the dropdown or select without business portfolio
- Terms Agreement: Review and agree to Meta Platform Terms and Developer Policies
- Create App: Click "Create app" to finalize the process
Step 5: App Creation Success
Once created successfully, you'll be redirected to your app dashboard where you can begin the configuration process.
🔧 Post-Creation App Configuration
Step 1: Complete Basic App Information
After creating your app, you must complete additional required information before making it live:
Required App Details
- App Icon: Upload a professional 1024x1024 pixel app icon representing your business
- App Description: Provide a clear description of your app's purpose (lead collection and integration)
- Category: Select appropriate business category for your app
- Contact Person: Add contact person details (name, email, phone) for Meta communications
Privacy & Legal Requirements
⚠️ Critical Requirements: These are mandatory for app approval and going live:
Privacy Policy URL:
- Must be a publicly accessible web page
- Should detail how you collect, use, and protect Facebook user data
- Must comply with applicable privacy laws (GDPR, CCPA, etc.)
- Example:
https://yourdomain.com/privacy-policy
Terms of Service URL:
- Must outline terms for using your lead capture service
- Should include user rights and responsibilities
- Example:
https://yourdomain.com/terms-of-service
Data Deletion Instructions:
- Provide clear instructions for users to request data deletion
- Can be a URL or contact email
- Example:
mailto:[email protected]orhttps://yourdomain.com/data-deletion
Business Verification (If Required)
Some regions may require additional business verification:
- Business Documents: Upload official business registration documents
- Address Verification: Provide verified business address
- Identity Verification: Upload government-issued ID for business owner
- Phone Verification: Verify business phone number
Step 2: Configure App Domains and URLs
Set up your app's allowed domains and URLs:
- App Domains: Add your website domain (e.g.,
yourdomain.com) - Authorized Redirect URIs: Add authorized callback URLs
- Webhook URLs: Add your webhook endpoint URLs (configured later)
Step 3: Country-Specific Considerations
⚠️ Important Note: Meta app creation and approval processes may vary by country and region:
Common Regional Variations:
- United States: Standard process with business verification options
- European Union: Enhanced GDPR compliance requirements and documentation
- India: Additional local compliance and business verification requirements
- Brazil: Specific business registration and tax ID requirements
- Other Regions: May have unique local regulatory requirements
General Recommendations:
- Check Local Requirements: Research Meta's specific requirements for your country
- Compliance Documentation: Prepare all required business and legal documentation
- Local Legal Review: Consider legal review of privacy policy and terms for local compliance
- Meta Support: Contact Meta Developer Support for country-specific guidance if needed
Step 4: Copy Essential App Credentials
Once your app is configured, you'll need to copy these essential credentials for WhatsMarkSaaS integration:
Accessing App ID and App Secret
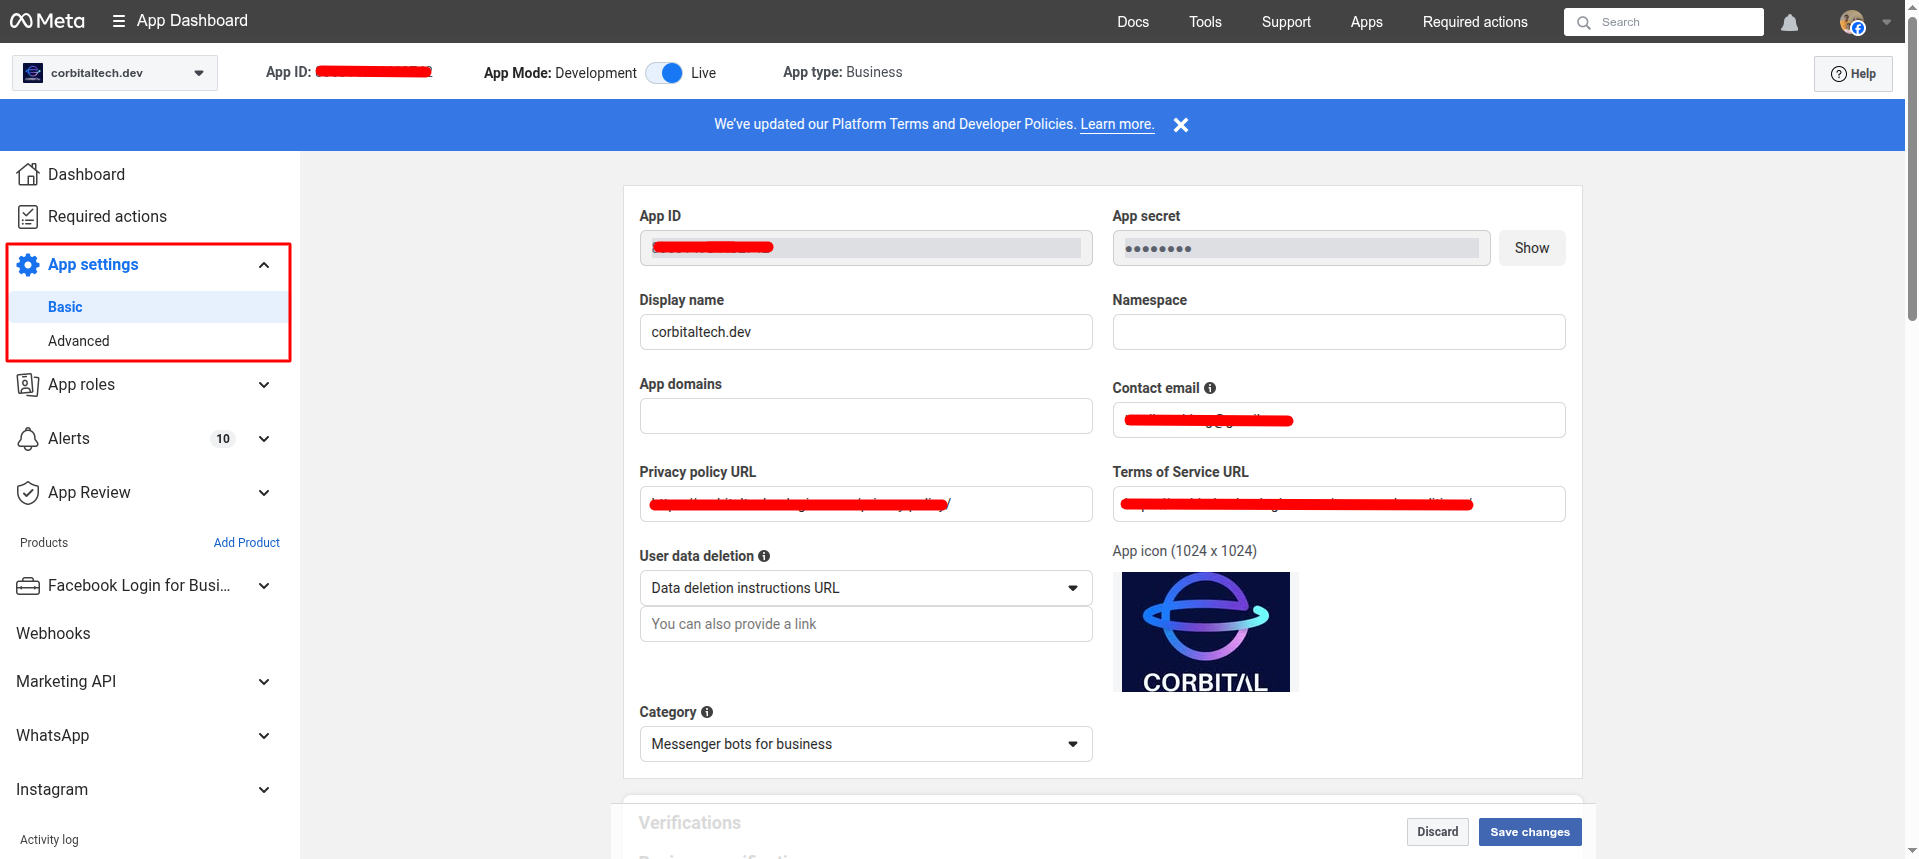
Navigate to Basic Settings:
- In your app dashboard, go to Settings > Basic
- This page contains your essential app credentials
Copy App ID:
- Location: Displayed at the top of Basic Settings page
- Format: Numeric string (e.g.,
123456789012345) - Usage: Required for WhatsMarkSaaS Facebook integration setup
- Security: This can be public-facing in your code
Copy App Secret:
- Location: In Basic Settings, click "Show" next to App Secret
- Format: Alphanumeric string (e.g.,
abc123def456ghi789) - Usage: Required for WhatsMarkSaaS authentication
- ⚠️ Security: Keep this SECRET - never expose in client-side code or public repositories
Step 5: Make Your App Live
Development vs Live Mode
- Development Mode: Limited to app developers and testers only
- Live Mode: Available to all Facebook users (required for production)
🔑 Permissions Setup
Step 1: Required Permissions Management
Critical Permissions Setup: Request and obtain approval for required permissions:
⚠️ Critical: The Facebook Leads Integration & Sync Addon requires these specific Meta app permissions:
ads_management- For managing ads and campaignspages_manage_ads- For managing page advertisementspages_manage_metadata- For managing page metadatapages_read_engagement- For reading page engagement dataleads_retrieval- For retrieving lead generation data (most important)
Permission Approval Process:
- Submit App Review: Submit app for Meta review process
- Provide Documentation: Include detailed use case documentation
- Wait for Approval: Meta review can take several days to weeks
- Verify Permissions: Confirm all permissions are approved and active
Important Notes:
- All permissions must be approved by Meta through their App Review process
- We do not provide support for Meta permission approval
- Tenants must handle permission requests and approval directly with Meta
- Without proper permissions, the addon will not function correctly
🔗 Webhook Configuration
Step 1: Add Webhook Product
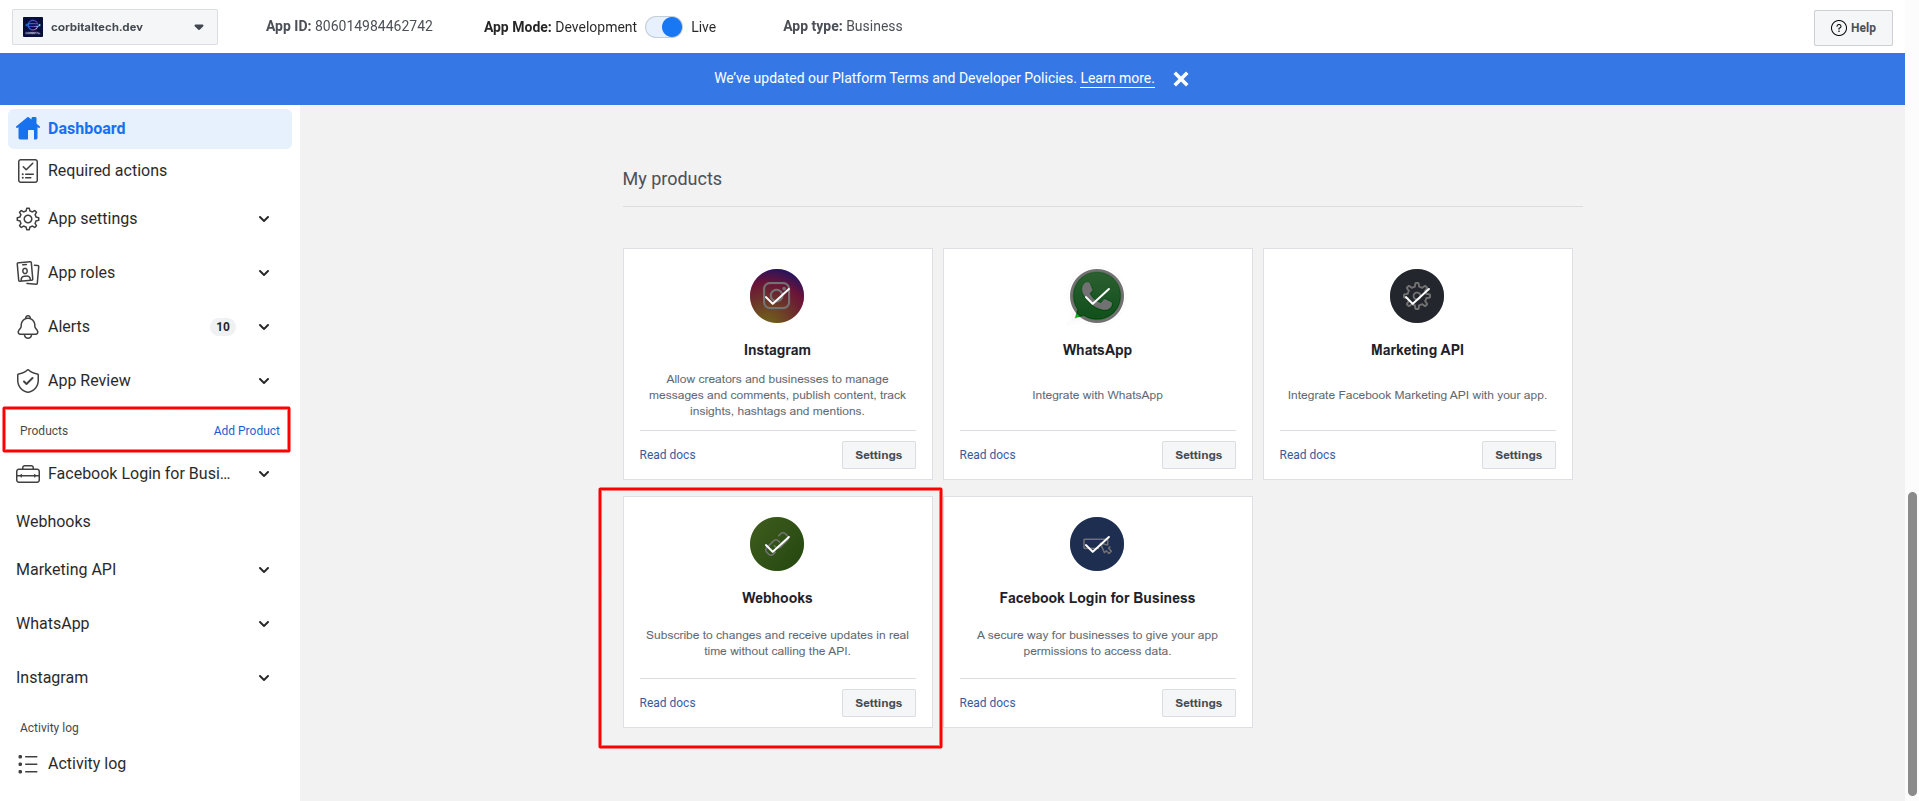
Add Webhook Support: Configure webhooks for real-time lead processing:
- Add Webhooks Product: In Meta app dashboard, add "Webhooks" product
- Create Page Subscription: Click on "Page" to create page subscription
Step 2: Configure Webhook Endpoint
- Configure Webhook Endpoint:
- Callback URL: Enter webhook URL from WhatsMarkSaaS settings
- Verify Token: Enter verify token from WhatsMarkSaaS settings
- Click "Verify and Save" to establish connection
Step 3: Subscribe to Events
- Subscribe to Lead Events:
- After webhook verification, select subscription events
- Check "leadgen" event subscription (essential)
- Click "Subscribe" to activate lead event listening
- Verify "Successfully subscribed to leadgen" confirmation
Step 4: Verify Webhook
Facebook will send a verification request to your webhook URL with:
hub.mode: "subscribe"hub.challenge: Random string to echo backhub.verify_token: Your verify token
⚙️ WhatsMarkSaaS Integration Setup
Step 1: Configure App Credentials in WhatsMarkSaaS
Enter Meta App Details: Connect your Meta app with WhatsMarkSaaS:
- Access Integration Settings: Go to Application Settings > Facebook Lead Integration
- Enable Feature: Toggle "Enable Facebook Lead Integration" to ON
- Enter Meta App Credentials:
- Facebook App ID: Copy from Meta app basic settings
- Facebook App Secret: Copy from Meta app basic settings
- Webhook Verify Token: System will auto-generate (note this value)
- Save Configuration: Click "Save Settings" to establish connection
- Copy Webhook Details: Note the generated:
- Webhook URL (needed for Meta app webhook configuration)
- Verify Token (needed for webhook verification)
Step 2: Test Facebook Connection
Verify Integration: Ensure proper connection between systems:
- Connection Test: Click "Test Connection" button to verify app credentials
- Success Confirmation: Look for "Connection successful" message
- Permission Check: Verify all required permissions are accessible
- Error Handling: Address any connection errors before proceeding
Step 3: Connect Facebook Pages
Link Business Pages: Configure which Facebook pages to capture leads from:
- Fetch Pages: Click "Fetch Facebook Pages" button in integration settings
- Review Available Pages: System displays all pages linked to your Meta app
- Subscribe to Pages: For each page you want to capture leads from:
- Find the page in the list
- Click "Subscribe to Leads" button next to page name
- Verify status changes to "Subscribed"
- Repeat for all desired pages
- Verify Subscriptions: Ensure all target pages show "Subscribed" status
Step 4: Lead Campaign Management
Create Lead Generation Campaigns: Set up Facebook Lead Ads:
- Access Ads Manager: Go to business.facebook.com
- Create Lead Campaign:
- Choose "Lead generation" campaign objective
- Select subscribed Facebook page from WhatsMarkSaaS
- Configure target audience and budget settings
- Design Lead Form:
- Create lead capture form with essential fields (name, email, phone)
- Add custom qualifying questions based on business needs
- Include privacy policy link (optional)
- Set up thank you message for form completion
- Launch Campaign: Publish campaign and monitor lead generation performance
📋 Lead Form Setup
Creating Effective Lead Forms
Form Structure
- Form Name: Use clear, descriptive names
- Welcome Screen: Create engaging welcome message
- Questions: Add relevant qualification questions
- Privacy Policy: Include privacy policy link
- Thank You Screen: Add confirmation message
Question Types
- Contact Info: Name, email, phone (required)
- Multiple Choice: Predefined options
- Short Answer: Free text responses
- Conditional Logic: Dynamic question flow
Best Practices
- Keep forms short (3-5 questions max)
- Use clear, simple language
- Avoid asking for sensitive information
- Include privacy reassurance
- Test forms before publishing
🔄 Real-time Sync Setup
Webhook Processing
The FBLead Addon automatically processes Facebook webhooks:
- Receives Webhook: Facebook sends lead data
- Validates Request: Verifies Facebook signature
- Processes Lead: Extracts and stores lead information
- Triggers Actions: Executes configured automation
🛡️ Security Configuration
API Security
- HTTPS Required: All API calls must use HTTPS
- Token Security: Store tokens securely
- Request Validation: Validate all Facebook requests
Webhook Security
- Signature Verification: Verify Facebook webhook signatures
- Token Validation: Validate verify tokens
- IP Whitelisting: Restrict webhook access to Facebook IPs
- Request Logging: Log all webhook requests for audit
📊 Testing & Validation
Test Scenarios
- Create Test Lead: Submit test lead through Facebook form
- Verify Webhook: Confirm webhook receives data
- Check Processing: Ensure lead appears in system
- Test Automation: Verify triggered actions execute
Common Issues
Connection Problems
- Invalid Credentials: Check App ID and Secret
- Permission Issues: Verify required permissions
- Network Problems: Check server connectivity
Sync Issues
- Missing Webhooks: Verify webhook configuration
- Processing Errors: Check error logs
- Duplicate Leads: Configure deduplication
🔧 Advanced Configuration
Multiple Ad Accounts
- Business Manager: Use Facebook Business Manager
- Account Access: Grant app access to multiple ad accounts
- Account Selection: Configure which accounts to sync
- Permission Management: Manage account-level permissions
With proper Facebook integration, you'll have a seamless flow of leads from Facebook directly into your WhatsApp engagement system.