How to Create AI Assistant
This guide walks you through the process of creating and training your AI Assistant using uploaded knowledge base files in WhatsMark SaaS.
Introduction
After configuring OpenAI integration, you can create intelligent AI assistants that use your uploaded documents to provide contextual responses to user queries. The AI Assistant can analyze PDF, DOC, DOCX, TXT, and MD files to build a comprehensive knowledge base.
Step 1: Access AI Assistant Section
Navigate to AI Assistant Management
- Log in to your WhatsMark SaaS admin dashboard
- Go to AI Assistant in the left sidebar menu
- Click "+ Create New Assistant" button to start creating your assistant
Step 2: Configure Assistant Basic Settings
Create New Personal Assistant Form
Fill out the assistant creation form with the following details:
Assistant Configuration Parameters
| Field | Description | Example | Required |
|---|---|---|---|
| Assistant Name | Unique identifier for your assistant | SmartFlow AI | ✅ Yes |
| Assistant Description | Detailed explanation of assistant purpose and capabilities | An intelligent virtual assistant designed to streamline your workflows, provide real-time insights, automate tasks, and support seamless communication across platforms. | ✅ Yes |
| System Instructions | Behavior and personality guidelines for the AI | You are SmartFlow AI, a proactive and helpful assistant. Always provide clear, concise, and context-aware responses. | ✅ Yes |
| AI Model | OpenAI model selection | GPT-4o Mini (Fast & Cost-effective) | ✅ Yes |
| Temperature | Response creativity level (0.0-1.0) | 0.7 (balanced creativity) | ✅ Yes |
AI Model Options
| Model | Performance | Cost | Best For |
|---|---|---|---|
| GPT-4o Mini | Fast & Cost-effective | Low | Basic queries, quick responses, most use cases |
| GPT-3.5 Turbo | Balanced | Medium | General purpose, standard applications |
| GPT-4 | Advanced | High | Complex reasoning, detailed analysis |
Temperature Settings
The temperature slider controls response creativity:
- 0 (Focused): More deterministic, consistent responses
- 0.7 (Balanced): Good balance of creativity and focus (recommended)
- 1 (Creative): More creative and varied responses
System Instructions Guidelines
Use this format for professional assistant behavior:
text
You are [Assistant Name], a proactive and helpful assistant. Always provide clear,
concise, and context-aware responses. Anticipate user needs, suggest relevant
actions, and ensure user interactions are productive and pleasant. When unsure,
ask clarifying questions rather than guessing.
concise, and context-aware responses. Anticipate user needs, suggest relevant actions, and ensure user interactions are productive and pleasant.
---
## Step 3: Upload Knowledge Base Documents
### File Upload Interface
The interface provides a drag-and-drop area for uploading knowledge documents:

### Upload Files for AI Analysis
- **Drag and Drop**: Drag files directly into the upload area
- **Click to Upload**: Click the upload area to browse and select files
- **File Format Support**: PDF, DOC, DOCX, TXT, MD up to 10MB each
- **Multiple Files**: Upload multiple documents at once
### Supported File Formats
| Format | Extension | Max Size | Use Case |
|--------|-----------|----------|----------|
| **PDF Documents** | .pdf | 10MB | Manuals, guides, reports |
| **Word Documents** | .doc, .docx | 10MB | Policies, procedures |
| **Text Files** | .txt | 10MB | FAQs, simple content |
| **Markdown Files** | .md | 10MB | Technical documentation |
### Document Upload Process
1. **Prepare Your Documents**
- Ensure files contain relevant business information
- Remove any sensitive or confidential data
- Organize content logically with clear headings
2. **Upload Files**
- Click **Upload Knowledge Documents**
- Select multiple files (up to 10MB each)
- Wait for upload completion
3. **Document Processing**
- System automatically extracts text content
- Documents are indexed for vector search
- Processing status shows as "Sync Status"
### Content Types for Knowledge Base
| Content Type | Purpose | Examples |
|--------------|---------|----------|
| **FAQs** | Common questions and answers | Product questions, troubleshooting |
| **Product Information** | Detailed descriptions | Features, specifications, pricing |
| **Process Documentation** | Step-by-step guides | Installation, setup procedures |
| **Company Policies** | Terms and procedures | Support policies, return procedures |
| **Contact Information** | Support channels | Phone numbers, email addresses |
---
## Step 4: Create Assistant and Monitor Processing
### Assistant Creation Process
After filling out the form and uploading documents:
1. **Click "Create Assistant"** button
2. **System Processing**: Assistant is created in OpenAI
3. **Document Processing**: Files are analyzed and indexed
4. **Status Monitoring**: Track progress on the dashboard
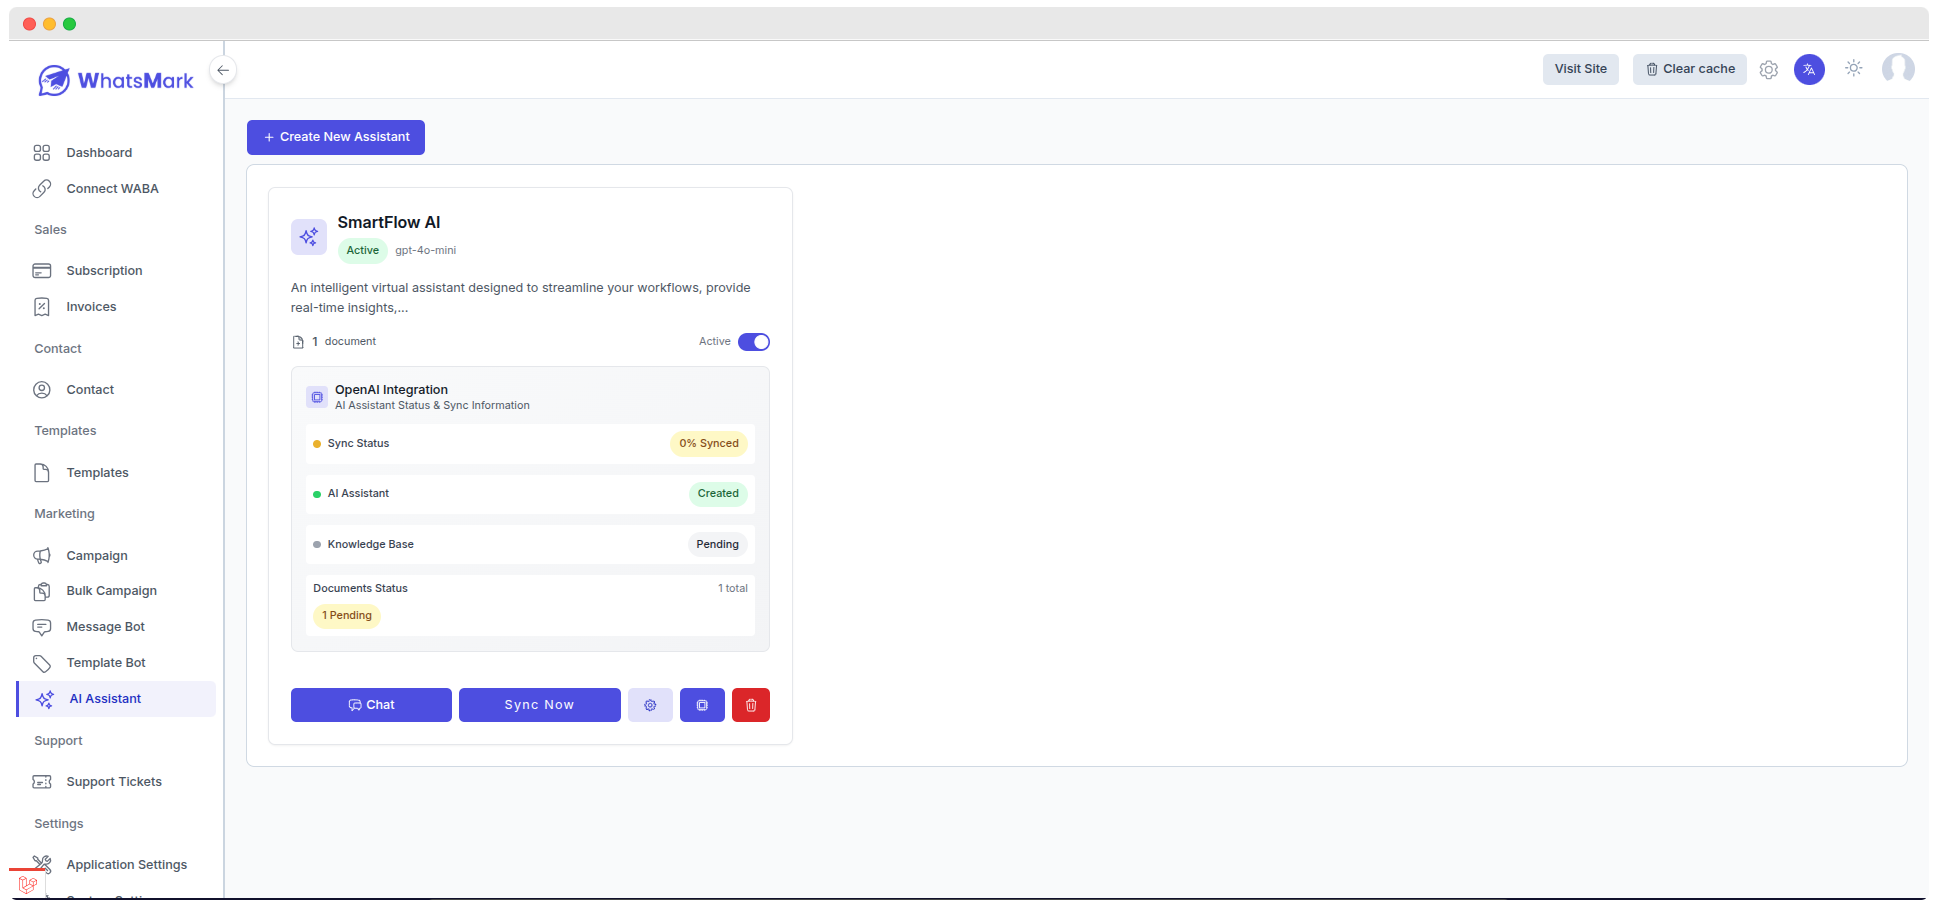
### AI Assistant Dashboard - Processing State

The dashboard shows your assistant with initial processing status:
### Status Indicators During Processing
| Component | Initial Status | Description |
|-----------|----------------|-------------|
| **Sync Status** | "0% Synced" (Yellow) | Documents being processed |
| **AI Assistant** | "Created" (Green) | Assistant successfully created |
| **Knowledge Base** | "Pending" (Yellow) | Vector store being prepared |
| **Documents Status** | "1 Pending" | Files waiting to be processed |
### Processing Actions Available
- **Sync Now**: Manually trigger synchronization
- **Chat**: Available once fully synced
- **Assistant Settings**: Manage configuration
---
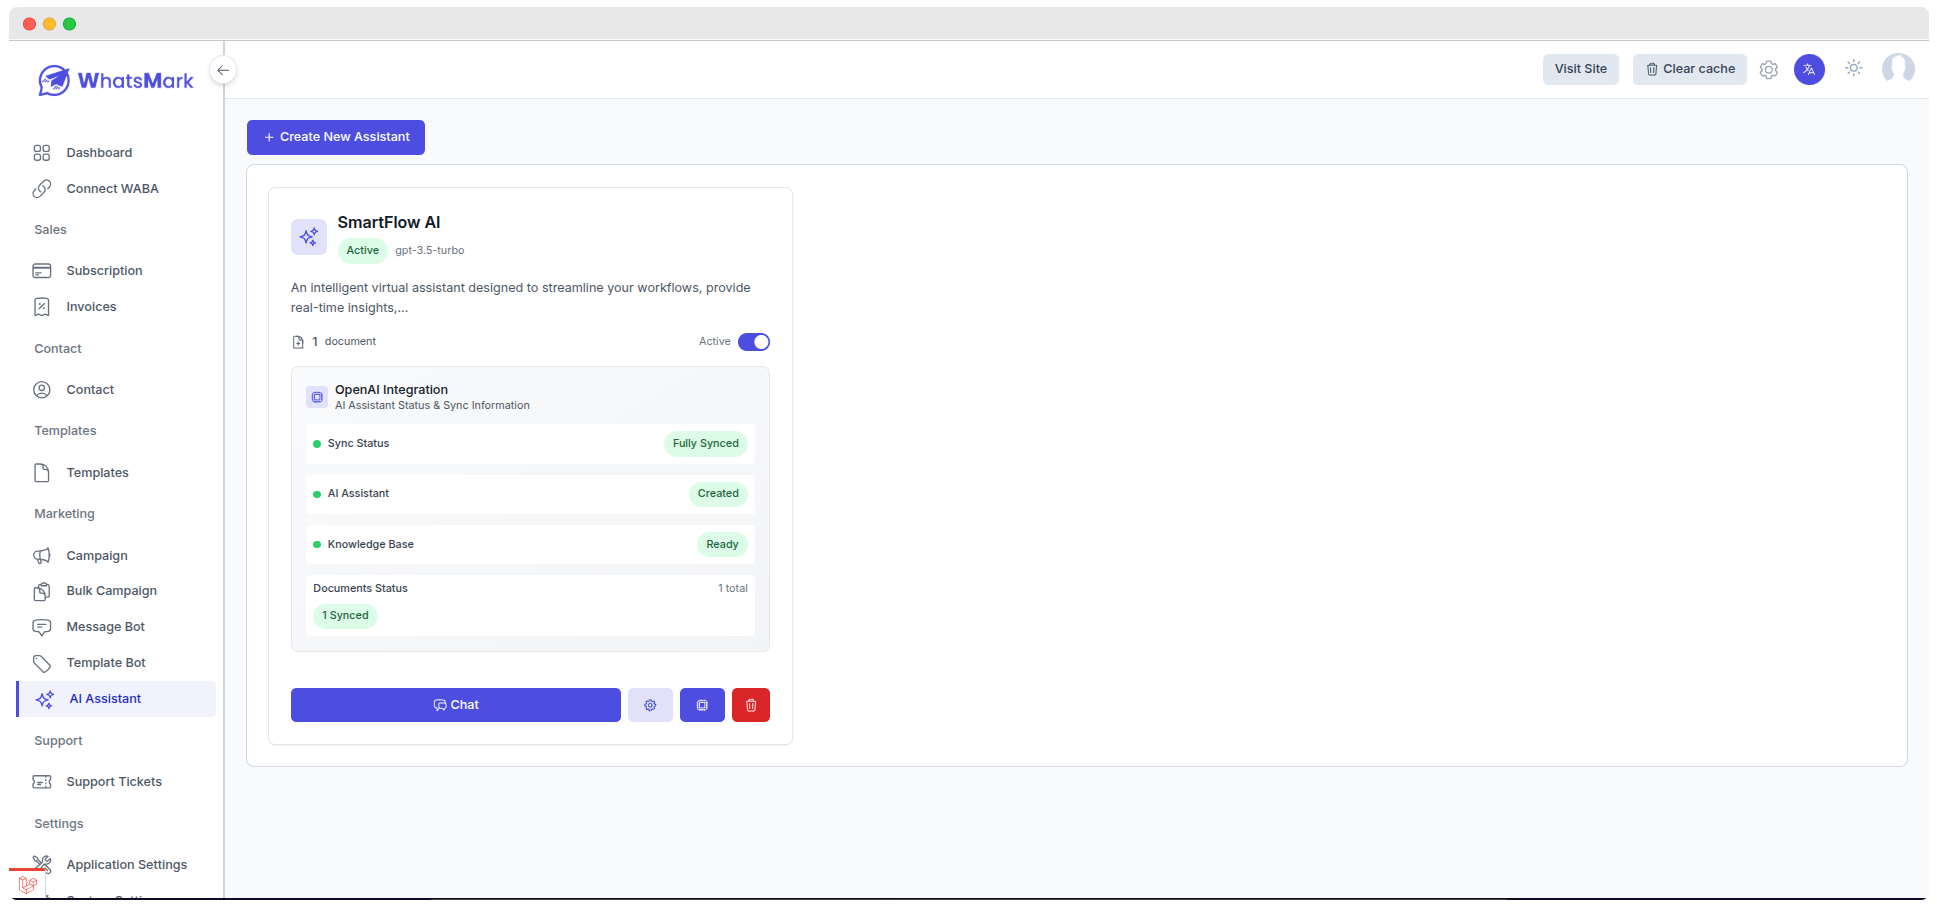
## Step 5: Verify Completed Setup
### AI Assistant Dashboard - Completed State

Once processing is complete, the dashboard shows:
### Status Indicators When Ready
| Component | Final Status | Description |
|-----------|--------------|-------------|
| **Sync Status** | "Fully Synced" (Green) | All documents processed |
| **AI Assistant** | "Created" (Green) | Assistant ready for use |
| **Knowledge Base** | "Ready" (Green) | Vector store operational |
| **Documents Status** | "1 Synced" | All files successfully indexed |
### Available Actions
- **Chat**: Test your assistant directly
- **Integration**: Use in bot flows
- **Management**: View detailed status
---
## Step 6: View Detailed Integration Status
### OpenAI Integration Details Modal

Click on the assistant card to view comprehensive status information:
### Assistant Overview Dashboard
| Metric | Value | Status |
|--------|-------|--------|
| **Total Documents** | 1 | Successfully uploaded |
| **Sync Progress** | 100% | Fully completed |
| **Overall Status** | "Fully Synced" | Ready for operation |
### OpenAI Resources Status
| Resource | Status | Function |
|----------|--------|----------|
| **AI Assistant** | "Created" | OpenAI Assistant Instance active |
| **Knowledge Base** | "Ready" | Vector Store for Document Search operational |
### Resource Identifiers
The system provides unique identifiers for integration:
- **Assistant ID**: `asst_D6gDH34hsCvf4AE6lQHqBE1` (for API calls)
- **Vector Store ID**: `vs_680c477487b48516acbf fc2e1a6E1d0c` (for document search)
### Quick Actions Available
| Action | Purpose | Access |
|--------|---------|--------|
| **Manage Assistant** | Edit settings and configuration | Direct management |
| **Open Chat** | Test assistant responses | Real-time testing |
| **OpenAI Dashboard** | View OpenAI platform details | External monitoring |
| **View Vector Store** | Inspect document indexing | Search capabilities |
---
## Step 5: Test Your AI Assistant
### Chat Interface Testing
The chat interface provides several testing capabilities:
| Feature | Description | Benefits |
|---------|-------------|----------|
| **Real-time Messaging** | Instant responses | Test conversation flow |
| **Knowledge Base Sidebar** | Uploaded documents display | Verify document access |
| **Document Status** | Sync indicators | Confirm processing complete |
| **Chat History** | Complete logs | Review conversation quality |
### Testing Scenarios
| Test Type | Example Query | Expected Response |
|-----------|---------------|-------------------|
| **FAQ Questions** | "What are your business hours?" | Accurate info from uploaded docs |
| **Product Inquiries** | "Tell me about your premium plan" | Detailed product information |
| **Process Questions** | "How do I reset my password?" | Step-by-step instructions |
| **General Support** | "I need help with billing" | Relevant guidance or handoff |
---
## Step 7: Integrate with Message Bot Flows
### Message Bot Integration

To use your AI Assistant in automated conversations:
### Access Message Bot Creation
1. **Navigate to Message Bot** in the left sidebar
2. **Click "Add Message Bot"** to create a new bot
3. **Select "Personal Assistant"** tab in Message Bot Options
### Bot Configuration Parameters
| Field | Configuration | Example |
|-------|---------------|---------|
| **Bot Name** | Unique identifier for the bot | "testing" |
| **Relation Type** | Contact classification | "Lead" |
| **Reply Type** | Trigger method | "On Exact Match" |
| **Trigger Keyword** | Activation words | "hello" |
### Personal Assistant Selection
In the **Personal Assistant** dropdown:
- Select your created assistant (e.g., "SmartFlow AI")
- Configure additional response options
- Set fallback behaviors
### Message Bot Options
The interface provides multiple response types:
- **Reply Button**: Quick response options
- **CTA URL**: Call-to-action links
- **File Upload**: Document sharing
- **Personal Assistant**: AI-powered responses (your assistant)
### Advanced Bot Flow Setup
1. **Define Triggers**
- Set contact types (Lead, Customer, Prospect)
- Configure trigger keywords
- Set matching criteria
2. **Configure AI Response**
- Select your Personal Assistant
- Set response parameters
- Define fallback actions
3. **Test Integration**
- Send test messages with trigger keywords
- Verify AI assistant responds appropriately
- Check conversation flow
---
## Step 7: Advanced Configuration
### Response Customization
| Parameter | Description | Recommended Value |
|-----------|-------------|-------------------|
| **Response Length** | Token limit for responses | 150-300 tokens |
| **Temperature** | Creativity level (0.0-1.0) | 0.1-0.3 for accuracy |
| **Confidence Threshold** | Minimum confidence for responses | 0.7-0.8 |
### Fallback Configuration
| Scenario | Response Template | Action |
|----------|-------------------|--------|
| **No Information Found** | "I don't have specific information about that topic." | Offer human handoff |
| **Low Confidence** | "I'm not entirely sure about that." | Suggest alternative help |
| **Out of Scope** | "That question is outside my knowledge area." | Transfer to support |
---
## Step 8: Monitoring and Optimization
### Performance Metrics
| Metric | What It Measures | How to Improve |
|--------|------------------|----------------|
| **Response Accuracy** | Correct answers given | Update knowledge base |
| **User Satisfaction** | Positive feedback rate | Refine responses |
| **Completion Rate** | Resolved conversations | Improve training data |
| **Handoff Rate** | Escalations to humans | Expand knowledge base |
### Maintenance Tasks
| Task | Frequency | Purpose |
|------|-----------|---------|
| **Update Documents** | Monthly | Keep information current |
| **Review Chat Logs** | Weekly | Identify improvement areas |
| **Monitor Usage** | Daily | Track performance |
| **Refine Instructions** | As needed | Optimize behavior |
---
## Best Practices
### Content Preparation
| Practice | Description | Benefit |
|----------|-------------|---------|
| **Clear Structure** | Use headings and sections | Better AI understanding |
| **Current Information** | Regular content updates | Accurate responses |
| **Simple Language** | Avoid jargon | Improved comprehension |
| **Specific Examples** | Include real scenarios | Better context |
### Response Quality
| Factor | Best Practice | Impact |
|--------|---------------|--------|
| **Consistency** | Maintain same tone | Professional image |
| **Accuracy** | Verify information | User trust |
| **Completeness** | Provide sufficient detail | User satisfaction |
| **Relevance** | Address actual question | Efficiency |
---
## Troubleshooting
### Common Issues
| Issue | Symptoms | Solution |
|-------|----------|---------|
| **Documents Not Processing** | Sync status stuck | Check file formats and size |
| **Poor Response Quality** | Irrelevant answers | Update system instructions |
| **Assistant Not Responding** | No AI responses | Verify OpenAI API key |
| **Knowledge Base Empty** | No document access | Re-upload and wait for sync |
### Error Messages
| Error | Meaning | Resolution |
|-------|---------|------------|
| **"Knowledge Base Pending"** | Documents still processing | Wait for completion |
| **"API Key Invalid"** | OpenAI key issue | Check API key in settings |
| **Model Not Available** | Selected model unavailable | Choose different model |
| **Upload Failed** | File upload error | Check file size and format |
---
## Next Steps
Once your AI Assistant is created and tested:
1. **Deploy in Chat Flows** - Integrate with your bot builder
2. **Monitor Performance** - Track user interactions and satisfaction
3. **Continuous Improvement** - Regular updates and optimizations
4. **Scale Usage** - Expand to additional use cases
---
## Need Help?
For assistance with AI Assistant creation:
- **Email Support:** [[email protected]](mailto:[email protected])
- **Support Tickets:** [support.corbitaltech.dev](https://support.corbitaltech.dev/)
- **OpenAI Configuration:** Check our [OpenAI Setup Guide](configure.md)