System Settings
Controls platform-wide configuration and technical settings and customizes the platform to your business!
Location:
Admin Panel → Settings
Required Permissions
admin.settings.view- View system settingsadmin.settings.edit- Edit system settings
System
Core system-level settings impact SaaS platform’s functionality, appearance, and company details.
Core Settings
Location:
Admin Panel → System Settings → System core settings
Basic Settings
| Setting | Description |
|---|---|
| Application Name | The name of your SaaS product. Appears in titles, emails, and headers. |
| Application URL | Your main domain URL (e.g., https://app.yourdomain.com). Used for links and redirects. |
| Logo & Favicon | Upload your platform's logo and favicon to reflect your brand identity. |
| Default Language | Sets the primary language for the system interface. |
| Timezone | Defines the default timezone used across the system (e.g., UTC, EST, etc.). |
| Date Format | Format used to display dates (e.g., YYYY-MM-DD, MM/DD/YYYY). |
| Currency | Default currency used for pricing, billing, and display. |
Advanced Settings
| Setting | Description |
|---|---|
| Debug Mode | Enable during development or troubleshooting to show system-level error messages. Turn off in production. |
| Maintenance Mode | Temporarily disables user access to the platform while updates or fixes are being applied. |
| Session Lifetime | Duration (in minutes) that users remain logged in without activity. Helps manage session security. |
| Registration | Enable or disable new user sign-ups. Useful for private platforms or during maintenance. |
| Default Plan | Specifies which subscription plan new users are automatically assigned to upon registration. |
Application Settings UI
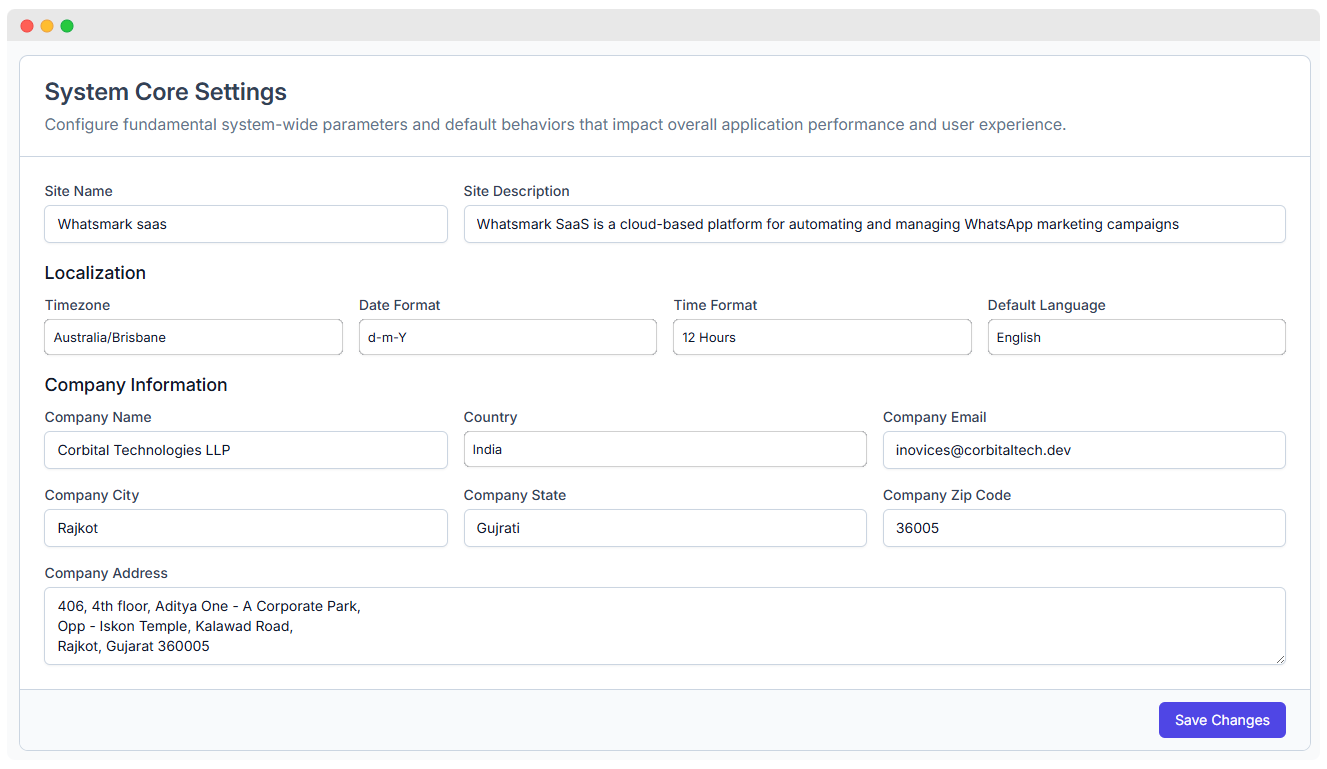
Company Information
This section allows you to input key business and contact information that appears in invoices, emails, and system communications.
Required Information
| Field | Description |
|---|---|
| Company Name | Your legal business name as it should appear on invoices and documents. |
| Company Address | The physical location or headquarters of your business. |
| Tax/VAT Number | Optional. Used for compliance and added to invoices if applicable. |
| Contact Email | Public-facing email address for customer support or business inquiries. |
| Contact Phone | A phone number customers can use to reach your support team. |
| Business Hours | Operational hours during which your support or sales team is available. |
Email
Configure email delivery and customize email templates for delivering notifications like password resets, welcome emails, subscription updates, and system alerts.
Where to Find Email Settings & Templates
| Feature | Navigation Path |
|---|---|
| Email Settings | Admin Panel → System Settings → Email |
| Email Templates | Admin Panel → Setup → Email Templates |
Email Settings
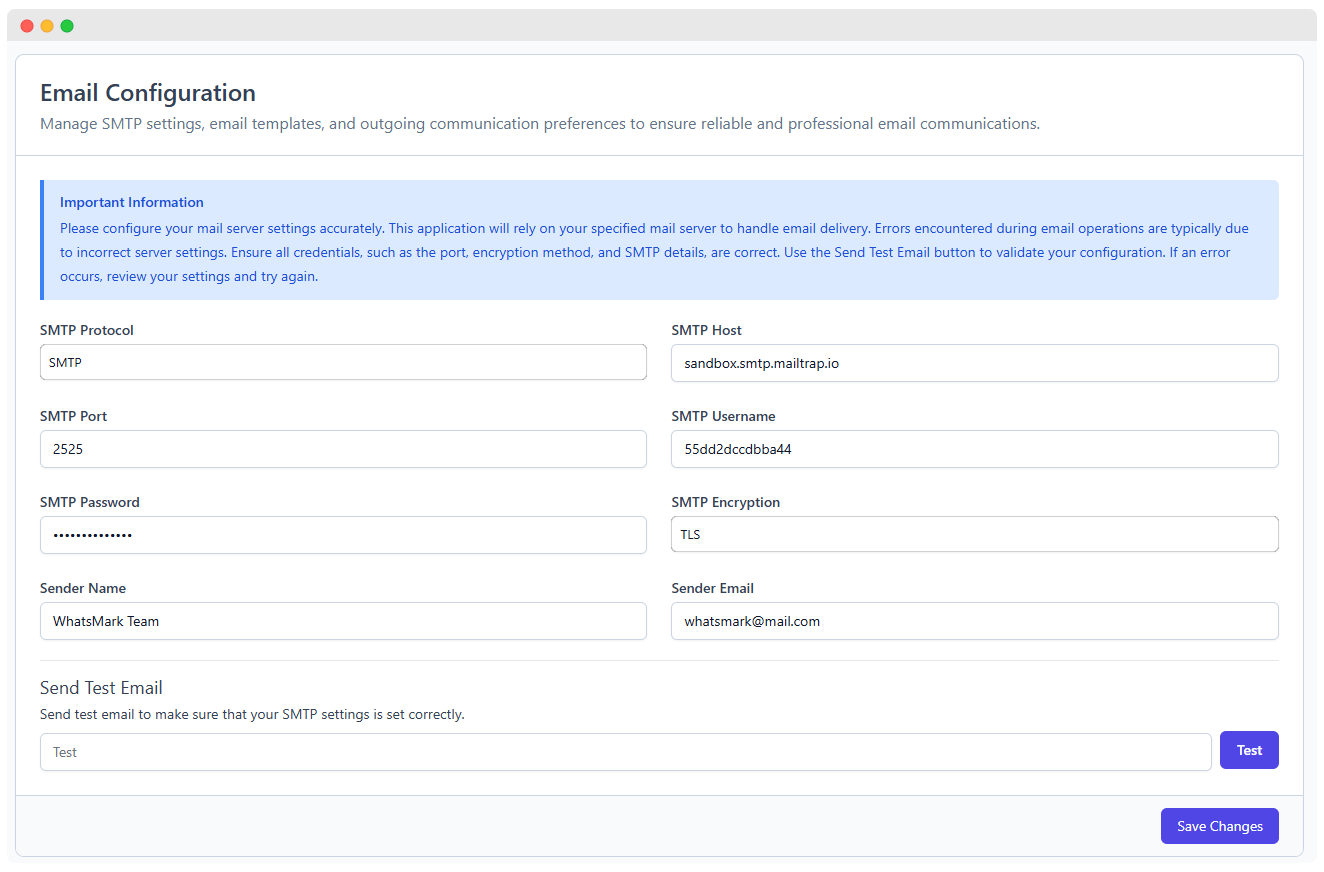
System emails such as password resets and invoices are sent using configured SMTP or mail services. You must enter valid credentials from your email service provider.
SMTP (Simple Mail Transfer Protocol) Configuration
This section defines how emails are delivered.
| Field | Description |
|---|---|
| Mail Driver | The mechanism used to send emails. Choose from: - smtp – Standard protocol, reliable - sendmail – Uses server’s mail function - mailgun – Third-party service - ses – Amazon Simple Email Service |
| SMTP Host | The hostname or IP address of your email provider’s SMTP server. Examples: smtp.gmail.com, smtp.mailgun.org, email-smtp.us-east-1.amazonaws.com |
| SMTP Port | The port used to connect to the SMTP server. - 587 for TLS (recommended, secure) - 465 for SSL (secure) - 25 for non-encrypted (not recommended) |
| Username | Your SMTP account’s login (usually your email address). |
| Password | Password or API key used for SMTP authentication. For Gmail or Outlook, you may need an App Password. |
| Encryption | Method of encryption used for secure email transmission. Choose from: - tls (recommended) - ssl (older but still supported) |
| From Address | The email address that appears as the sender of all system emails. Example: [email protected] |
| From Name | The sender name that will appear in recipients’ inbox. Example: WhatsMarkSaaS Notifications |
Note: Incorrect settings can cause email delivery failures or spam issues. Always test your configuration.
Testing & Diagnostics
Once configured, test the email system to ensure it works as expected.
| Tool/Option | Purpose & Description |
|---|---|
| Send Test Email | Allows admins to verify that email settings are correct and working. Sends a sample email to a specified address. |
| View Email Logs | Logs of sent emails including delivery status, timestamp, and errors. Useful for troubleshooting. |
| Troubleshooting Panel | Displays common misconfiguration alerts, failed connections, or authentication errors. |
Email Templates
System templates are triggered by different user or platform actions (e.g., registration, password reset, subscription updates). Customizing them allows for consistent branding and personalized messaging.
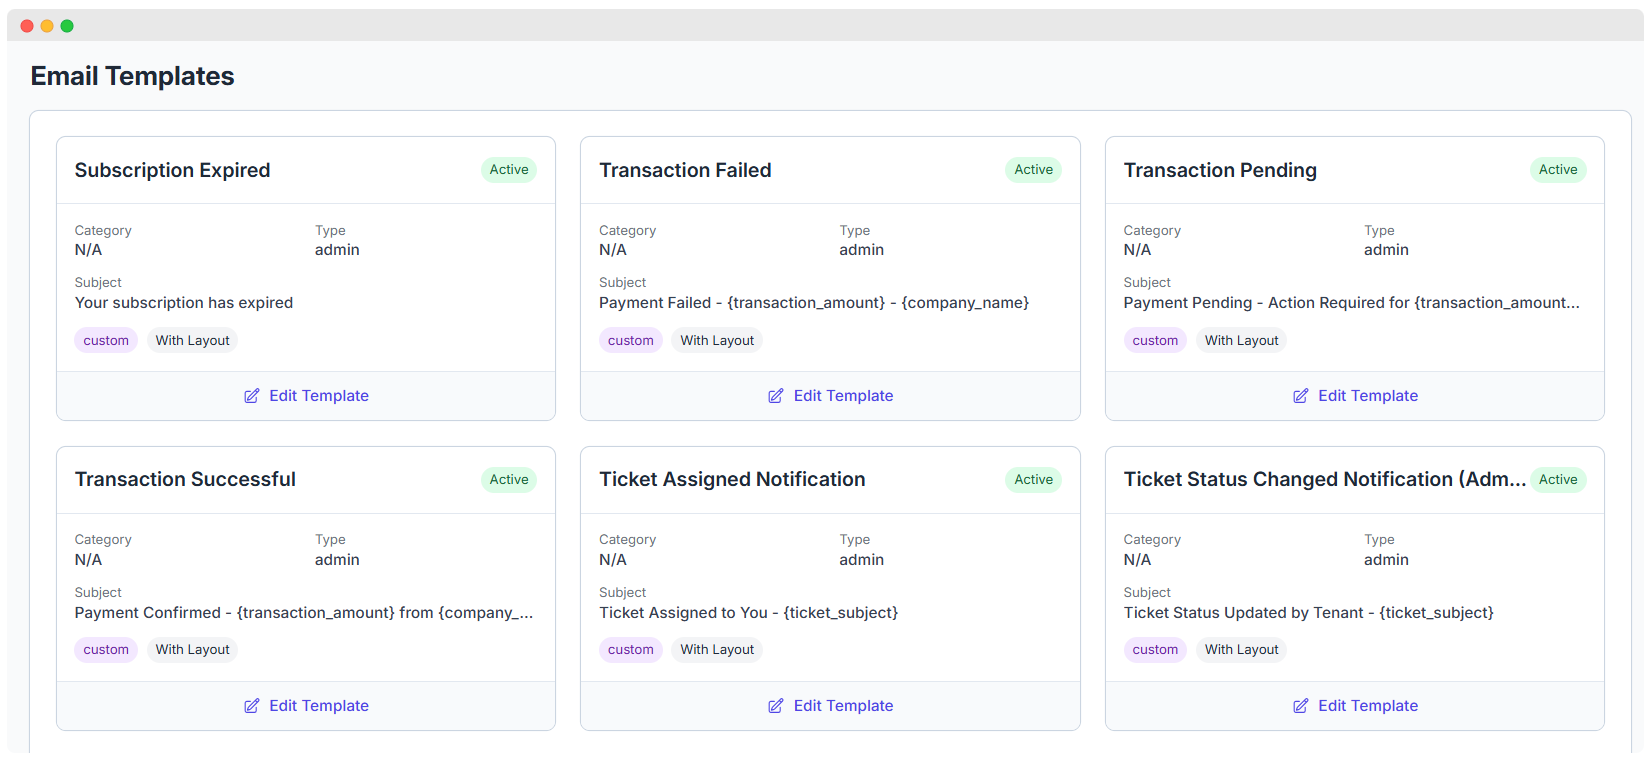
Common Email Templates
| Template Name | Triggered When... |
|---|---|
| Welcome Email | A user signs up or is invited to the system |
| Password Reset | A user requests to reset their password |
| Email Verification | After registration or email change to verify ownership |
| Subscription Notice | Subscription events like plan changes, renewals, or cancellations |
| Invoice Receipt | After successful payment or billing update |
| System Alerts | Important messages like account issues, admin alerts, or warnings |
| Trial Expiration | Reminder before or after the free trial ends |
Template Customization Options
WhatsMarkSaaS provides rich editing capabilities for system-generated emails. You can fully tailor them to match your brand and language.
| Feature | Description |
|---|---|
| Edit Email Body | Use HTML or Markdown to write the message. Includes styling and layout customization. |
| Edit Subject Line | Define a custom subject line for each template to improve email open rates. |
| Dynamic Variables | Insert placeholders that automatically populate with user-specific data. |
| Preview Mode | See a live preview of the template before saving it. Helps avoid formatting errors. |
| Language Versions | Add templates in multiple languages. The system will automatically select the right version based on user preference or locale. |
Best Practices for Email Configuration
| Best Practice | Description |
|---|---|
| Use a professional domain email | Avoid free providers like Gmail or Yahoo for sending system emails. Use a domain-based address like [email protected] to improve trust and deliverability. |
| Set up SPF, DKIM, and DMARC | These DNS records authenticate your domain and reduce the risk of emails being marked as spam or spoofed. Essential for email security and inbox placement. |
| Avoid using port 25 | Many cloud servers block port 25 to prevent spam. Use 587 with TLS or 465 with SSL instead for reliable and secure delivery. |
| Use strong authentication | Always use secure credentials (strong passwords or API keys) and enable 2FA on your email service account to prevent unauthorized access. |
| Send test emails after changes | Use the built-in test feature to verify email delivery after modifying SMTP or template settings. This helps catch misconfigurations early. |
| Monitor email logs regularly | Review logs to detect failed deliveries, authentication errors, or blacklisted IPs. This helps maintain a healthy email system. |
| Avoid spammy content | Don't use all caps, clickbait language, or excessive punctuation in subjects or content. These can trigger spam filters. |
| Write clear, concise subject lines | Use meaningful and personalized subject lines that reflect the purpose of the email and encourage opens. |
| Maintain branding in templates | Ensure templates reflect your company’s tone, colors, and branding. This creates trust and consistency in user communication. |
| Keep templates updated | Review and refresh email templates regularly to fix outdated information, broken links, or formatting issues. |
Re-Captcha
Security Configuration
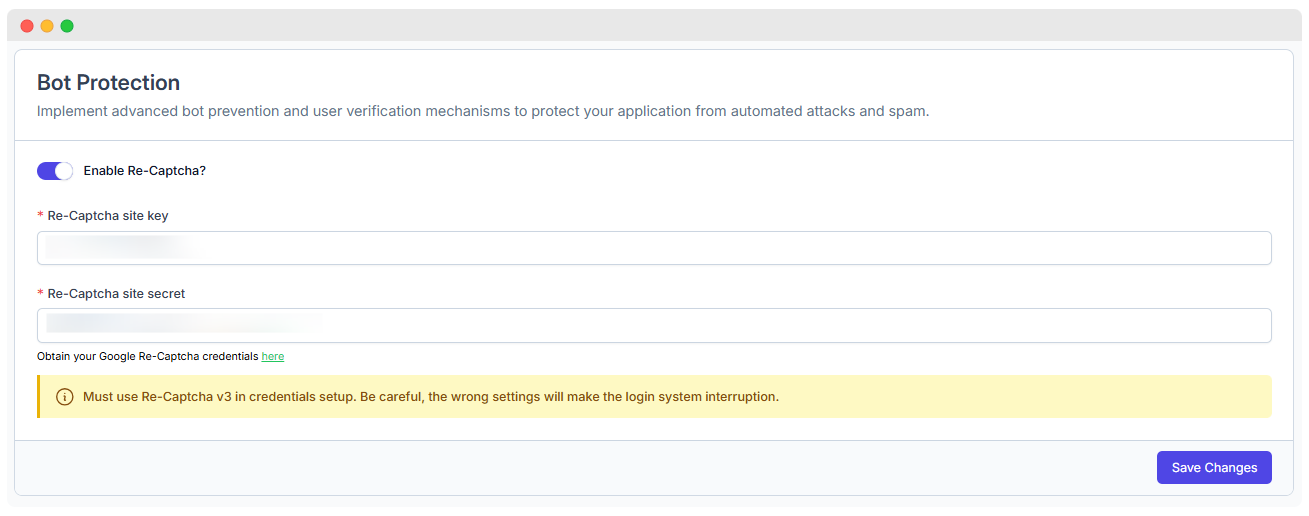
Location: Admin Panel → System Settings → Re-Captcha
| Feature | Description | Notes |
|---|---|---|
| Password Policy | Set minimum password length, complexity, and character rules | Helps enforce strong user passwords |
| 2FA (Two-Factor Authentication) | Enable/disable 2FA for user accounts for extra security | Can use authenticator apps or SMS codes |
| Login Attempts | Maximum allowed failed login attempts before locking the account | Prevents brute-force attacks |
| Password Expiry | Force users to change passwords after a defined period | Increases security hygiene |
| Session Security | IP binding and session timeout settings | Reduces risk of session hijacking |
reCAPTCHA Integration
| Setting | Description |
|---|---|
| Enable reCAPTCHA | Turn on reCAPTCHA on login and registration forms to block bots |
| Site Key | Public key from Google reCAPTCHA service |
| Secret Key | Private key for server-side verification |
| Visibility Threshold | Adjust when CAPTCHA challenges are presented (e.g., always, only suspicious activity) |
Cron Job
Cron Job Configuration
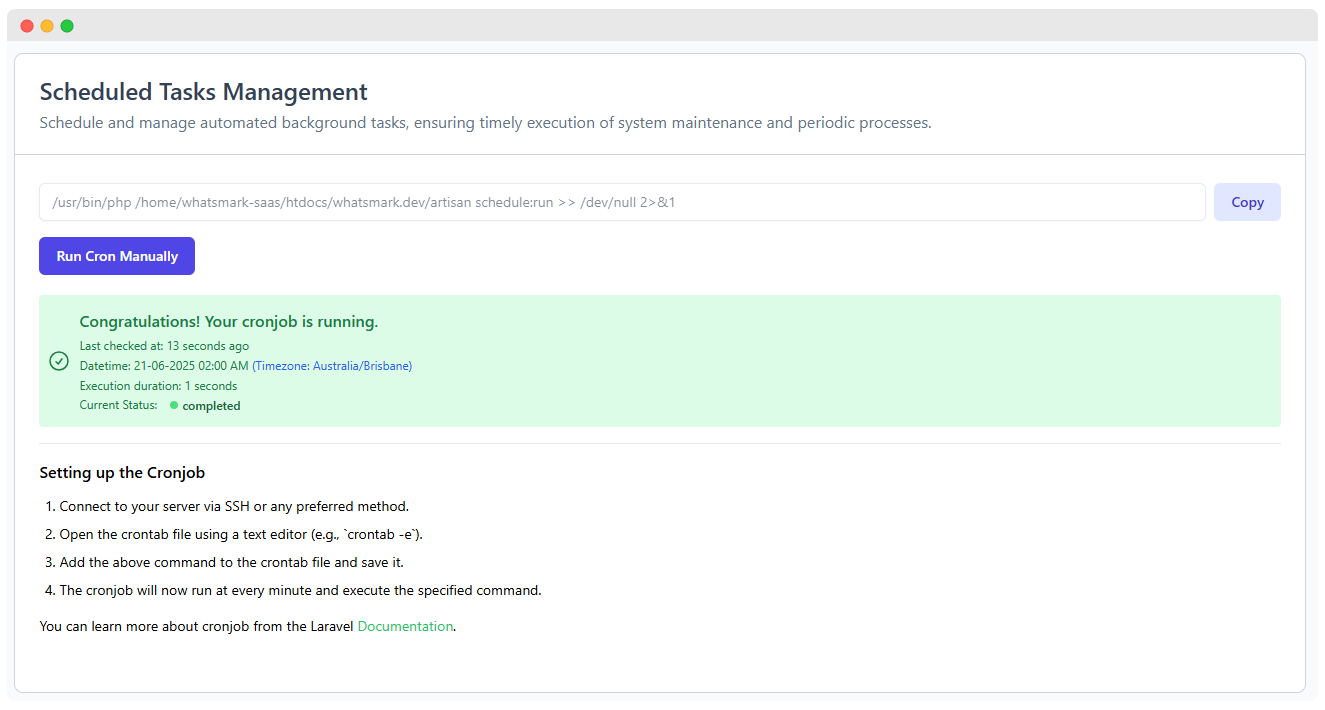
Location: Admin Panel → SystemSettings → Cron Jobs
Configure scheduled tasks that automate system maintenance and background processing.
| Setting | Description | Notes |
|---|---|---|
| Cron Job URL/Command | The URL or CLI command used to trigger scheduled tasks | Usually a Laravel Artisan command |
| Schedule Frequency | How often the cron job runs (e.g., every minute, hourly) | Typically every minute for Laravel scheduler |
| Last Run Status | Displays the result and timestamp of the last cron execution | Helps monitor job success or failure |
| Manual Trigger | Option to run the cron job manually from the admin panel | Useful for testing or urgent runs |
| Failure Notifications | Enable email alerts if a scheduled task fails | Helps admins quickly respond to issues |
Recommended Cron Schedule
To ensure proper task scheduling, set your server’s cron tab with the following entry:
* * * * * cd /path-to-application && php artisan schedule:run >> /dev/null 2>&1Announcements
Create and manage global messages that can be displayed across the application to communicate important updates or information.
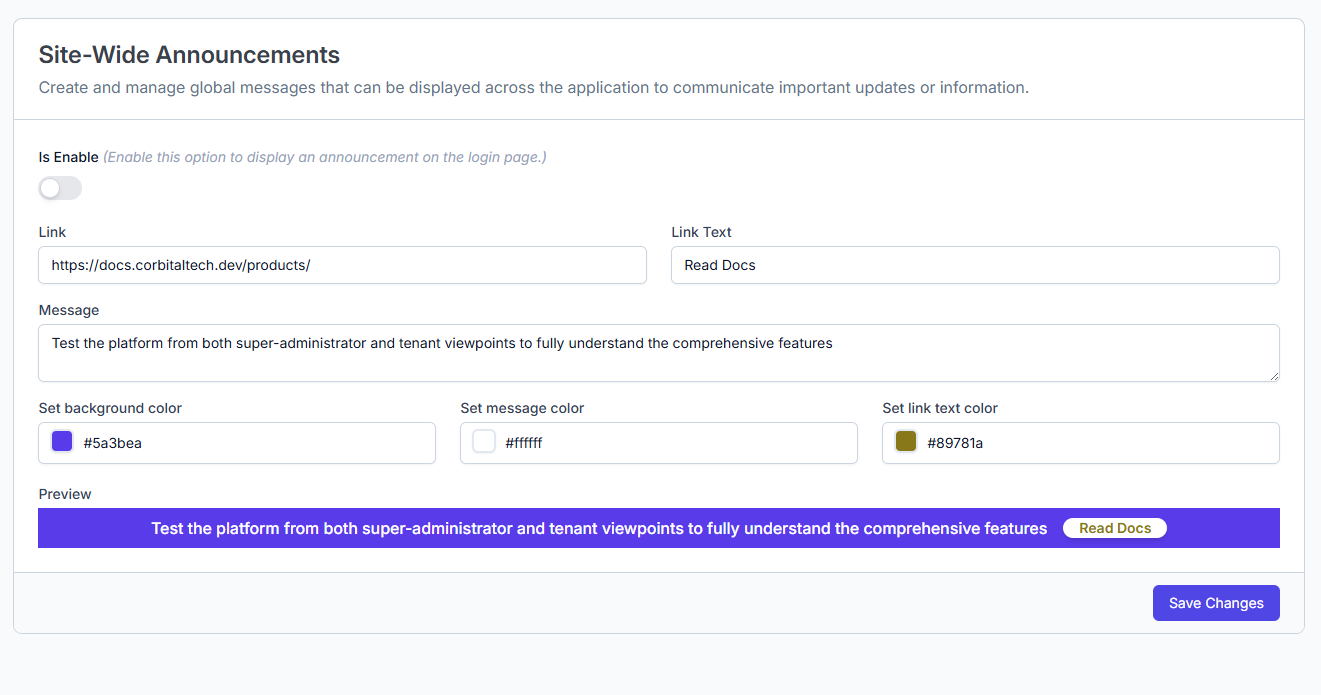
Configuration Form
Enable Announcement
Enable this option to display an announcement on the login page.
- [ ] Toggle (On / Off)
Link
URL to which users will be directed when clicking the link in the announcement.
Link Text
The clickable text shown in the announcement.
Message
The main announcement message displayed site-wide.
Colors Configuration
| Field | Color Picker / Hex Code | Description |
|---|---|---|
| Set background color | #5a3bea | Background color of the announcement banner |
| Set message color | #ffffff | Color of the main message text |
| Set link text color | #89781a | Color of the clickable link text |
Preview
[Background: #5a3bea, Message color: #ffffff, Link text color: #89781a]
Test the platform from both admin and tenant viewpoints to fully understand the comprehensive features.
Actions
- [ Save Changes ] (Button to save the announcement configuration)
This form provides a centralized way to manage site-wide announcements with customizable styling and messaging for WhatsMark SaaS.
Cache Management
Allows administrators to manage cached data that builds up over time which improves speed and reduces server load, but outdated or corrupted cache can lead to issues.
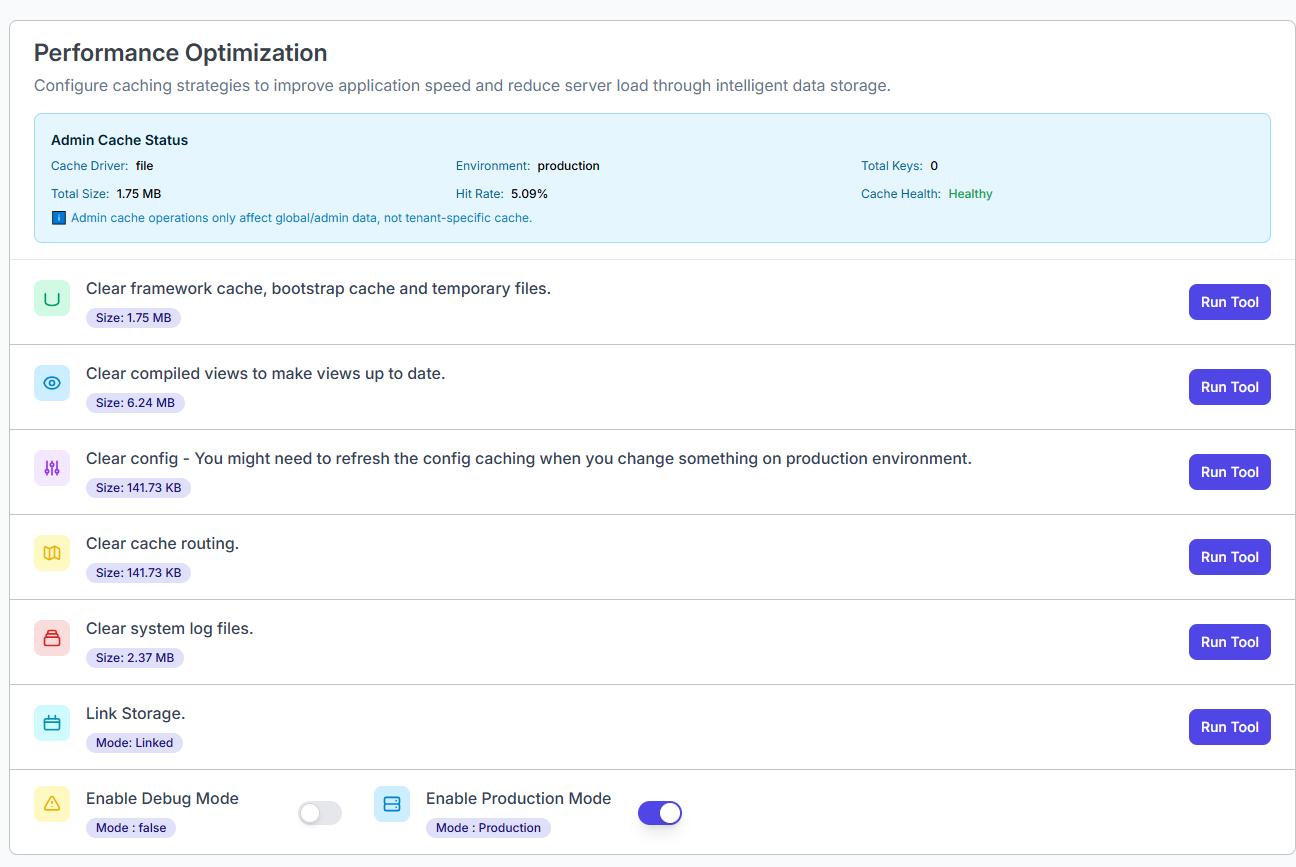
Admin Cache Status Overview
Before clearing cache, WhatsMark provides key insights about the current cache state:
| Field | Description |
|---|---|
| Cache Driver | Backend used for storing cached data (e.g., file, redis). |
| Total Size | Total size of all cached data. |
| Hit Rate | Percentage of successful cache reads (98.68% indicates high efficiency). |
| Last Cleared | When the cache was last manually cleared. |
| Total Keys | Total number of items stored in cache. |
| Cache Tags | Whether tag-based cache invalidation is supported (Supported). |
| Cache Health | Overall status (Excellent, Good, etc.). |
Each tenant's cache is isolated — operations affect only the current tenant and not others or the global admin cache.
Cache Management Tools
You can selectively clear the following cache types by clicking Run Tool for each one. Here's a breakdown of each option:
Clear Framework Cache
- What it does: Clears Laravel's internal cache, including application configuration, service providers, and more.
- When to use: After code changes or package updates.
- Benefits: Ensures the application reflects the latest logic and settings.
Clear Bootstrap Cache
- What it does: Removes compiled PHP class files stored in
bootstrap/cache/. - When to use: After Laravel upgrades or changes in service container bindings.
- Benefits: Avoids conflicts with outdated precompiled classes.
Clear Temporary Files
- What it does: Deletes all temporary cache files stored by the system to improve performance and storage.
- When to use: During routine maintenance or if storage usage grows unexpectedly.
- Benefits: Frees up disk space and removes unused temporary data.
Clear Compiled Views
- What it does: Clears Blade view caches to force recompilation of UI templates.
- When to use: After modifying
.blade.phpor theme files. - Benefits: Displays the most recent interface updates to users.
Clear Config Cache
- What it does: Regenerates the configuration cache from the
/configdirectory. - When to use: After changing
.envvalues or editing config files. - Benefits: Ensures the application uses up-to-date configuration values.
Clear Route Cache
- What it does: Clears and regenerates route definitions.
- When to use: After adding, removing, or modifying routes in
web.phporapi.php. - Benefits: Ensures proper routing behavior across modules and endpoints.
Clear System Log Files
- What it does: Deletes old logs generated by the system.
- When to use: During performance optimization, cleanup, or to free up disk space.
- Benefits: Prevents excessive storage usage and improves disk I/O performance.
Enable WhatsApp Log
- What it does: Enables or disables logging specific to WhatsApp API events.
- When to use: When debugging WhatsApp integrations or tracking delivery/report data.
- Mode:
false(off) by default.
How to Use These Tools
Navigate to: System Settings → Cache Management
Review your Admin Cache Status panel for overall system metrics.
Under the tool list, click the Run Tool button next to the cache type you want to clear.
WhatsMark will execute the action and display a confirmation or status message.
Caution: Avoid clearing config or route caches in production during peak usage unless necessary, as this may cause temporary application errors or delays.
By keeping cache clean and up to date, you ensure WhatsMark remains responsive, efficient, and secure — even at scale.
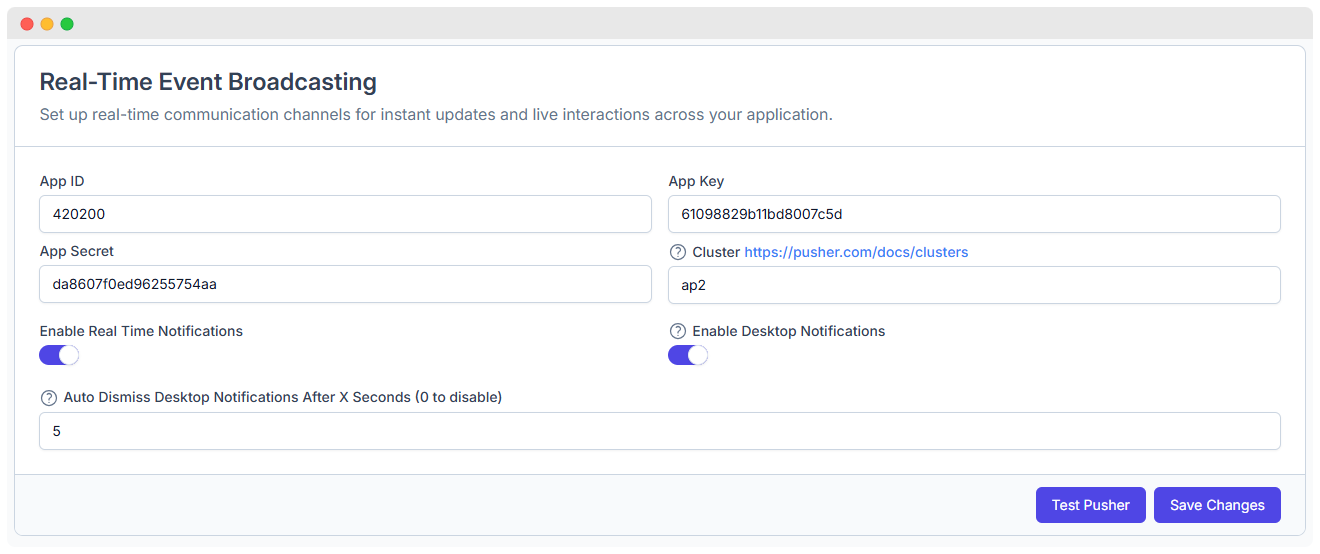
Pusher
Version 1.5.1WhatsMarkSaaS uses Pusher to power its real-time event broadcasting system across all tenants. As a Super Admin, you configure Pusher once at the platform level, enabling instant notifications, live chat updates, and desktop alerts for all tenant users — ensuring everyone stays informed and engaged with minimal delay.
Location: Admin Panel → Admin Settings → System Settings → Pusher
Overview
The Pusher integration provides:
- Real-time notifications for all tenant users
- Live chat message delivery without page refresh
- Desktop push notifications for browser alerts
- Event broadcasting for campaign updates, bot triggers, and system events
- Centralized configuration — no per-tenant setup required
Super Admin Only
This feature is configured once by the Super Admin and automatically applies to all tenants. Individual tenants do not need to set up their own Pusher credentials.
How to Set Up Pusher in WhatsMarkSaaS
Follow these steps to integrate Pusher with your WhatsMarkSaaS platform:
Step 1: Create a Pusher Account
- Sign up or log in to your Pusher account.
- From the Pusher dashboard, click Create App or Create New App.
- Choose a name for your app (e.g.,
WhatsMarkSaaS Production). - Select your preferred Cluster (refer to the Cluster Selection section below).
- Click Create App.
Pusher Plan Requirements
Pusher's free plan works well for initial setup and testing with a few tenants. However, as your platform grows with more tenants and active users, you'll need to upgrade to a paid Pusher plan to handle increased connection limits, message throughput, and concurrent users. Monitor your usage in the Pusher dashboard and upgrade as per your requirements.
Step 2: Get Your Pusher Credentials
After creating your app, navigate to the App Keys section in the Pusher dashboard and copy the following credentials:
- App ID
- App Key
- App Secret
- Cluster
Step 3: Configure Pusher in WhatsMarkSaaS Admin Panel
Log in to your WhatsMarkSaaS Admin Panel.
Navigate to:
textAdmin Settings → System Settings → PusherLocate the Real-Time Event Broadcasting section.
Paste your Pusher credentials into the respective fields:
| Field | Example Value |
|---|---|
| App ID | 4***00 |
| App Key | 610********bd800**5d |
| App Secret | da8********625575**a |
| Cluster | ap2 (or your region) |
Step 4: Enable Real-Time Features
Toggle the following options based on your requirements:
| Feature | Description |
|---|---|
| Enable Real-Time Notifications | Sends instant updates to all tenant users (e.g., new messages, task changes). |
| Enable Desktop Notifications | Triggers browser-based push notifications for end users. |
Step 5: Save
- Click Save Changes to apply the configuration platform-wide.
Configuration Fields
| Field | Description |
|---|---|
| App ID | Unique identifier for your Pusher application. |
| App Key | Public key used by WhatsMarkSaaS's frontend to authenticate with Pusher. |
| App Secret | Private key used by WhatsMarkSaaS's backend for secure communication with Pusher. |
| Cluster | Server region closest to your users (e.g., ap2 for Asia-Pacific, us2 for United States). View all clusters. |
| Enable Real-Time Notifications | Sends instant in-app updates for messages, campaigns, bot triggers, and system events across all tenants. |
| Enable Desktop Notifications | Allows browser-based push notifications for tenant users when they have the platform open. |
| Auto Dismiss Notifications | Controls how long desktop alerts remain visible (in seconds). Set to 0 to keep notifications visible until manually dismissed. |
How It Works
Once configured:
- Backend uses the App Secret to securely publish events to Pusher.
- Frontend uses the App Key to subscribe to channels and receive real-time updates.
- All tenant users across the platform automatically benefit from real-time notifications without any additional setup.
Use Cases
- Live Chat: Messages appear instantly without page refresh.
- Campaign Updates: Notify users when bulk campaigns are sent or completed.
- Bot Triggers: Real-time alerts when bots respond to customer messages.
Frequently Asked Questions
Do tenants need to configure Pusher separately?
No. Pusher is configured once by the Super Admin and automatically applies to all tenants. Tenants do not need their own Pusher accounts or credentials.
Can I use a free Pusher account?
Yes, Pusher offers a free tier suitable for small to medium-sized platforms. As your user base grows, you may need to upgrade to a paid plan for higher connection limits and message volume.
What happens if Pusher is not configured?
Real-time features will not work. Users will need to manually refresh pages to see new messages, notifications, and updates. Chat functionality may be significantly degraded.
Can I change the Pusher cluster after initial setup?
Yes, but you'll need to update the Cluster setting in both your Pusher dashboard and WhatsMarkSaaS admin panel. Ensure both match to avoid connection issues.
How do I know if Pusher is working correctly?
- Click Test Pusher in the admin panel.
- Check your Pusher dashboard for active connections.
- Test real-time features like live chat or notifications from a tenant account.
Additional Resources
System Updates
Location: Admin Panel → System Settings → System Update
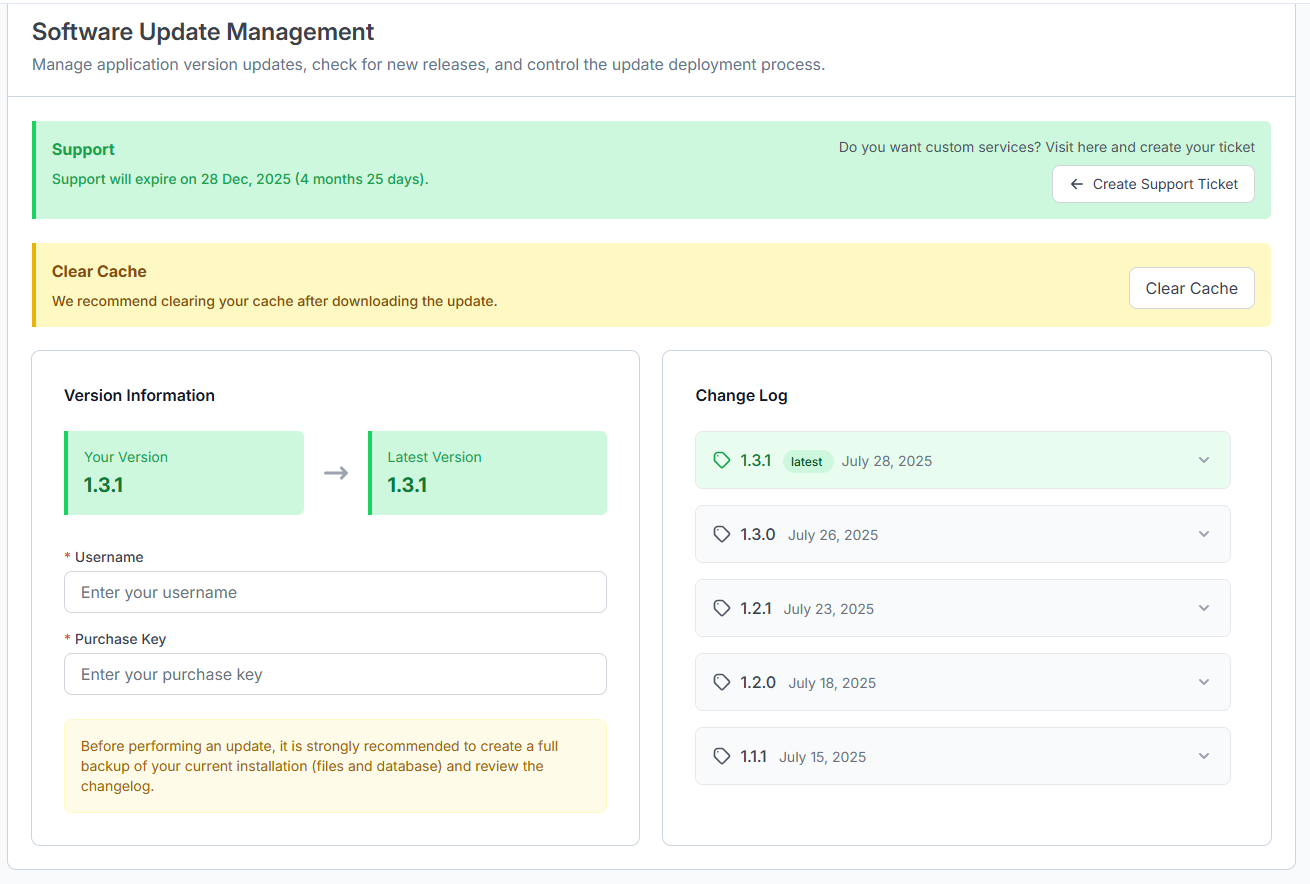
Software Update Management
Manage application version updates, check for new releases, and control the update deployment process.
Support Information
- Support expires on: 28 Dec, 2025 (4 months 25 days remaining)
- For custom services, create a support ticket through the admin panel.
Cache Management
- It is recommended to clear your cache after downloading the update.
- Option to clear cache is available via the "Clear Cache" button.
Version Information
| Your Version | Latest Version |
|---|---|
| 1.3.1 | 1.3.1 |
Before updating, enter the following details:
- Username: [Input your username]
- Purchase Key: [Input your purchase key]
Note: Before performing an update, it is strongly recommended to create a full backup of your current installation (files and database) and review the changelog.
Change Log
| Version | Date | Notes |
|---|---|---|
| 1.3.1 | July 28, 2025 | Latest |
| 1.3.0 | July 26, 2025 | |
| 1.2.1 | July 23, 2025 | |
| 1.2.0 | July 18, 2025 | |
| 1.1.1 | July 15, 2025 |
Features
Manage platform updates safely and efficiently with the following options:
| Feature | Description |
|---|---|
| Check for Updates | Verify if new software versions are available |
| View Changelog | See details on what changes, fixes, or features are included in updates |
| Backup System | Create a backup of current data and settings before applying updates |
| Run Update | Execute the update process directly from the admin panel |
| Update History | Access a log of previous updates applied to the platform |
System Information
Location: Admin Panel → System Settings → System Information
This document provides a comprehensive overview of the application's current system configuration, environment settings, and software versions. It is intended to assist developers, system administrators, and support teams in understanding the setup and status of the application and its dependencies.
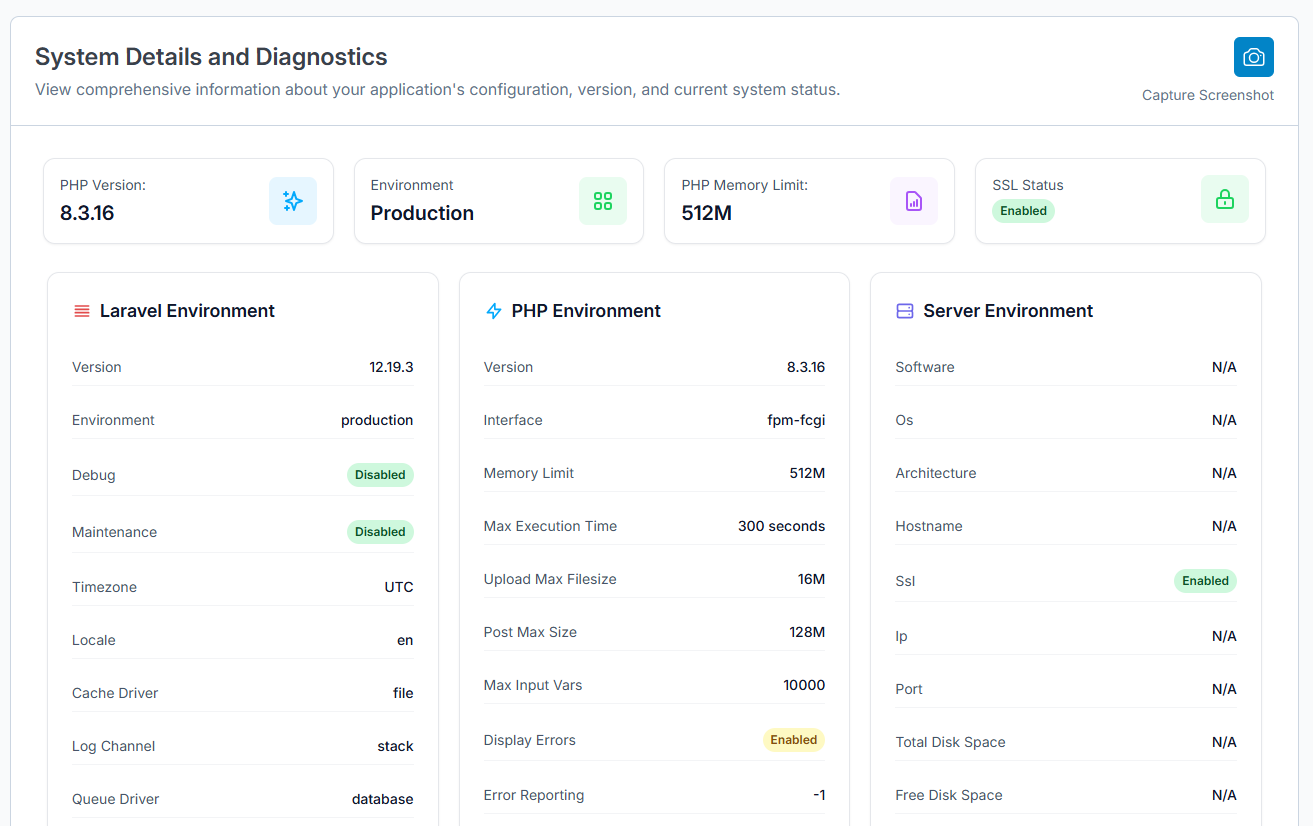
Overview
This section provides a high-level summary of critical environment information.
| Attribute | Value | Description |
|---|---|---|
| PHP Version | 8.3.16 | The version of PHP installed on the server, indicating features and compatibility. |
| Environment | Production | The environment in which the application is running (e.g., local, staging, production). Production means the live environment. |
| PHP Memory Limit | 512M | Maximum amount of memory PHP scripts can consume, here set to 512 Megabytes. Helps prevent runaway scripts from using too much memory. |
| SSL Status | Enabled | Indicates if SSL (Secure Sockets Layer) is enabled for secure HTTPS connections. |
Laravel Environment
Details about the Laravel framework's runtime environment.
| Attribute | Value | Description |
|---|---|---|
| Version | 12.19.3 | The installed version of the Laravel framework. |
| Environment | production | Laravel environment setting that controls app behavior (e.g., error reporting). Production disables verbose debug info. |
| Debug | Disabled | Whether debug mode is enabled, which shows detailed error messages. Disabled for security in production. |
| Maintenance | Disabled | Indicates if the application is in maintenance mode (temporarily offline for updates). Disabled means live. |
| Timezone | UTC | Default timezone for date/time functions in Laravel. Here set to Coordinated Universal Time (UTC). |
| Locale | en | The default language/locale used for translations and formatting. |
| Cache Driver | file | The caching mechanism in use, here file-based storage. |
| Log Channel | stack | Defines the logging setup; "stack" means multiple log channels are used. |
| Queue Driver | database | Specifies the driver managing queued jobs, using database tables here. |
PHP Environment
In-depth PHP runtime configuration details.
| Attribute | Value | Description |
|---|---|---|
| Version | 8.3.16 | PHP runtime version matching the overview. |
| Interface | fpm-fcgi | The PHP handler interface used to process requests; FPM FastCGI is common for performance. |
| Memory Limit | 512M | Memory available to PHP scripts, consistent with overview. |
| Max Execution Time | 300 seconds | Max time in seconds a script is allowed to run before termination to avoid hanging processes. |
| Upload Max Filesize | 16M | Maximum allowed size for file uploads. |
| Post Max Size | 128M | Maximum size of POST data that PHP will accept, including files and form data. |
| Max Input Vars | 10000 | Maximum number of input variables accepted (to avoid input overflow attacks). |
| Display Errors | Enabled | Indicates whether PHP will display errors in the response; useful for debugging but a risk in production. |
| Error Reporting | -1 | Sets the level of error reporting; -1 means report all errors. |
Server Environment
Information about the underlying server hosting the application.
| Attribute | Value | Description |
|---|---|---|
| Software | N/A | Web server software info (e.g., Apache, Nginx). Not available here. |
| OS | N/A | Operating system of the server (Linux, Windows). Not available here. |
| Architecture | N/A | Server hardware architecture (e.g., x86_64). Not available here. |
| Hostname | N/A | Network hostname of the server. Not available here. |
| SSL | Enabled | Confirms SSL encryption is active for secure connections. |
| IP | N/A | Server IP address. Not available here. |
| Port | N/A | Network port used for connections. Not available here. |
| Total Disk Space | N/A | Total disk capacity on the server. Not available here. |
| Free Disk Space | N/A | Available disk space remaining. Not available here. |
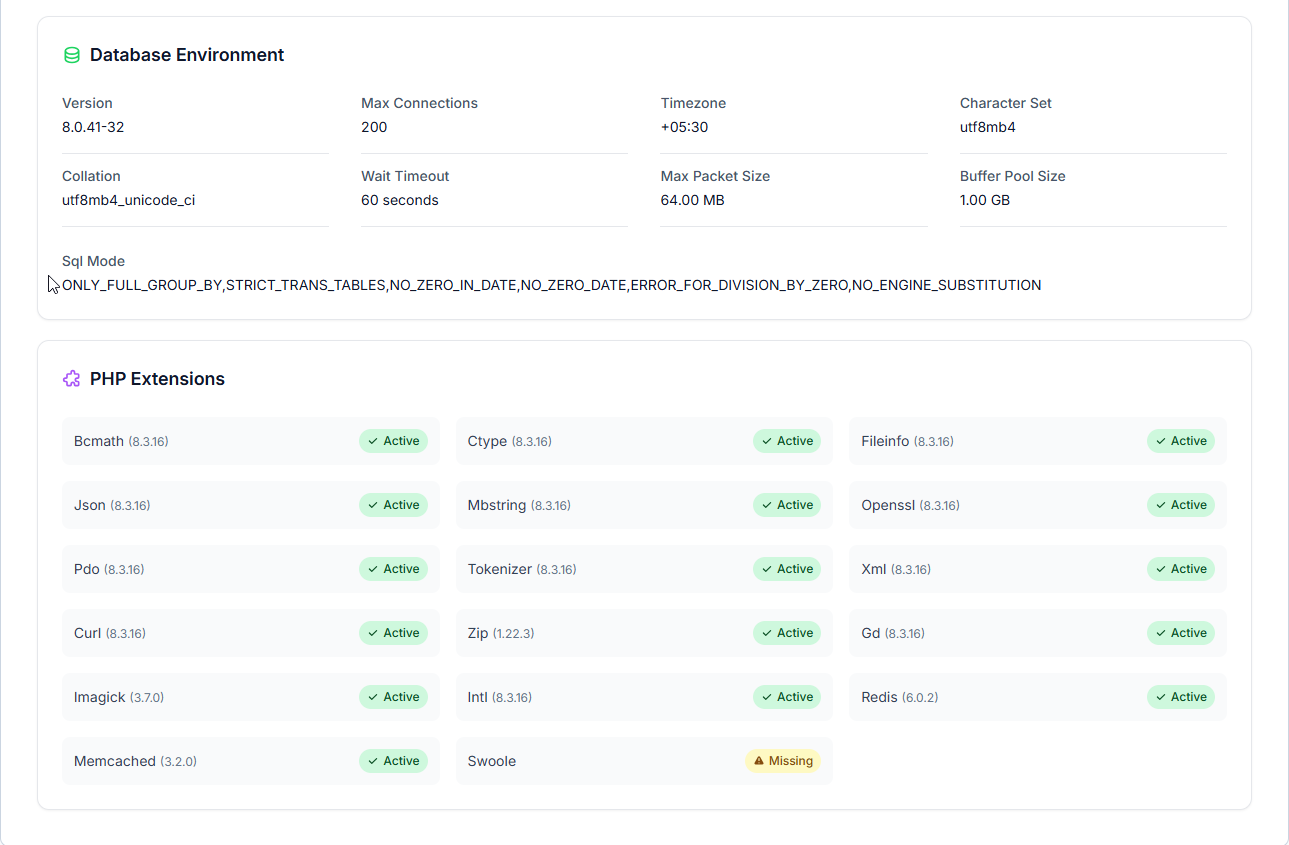
Database Environment
Configuration details related to the database server.
| Attribute | Value | Description |
|---|---|---|
| Version | 8.0.41-32 | Version of the database engine (e.g., MySQL). |
| Max Connections | 200 | Maximum concurrent client connections allowed. |
| Timezone | +05:30 | Timezone setting for the database server. |
| Character Set | utf8mb4 | Default charset supporting full Unicode (including emojis). |
| Collation | utf8mb4_unicode_ci | Collation setting defining how strings are compared. |
| Wait Timeout | 60 seconds | Time the server waits for activity before closing inactive connections. |
| Max Packet Size | 64.00 MB | Maximum size of communication packets allowed. |
| Buffer Pool Size | 1.00 GB | Amount of memory allocated for caching InnoDB tables. |
| SQL Mode | ONLY_FULL_GROUP_BY, STRICT_TRANS_TABLES, NO_ZERO_IN_DATE, NO_ZERO_DATE, ERROR_FOR_DIVISION_BY_ZERO, NO_ENGINE_SUBSTITUTION | SQL modes that affect query behavior and error handling for better standards compliance and safety. |
PHP Extensions
List of PHP extensions installed and their status. Extensions extend PHP functionality and are crucial for many features.
| Extension | Version | Status | Description |
|---|---|---|---|
| Bcmath | 8.3.16 | Active | Provides arbitrary precision mathematics support. |
| Ctype | 8.3.16 | Active | Character classification functions. |
| Fileinfo | 8.3.16 | Active | Detects file types by their content. |
| Json | 8.3.16 | Active | JSON data encoding and decoding. |
| Mbstring | 8.3.16 | Active | Multibyte string handling (UTF-8 etc.). |
| Openssl | 8.3.16 | Active | OpenSSL cryptographic functions. |
| Pdo | 8.3.16 | Active | PHP Data Objects - database abstraction layer. |
| Tokenizer | 8.3.16 | Active | Tokenizes PHP source code (used by frameworks). |
| Xml | 8.3.16 | Active | XML parsing and manipulation. |
| Curl | 8.3.16 | Active | Client URL library for HTTP requests. |
| Zip | 1.22.3 | Active | ZIP archive handling. |
| Gd | 8.3.16 | Active | Image processing and manipulation. |
| Imagick | 3.7.0 | Active | ImageMagick wrapper for advanced image manipulation. |
| Intl | 8.3.16 | Active | Internationalization support. |
| Redis | 6.0.2 | Active | Redis caching and data structure support. |
| Memcached | 3.2.0 | Active | Memcached caching support. |
| Swoole | - | Missing | High-performance async networking framework (missing, may be required depending on app). |
Tenant Settings
Location:
Admin Panel → System Settings → Tenant
Configure default settings applied automatically when a new tenant is created in the system.
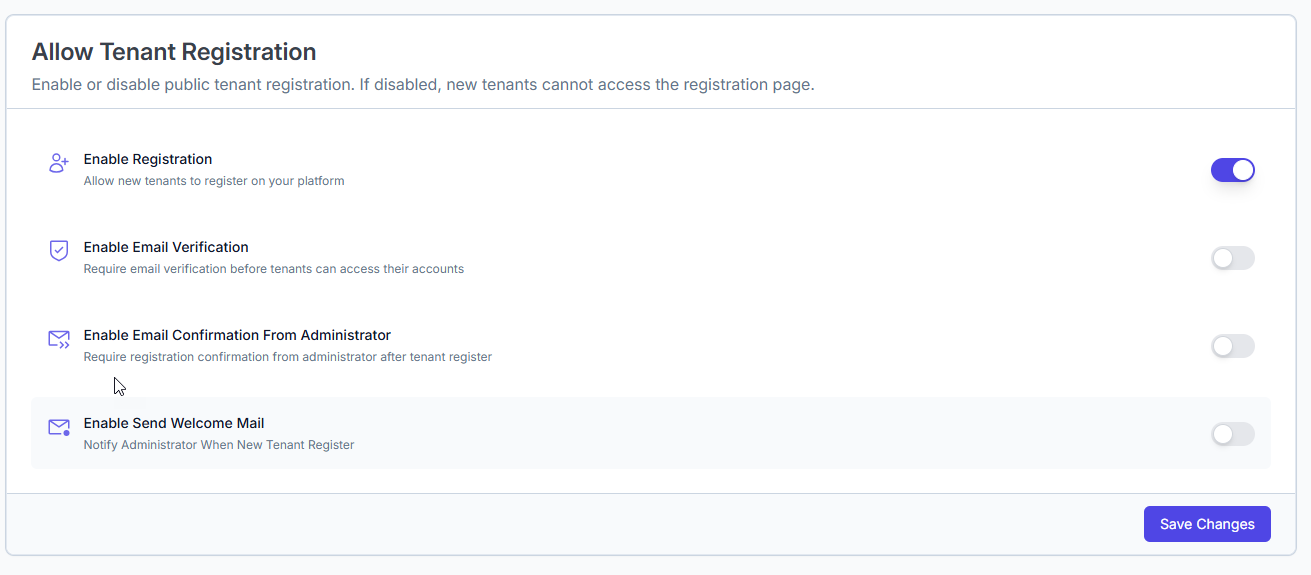
Tenant Registration Settings
Control whether new tenants can register and how the registration process is handled.
| Setting Name | Type | Default | Description | Prompt / Tooltip |
|---|---|---|---|---|
| Enable Registration | Toggle Switch | ON | Allow new tenants to register via a public registration page. | "If disabled, new tenants cannot access the registration page." |
| Enable Email Verification | Toggle Switch | OFF | Require tenants to verify their email address before accessing their account. | "Require email verification before tenants can access their accounts." |
| Enable Email Confirmation From Admin | Toggle Switch | OFF | Require administrator to manually approve each new tenant registration. | "Require registration confirmation from administrator after tenant register." |
| Enable Send Welcome Mail | Toggle Switch | OFF | Send a notification email to the administrator when a new tenant registers. | "Notify Administrator When New Tenant Register." |
Recommendation: For public SaaS products, enable both Email Verification and Welcome Mail to reduce spam and improve onboarding communication.
Tenant Default Configuration
Defines the base configuration automatically applied to newly created tenants. These settings standardize onboarding and reduce manual setup time.
| Setting Name | Description | Editable Per Tenant? | Notes |
|---|---|---|---|
| Initial Feature Configuration | Define which core features/modules are enabled for each new tenant. | Yes | Useful for trial tenants or onboarding packages. |
| Welcome Email Content | Message sent to tenant users upon creation (supports HTML and plain text). | Yes | Include branding, support links, and a welcome message. |
| Default User Roles | Automatically assign user roles and permissions when a tenant is created. | Yes | Example: Admin, Member, Viewer. Helps with RBAC enforcement. |
| UI Theme and Branding | Apply a default color scheme, logos, and layout styles to the tenant interface. | Yes | Helps maintain platform brand consistency. |
| WhatsApp Template Access | Specify which WhatsApp templates are available to the tenant by default. | Yes | Useful for compliance or plan-based feature segregation. |
Process Flow Example
| Step | Action | System Behavior |
|---|---|---|
| 1 | Tenant visits registration page | Allowed only if Enable Registration is ON. |
| 2 | Tenant submits registration | Account created immediately (unless admin confirmation is required). |
| 3 | Email Verification (if enabled) | User must verify email before accessing dashboard. |
| 4 | Admin Approval (if enabled) | Admin receives approval request. Account remains inactive until approved. |
| 5 | Welcome Mail (if enabled) | Admin receives notification about new tenant registration. |
| 6 | Default Configuration Applied | Modules, roles, themes, and WhatsApp templates are applied automatically. |
Recommendations
| Use Case | Recommended Configuration |
|---|---|
| Public SaaS | Enable Registration + Email Verification + Welcome Mail |
| Internal Tenants Only | Disable Registration + Use Admin-controlled tenant creation |
| High-Security Platforms | Enable All (Verification + Admin Confirmation + Welcome Mail) |
| Fast Onboarding | Enable Registration + Minimal Verification + Predefined Feature/Roles |
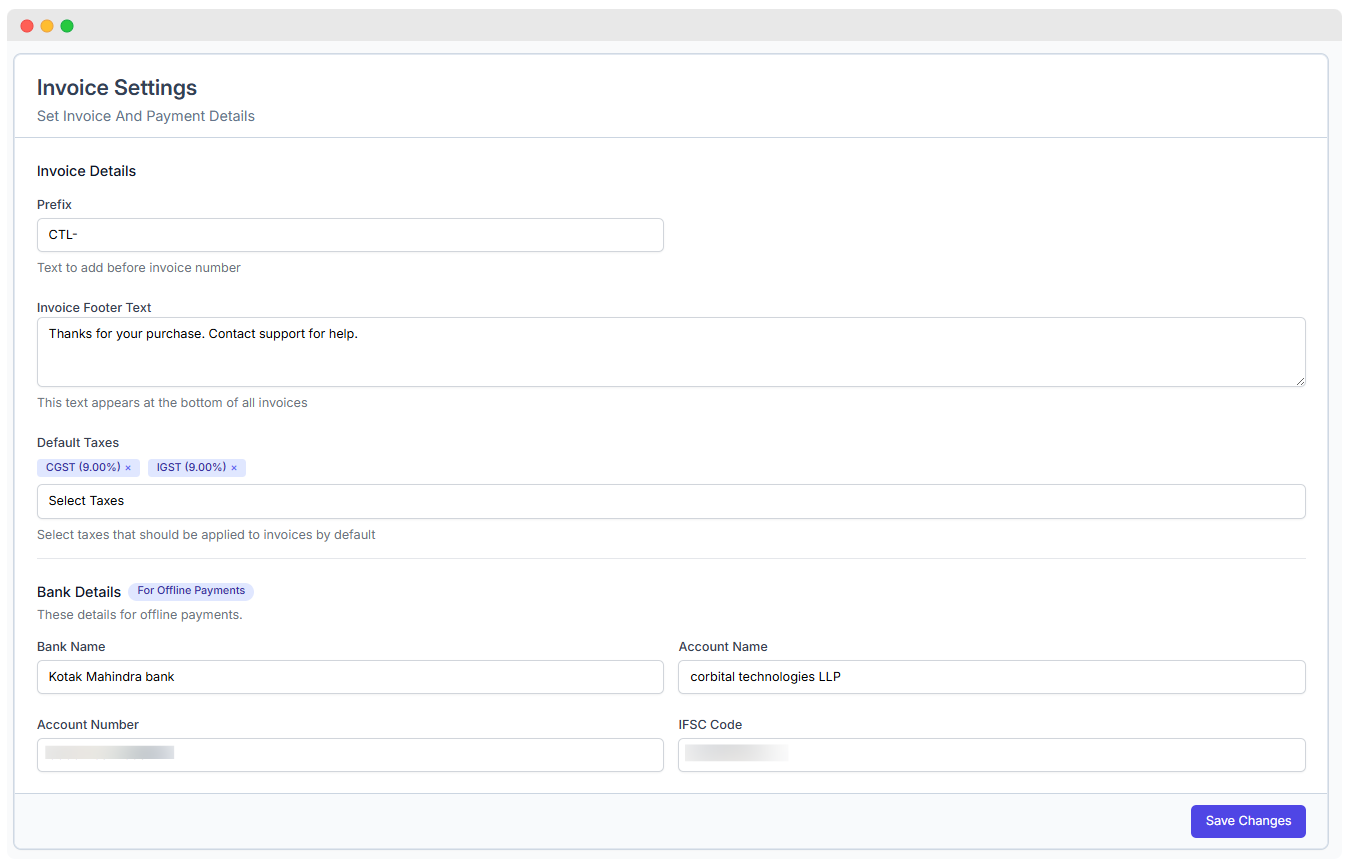
Invoice Settings
Configure invoice and payment details that affects how invoices are generated, what information is displayed, and how offline payments are handled.
Location: Admin Panel → Settings → Invoice
Overview
WhatsMark’s invoice settings allow administrators to customize:
- Invoice numbering format
- Invoice footer message
- Default tax rates (e.g., CGST, IGST)
- Bank account details for offline payments
- Invoice display and branding consistency
These settings apply platform-wide and will reflect on every invoice generated by the system.
Invoice Settings Breakdown
Invoice Details
| Field | Example / Input | Description |
|---|---|---|
| Prefix | CTL- | Text that appears before the invoice number. Useful for identifying source or system. |
| Invoice Footer Text | Thanks for your purchase. Contact support for help. | Message displayed at the bottom of each invoice. Can include support, terms, etc. |
Use a meaningful prefix to distinguish invoices across departments or environments.
Default Taxes
| Selected Taxes | Rate (%) | Applied To |
|---|---|---|
| CGST | 9.00% | Goods & Services (India) |
| IGST | 9.00% | Interstate transactions |
These taxes are automatically added to each invoice unless manually overridden during invoice creation.
Bank Details (Offline Payments)
These fields provide bank account info for clients who choose to pay via offline methods like NEFT/IMPS/bank transfer.
| Field | Example Input | Purpose |
|---|---|---|
| Bank Name | Kotak Mahindra Bank | Name of your banking institution |
| Account Name | corbital technologies LLP | Registered business account holder’s name |
| Account Number | (Hidden for security) | Account number to receive payments |
| IFSC Code | (Hidden for security) | Required for domestic transfers (India) |
This section appears on invoices only when offline payment is selected as the payment method.
Example Workflow
| Step | Action |
|---|---|
| 1. Admin accesses Invoice Settings | Admin Panel → Settings → Invoice |
| 2. Set prefix | e.g., "CTL-" for invoice numbers like CTL-0001 |
| 3. Customize footer | Add company terms, thank-you note, or support info |
| 4. Choose default taxes | Select GST/IGST applicable by region |
| 5. Enter bank details | Provide payment credentials for manual/offline transfers |
| 6. Click "Save Changes" | All invoices will reflect the updated configurations |
Security Reminder
Ensure that bank account details are regularly verified and not exposed publicly. Only authorized personnel should manage invoice configurations.
Saving Changes
- After making edits, click the "Save Changes" button at the bottom of the Invoice Settings screen.
- Changes are immediately effective and will apply to all new invoices.
Privacy Policy
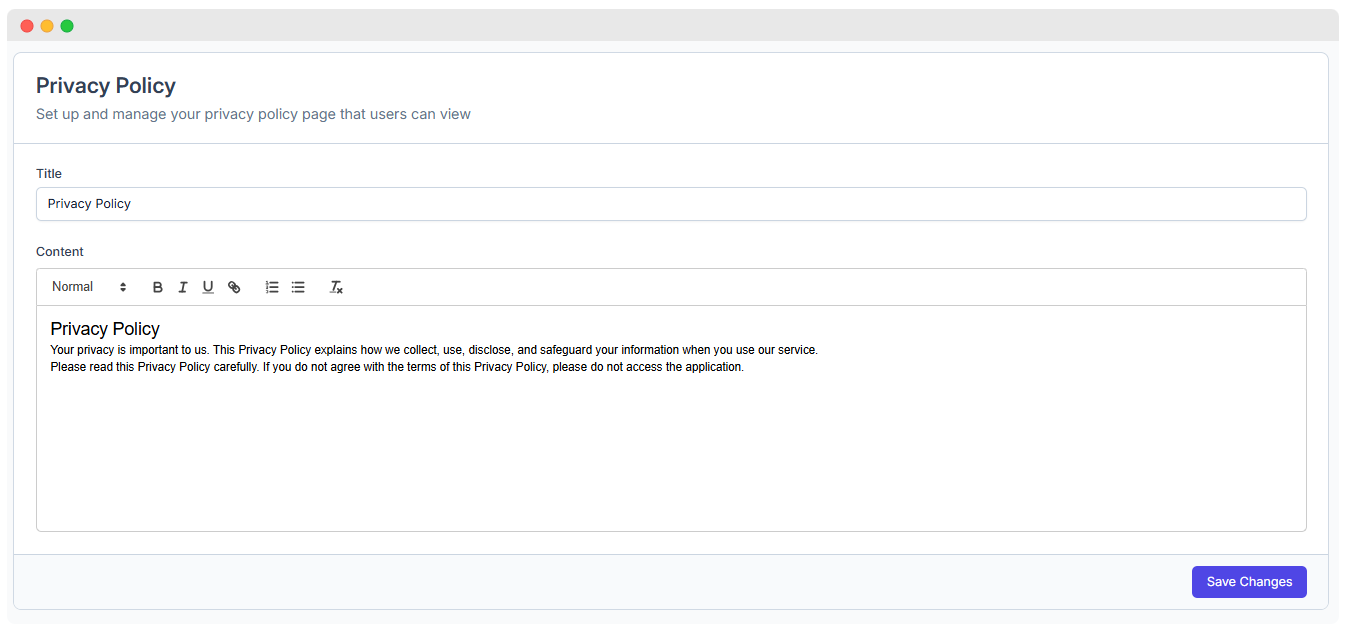
Location: Admin Panel → System Settings → Privacy Policy
Description
The Privacy Policy outlines how WhatsMark SaaS collects, uses, discloses, and safeguards users' personal information to ensure transparency and legal compliance.
Details
- Data collection practices including types of data collected
- Purpose and use of collected data
- Information sharing policies with third parties
- Security measures for protecting user data
- User rights to access, modify, or delete their data
- Usage of cookies and tracking technologies
- Policy update procedures and notifications
Terms and Conditions
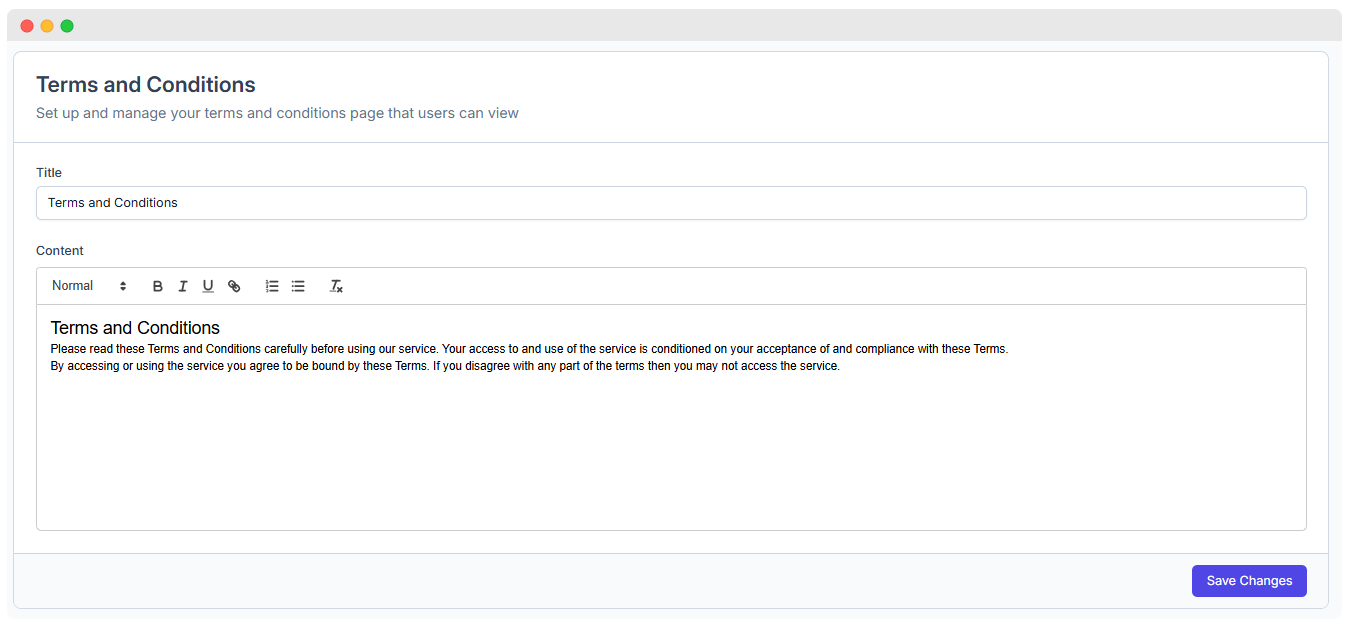
Location: Admin Panel → Settings → Legal → Terms and Conditions
Description
The Terms and Conditions establish the legal framework between WhatsMark SaaS and its users, defining acceptable use, rights, and responsibilities.
Details
- User agreement and acceptance requirements
- User responsibilities and conduct guidelines
- Prohibited actions and misuse policies
- Account creation, suspension, and termination rules
- Intellectual property and content ownership
- Limitations of liability and disclaimers
- Dispute resolution and governing law
- Procedures for updates and user notification
Miscellaneous
Location: Admin Panel → System Settings → Miscellaneous
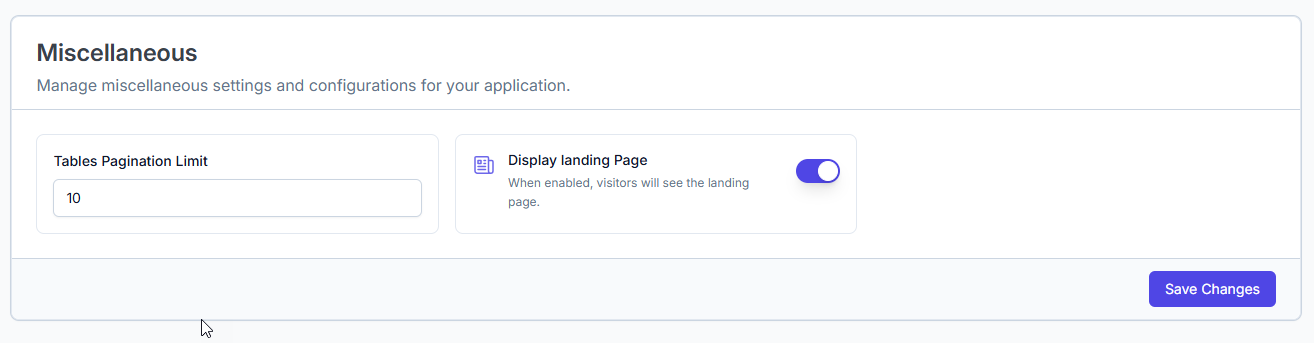
| Feature | Description | Details |
|---|---|---|
| Tables Pagination Limit | Controls the number of rows displayed per page in data tables. | - Set a numeric limit to paginate large datasets. - Helps improve UI performance and user experience. - Default value can be adjusted based on user preference or system requirements. |
| Display Landing Page | Toggle to enable or disable the public landing page for visitors. | - When enabled, visitors see a landing page instead of a direct login or dashboard. - Useful for marketing, announcements, or introductory information. - Can be switched off to restrict access or simplify navigation. |
Usage Notes
- These settings help customize the overall user interface and access behavior of the SaaS platform.
- Changes take effect immediately after saving.
- Pagination limits impact all tables globally across the application.
- Landing page toggle controls the first page users and guests see when accessing the platform URL.
Theme Style
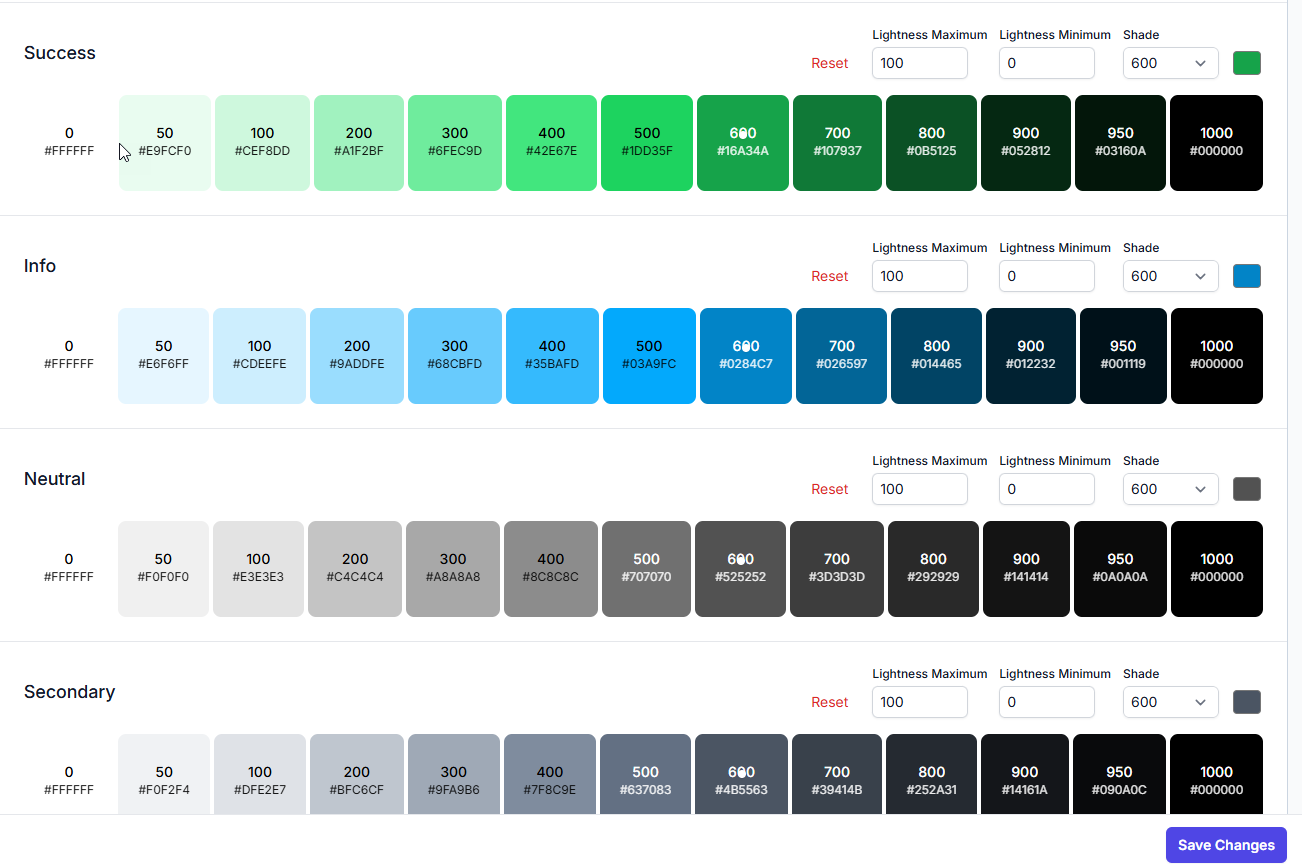
Manage and customize the color palette used throughout the WhatsMark SaaS platform. This section allows fine-tuning of color shades and lightness for different UI themes.
Location: Admin Panel → System Settings → Theme Style
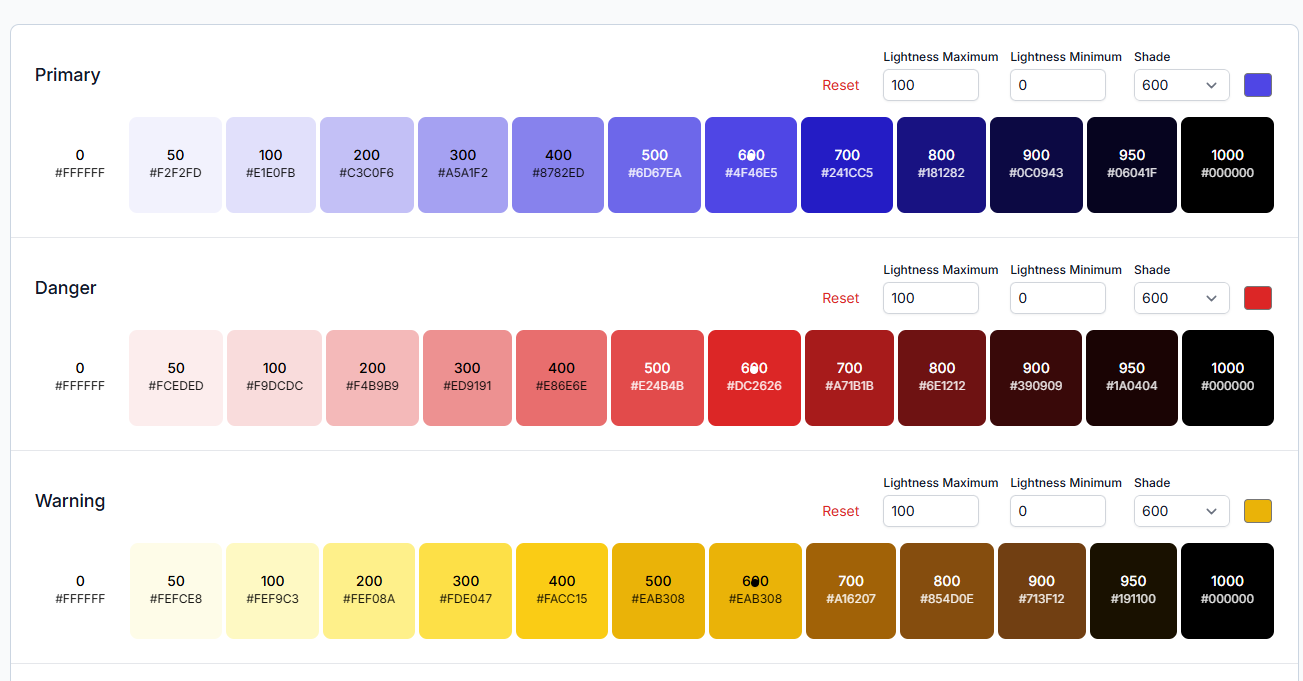
| Color Category | Description | Features |
|---|---|---|
| Primary | Primary brand colors, typically used for buttons, links, and highlights. | - Blue tones from light (#F2F2FD) to black (#000000). - Adjustable shade and lightness values. - Reset functionality. |
| Danger | Red shades used for errors, warnings, and critical alerts. | - Gradient from soft red (#FCDEDE) to black (#000000). - Lightness max/min and shade control. - Reset option available. |
| Warning | Yellow and orange shades for warnings and cautions. | - Colors range from pale yellow (#FEFCE8) to black (#000000). - Shade and lightness adjustable. - Reset control present. |
| Success | Green shades used to indicate success states, confirmations, and positive messages. | - Multiple shades from light (#E9FCF0) to dark (#000000). - Adjustable lightness range and shade level. - Reset option to revert changes. |
| Info | Blue shades representing informational messages and UI highlights. | - Shades range from very light (#E6F6FF) to very dark (#000000). - Lightness max/min and shade controls. - Reset available. |
| Neutral | Gray shades for neutral UI elements, backgrounds, and borders. | - Gradient from light (#F0F0F0) to black (#000000). - Lightness and shade customizable. - Reset option included. |
| Secondary | Secondary color palette for UI accents and less prominent elements. | - Shades from light gray (#F0F2F4) to black (#000000). - Controls for lightness and shade. - Reset button to undo changes. |
Controls Available
- Lightness Maximum: Sets the maximum lightness percentage for the color gradient.
- Lightness Minimum: Sets the minimum lightness percentage.
- Shade: Dropdown selector to adjust the base shade intensity.
- Reset: Reverts the current color category to its default values.
Notes
- Colors are displayed with their respective HEX codes.
- Adjustments here affect the overall theme and user interface consistency.
- Use the “Save Changes” button to apply all customizations globally.
Best Practices
Regular Review Conduct audits of system settings on a quarterly basis to ensure optimal performance and compliance.
Documentation Maintain a detailed record of all configuration changes for transparency and future reference.
Testing Regularly test email delivery and other critical features to verify proper operation.
Security Updates Keep all security-related settings and software up to date to protect against vulnerabilities.
Backups Always create backups before applying major configuration changes to safeguard data integrity.
Troubleshooting
Common Issues & Solutions:
Email Delivery Problems Verify SMTP credentials, server settings, and check if emails are being marked as spam.
Cron Job Failures Ensure correct server permissions and validate the paths used in scheduled tasks.
Language Issues Confirm that translation files are complete and properly formatted.
Security Lockouts Temporarily disable strict security settings if legitimate users are locked out.
Update Failures Review system requirements and error logs to resolve update problems.
Extended License Required
This feature requires an Extended License. Please ensure you have the appropriate license before using these admin features.