Tenant Management
Tenant Management allows platform admins to onboard, configure, monitor, and support customers (tenants) in an isolated and scalable manner within WhatsMarkSaaS — a WhatsApp marketing SaaS system.
Overview
Each tenant represents a separate business client and has:
- Dedicated admin login
- Isolated data environment (campaigns, users, messages)
- Separate billing and support
This guide breaks down:
- Tenant creation
- Admin user setup
- Status management
- Subscription & invoices
- Support actions like impersonation
Permissions Required:
| Permission Key | Action |
|---|---|
admin.tenants.view | View all tenant records |
admin.tenants.create | Add a new tenant |
admin.tenants.edit | Update tenant details/status |
admin.tenants.delete | Remove tenant (rare use) |
admin.tenants.login | Login as tenant |
Navigating to Tenant Management
Location: Admin Panel → Tenants → Tenant List
Tenant List Overview


This screen provides a complete list of all registered tenants with search, advanced filters, status indicators, quick actions, and one-click CSV export.
Visible Columns
| Column | Description |
|---|---|
| ID | Internal database ID |
| Name | Full name of tenant admin |
| Company Name | Business/brand name |
| Status | Current operational state of the tenant |
| Created At | Human-readable relative timestamp |
| Action | Login directly into tenant’s dashboard securely |
Use the Search box to filter tenants by name, email, or subdomain.
Step-by-Step: Creating a Tenant

Personal Information
| Field | Description | Required |
|---|---|---|
| Firstname | Admin user's first name | true |
| Lastname | Admin user's last name | true |
| Email used for login and notifications | true | |
| Phone | Mobile number with country selector | true |
ℹ The admin user created here will be the default super admin for the tenant.
Company Information
| Field | Description | Required |
|---|---|---|
| Company Name | Legal or trade name of the client’s business | true |
| Tenant Name | Used as the subdomain. e.g., ctlcompany → https://yourdomain.com/ctlcompany | true |
| Country | Used for regional filtering or localization | Optional |
| Timezone | Ensures scheduled messages respect tenant’s local time | |
| Address | Office address, displayed in invoices or support | Optional |
Account Security
| Field | Description | Required |
|---|---|---|
| Password | Initial login password | true |
| Confirm Password | Must match entered password | true |
Once complete, click Add to submit. A tenant is created, along with the admin user and their subdomain.
Tenant Status Management
| Status | Description | Visual |
|---|---|---|
Active | Tenant is fully operational and has valid subscription | |
Deactive | Temporarily disabled; user cannot log in | |
Suspended | Locked due to issues like non-payment or abuse reports |
How to Change Status
- Click the status dropdown next to the tenant.
- Select the new status.
- (Optional) Enter a reason for auditing.
- Confirm the action — the UI updates and sends notifications if configured.
Control Tenant Activity
- View: Click to see detailed information about the tenant. (Described below)
- Edit: Click to modify the tenant's information.
- Delete: Click to remove the tenant. Please double-check before proceeding, as this action may be irreversible. Currently, tenants with active subscriptions cannot be deleted — this may be supported in a future update.
Tenant Details View
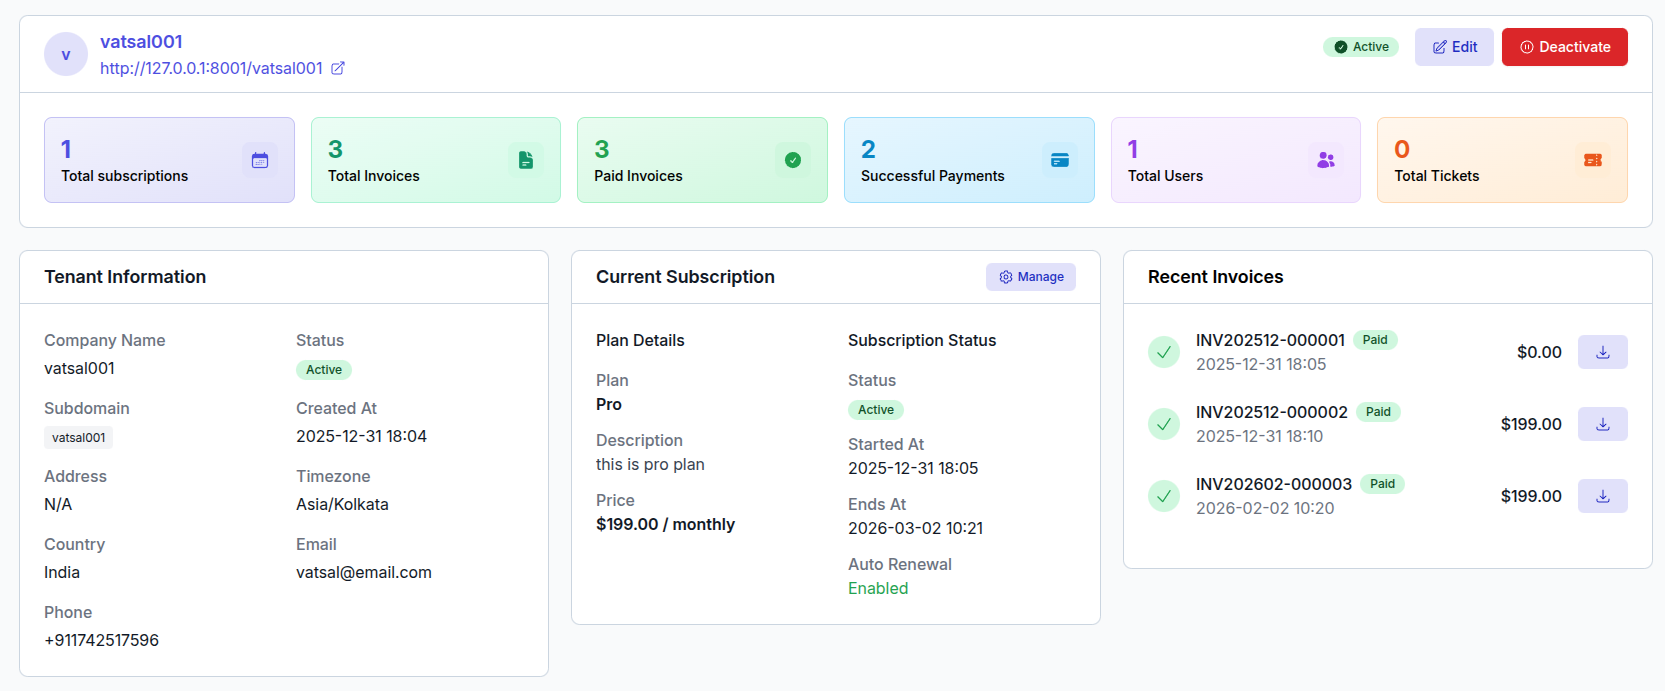
Clicking on a tenant from the list brings you to their details view, which provides a deep dive into their usage, configuration, and billing.
Sections Explained
Tenant Information
- Company Name
- Subdomain (auto-generated)
- Address
- Country
- Phone
- Status
- Created At
- Timezone
Current Subscription
- Plan Name (e.g., Starter, Business, Enterprise)
- Plan Description
- Plan Pricing
- Status (
New,Active,Expired) - Started/Ends At (billing cycle)
- Auto Renewal (
Enabled/Disabled)
Recent Invoices
- Invoice ID
- Status (
Pending,Paid, etc.) - Amount
- Download (PDF)
⏱ Keep an eye on pending invoices to avoid service interruptions.
Login as Tenant (Impersonation)
Powerful support tool that lets you access a tenant’s account as if you were them.
How it works
- Click
Login As Tenantfrom the tenant list. - You're securely redirected to the tenant's dashboard.
- A "Back to Admin" button is always available.
- All actions are logged for security and auditing.
Use Cases
- Helping tenant troubleshoot issues
- Reviewing campaign setup
- Testing WhatsApp connectivity or templates
Use responsibly. Only for debugging/support. Respect privacy laws (e.g., GDPR).
Assign Plan to Tenant
Admins can assign any subscription plan (public or private) directly to a client from the tenant create or edit form — bypassing the public checkout entirely.
Steps
- Open a tenant via Edit (existing) or create a new one via Add Tenant.
- Scroll down to the Assign Plan to Tenant section on the form.
- Click the plan dropdown — it lists all plans with their name, price, billing period, and Public/Private status.
- Select the desired plan.
- Click Add (new tenant) or Save (existing tenant). The subscription is activated immediately.
TIP
Both public and private plans appear in the dropdown. This lets you assign custom or enterprise deals directly without making them visible on the public pricing page.
Already subscribed?
If the tenant already has an active subscription, the plan dropdown is disabled. Cancel or end the current subscription first, then reassign.
For full details on billing periods, plan visibility (public vs private), and plan configuration, see Plan Management.