Campaign
The Send New Campaign allows users to send WhatsApp messages to targeted recipients using pre-approved templates from the WhatsApp Cloud API. Campaigns can be personalized, filtered by contact type (Leads or Contacts), and scheduled to send now or at a future time — perfect for marketing, billing, or updates.
Step 1: Campaign Creation Interface
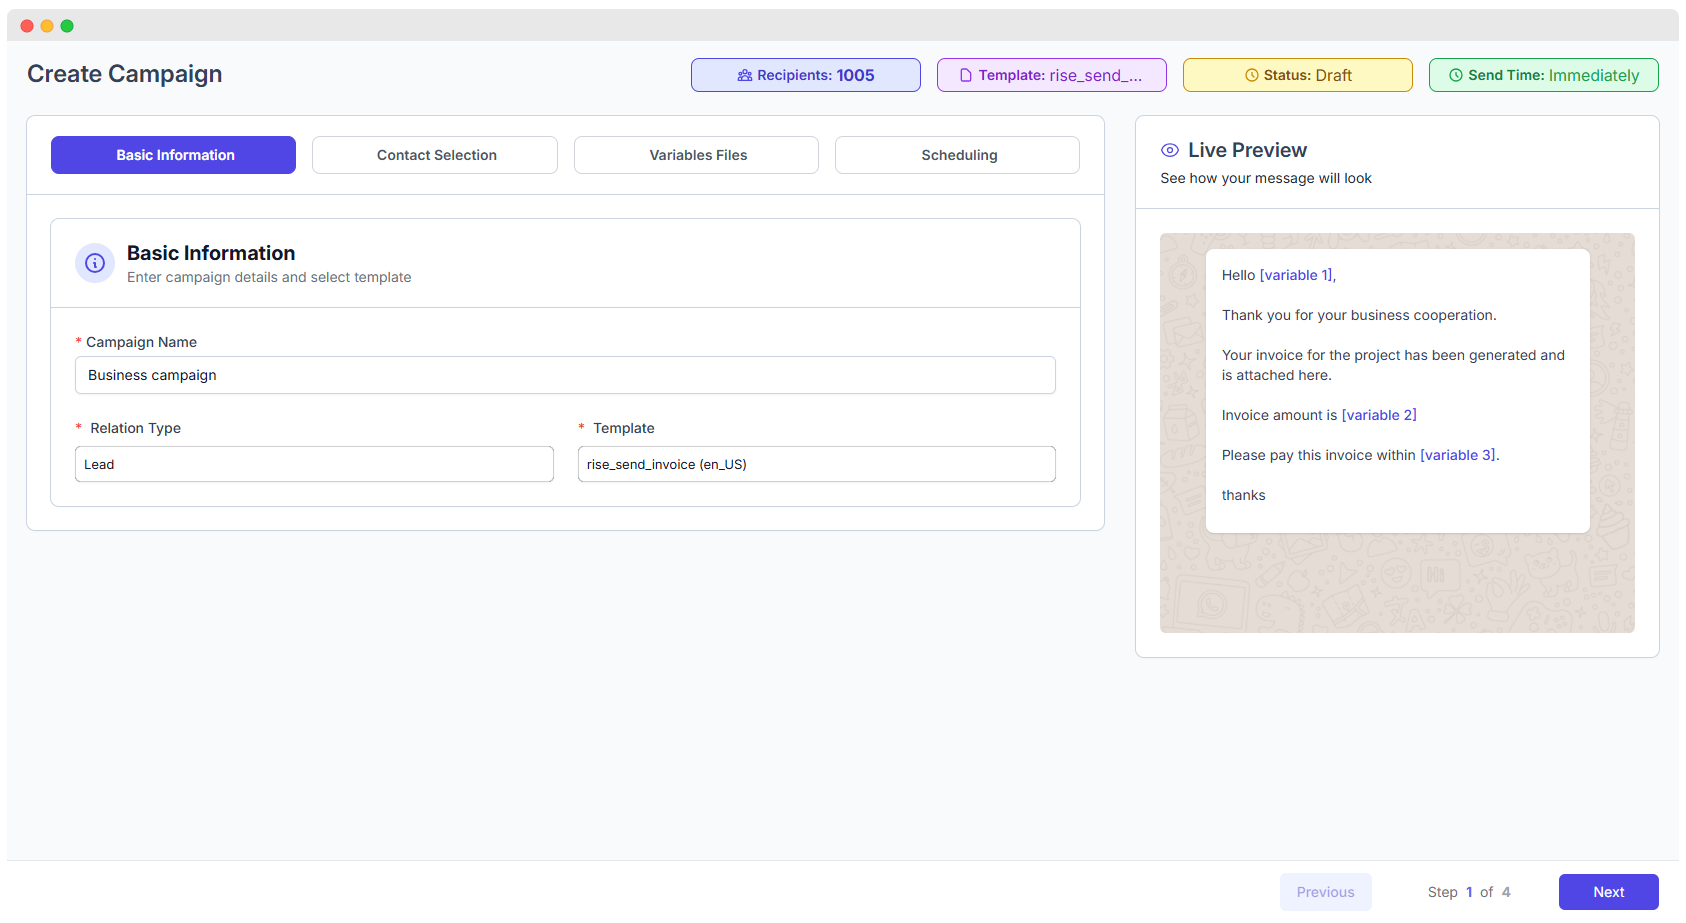
Interface Components
1. Campaign Name
- This is a required text field where you provide a name for your campaign.
- Example:
Business campaign,July Invoice Batch,Lead Follow-up.
2. Relation Type
- Choose the audience type for the campaign:
Lead: Target users categorized as leads.Contact: Target users categorized as existing contacts or customers.Guest: Target users who have sent messages but haven't been converted to leads or customers.
Guest Contacts
Guest contacts are automatically created when someone sends a message to your WhatsApp Business number for the first time (if Auto Lead is disabled). You can target guests in your campaigns to engage with new message senders.
3. Template
- Select a WhatsApp-approved message template from the dropdown.
- Example shown:
rise_send_invoice (en_US) - Templates contain placeholders like
[variable 1],[variable 2]which will be dynamically filled using a CSV file or input later in the campaign process.
Live Preview
- Shows how the message will appear to recipients.
- Variables (e.g.
[variable 1]) are placeholders for dynamic values like customer name, invoice amount, due date, etc.
Example preview: Hello [variable 1], Thank you for your business cooperation. Your invoice for the project has been generated and is attached here. Invoice amount is [variable 2] Please pay this invoice within [variable 3].
4. Scheduled Send Time
- Choose whether to send the message immediately or schedule it for later.
- If you leave this empty, the campaign won't be scheduled until manually triggered.
5. Send Time Control
- Toggle option: Ignore Scheduled Time and Send Now
- If enabled, the campaign will be sent instantly, bypassing the scheduling configuration.
Campaign Summary (Top Right Indicators)
- Recipients: Number of contacts the message will be sent to (e.g., 1005).
- Template: Selected WhatsApp template (e.g.,
rise_send_invoice). - Status: Current state of the campaign (e.g.,
Draft). - Send Time: Indicates whether the message is set to be sent immediately or scheduled.
Step 2: Contact Selection
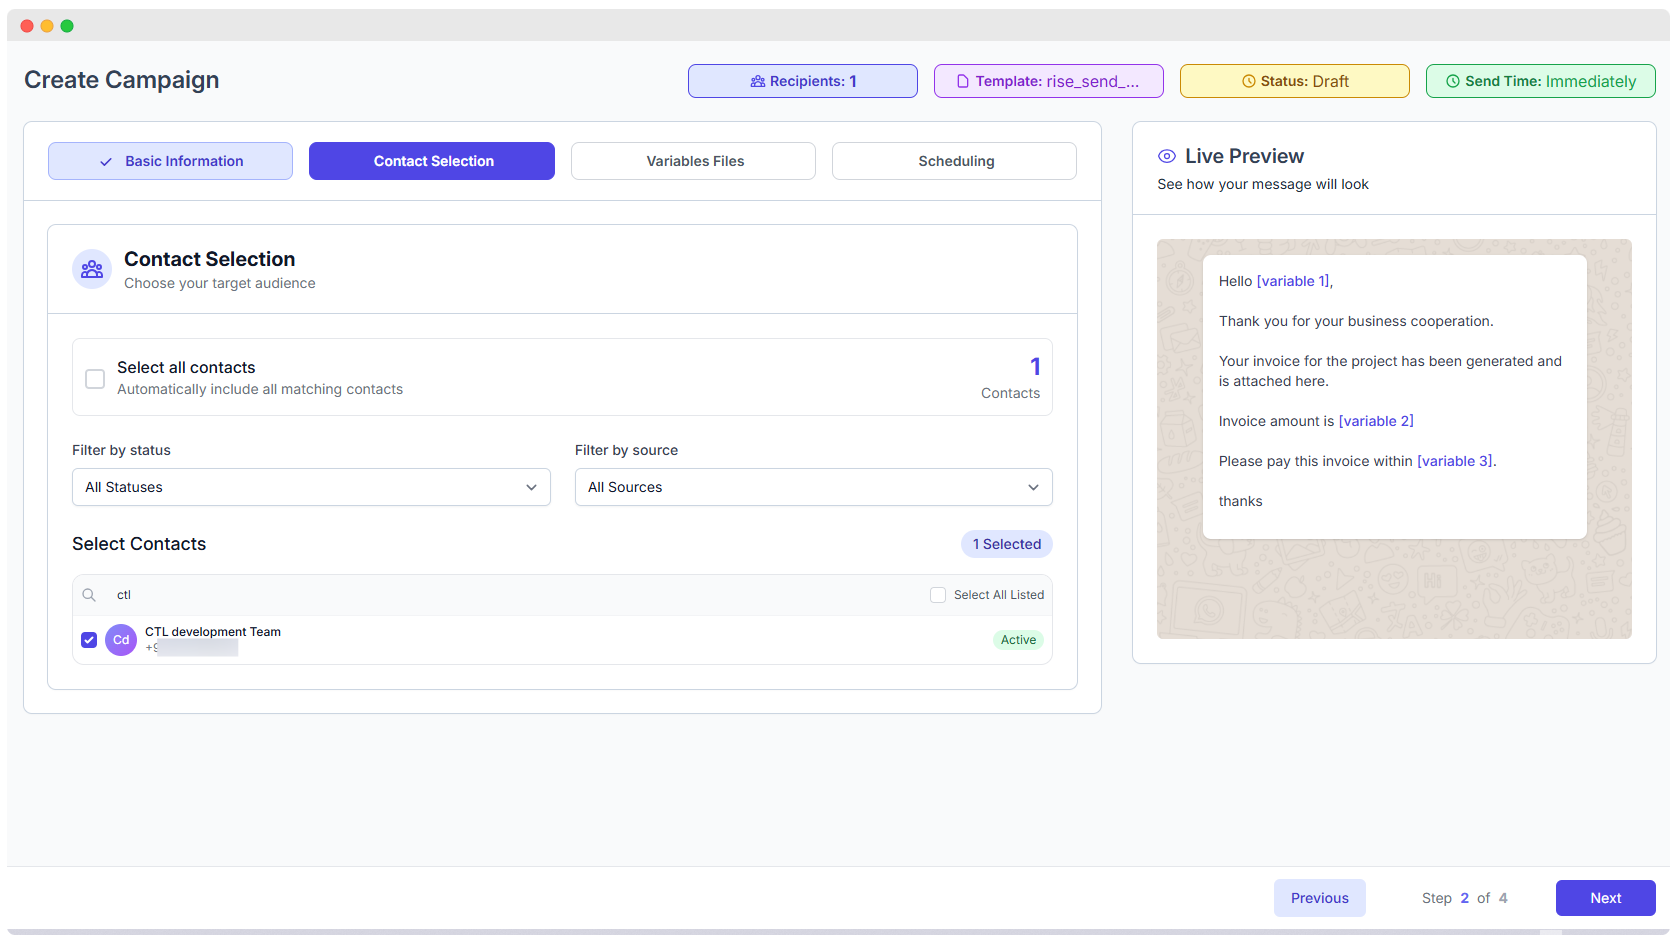
After selecting your campaign template in Step 1, the next step is to choose who will receive your message. You can send it to all your contacts or filter them by status, source, or manually select specific ones.
Contact Selection Panel
Select All Contacts
- Enabling this option will automatically include all matching contacts in the campaign.
- This disables manual filtering and selection and is ideal for broadcast campaigns.
Filter Options
Use the dropdowns to filter contacts based on their status or source:
1. Status Options
Select the current lifecycle stage of your contacts:
New– Recently added contactsQualified– Leads that meet your qualification criteriaIn Progress– Leads currently being engagedContracted– Contacts that have signed an agreement or purchaseClosed– Completed or dropped interactions
2. Source Options
Identify where your contacts came from:
Facebook– Contacts acquired through Facebook campaignsWhatsApp– Contacts obtained directly via WhatsApp conversations or entry points
These filters help you create highly targeted and personalized campaigns.
Select Specific Contacts
- Use the search bar to find contacts by name or keyword.
- Manually select individual contacts using checkboxes.
- Use "Select All Listed" to bulk-select filtered contacts.
- Selected count is shown in the top-right (e.g.,
1 Selected).
In this example, CTL development Team has been selected, and is marked as Active.
Live Preview
The preview panel on the right shows a real-time display of your message. Placeholders like:
[variable 1]— Customer name or reference[variable 2]— Invoice amount[variable 3]— Payment due duration
These will be filled in Step 3 using a variables file.
Navigation
- Click Previous to go back to Basic Information.
- Click Next to proceed to Step 3: Variables Files, where you upload the dynamic data (CSV or Excel).
Tip: Use filters to avoid sending irrelevant messages and ensure your campaign reaches the right audience with the right message.
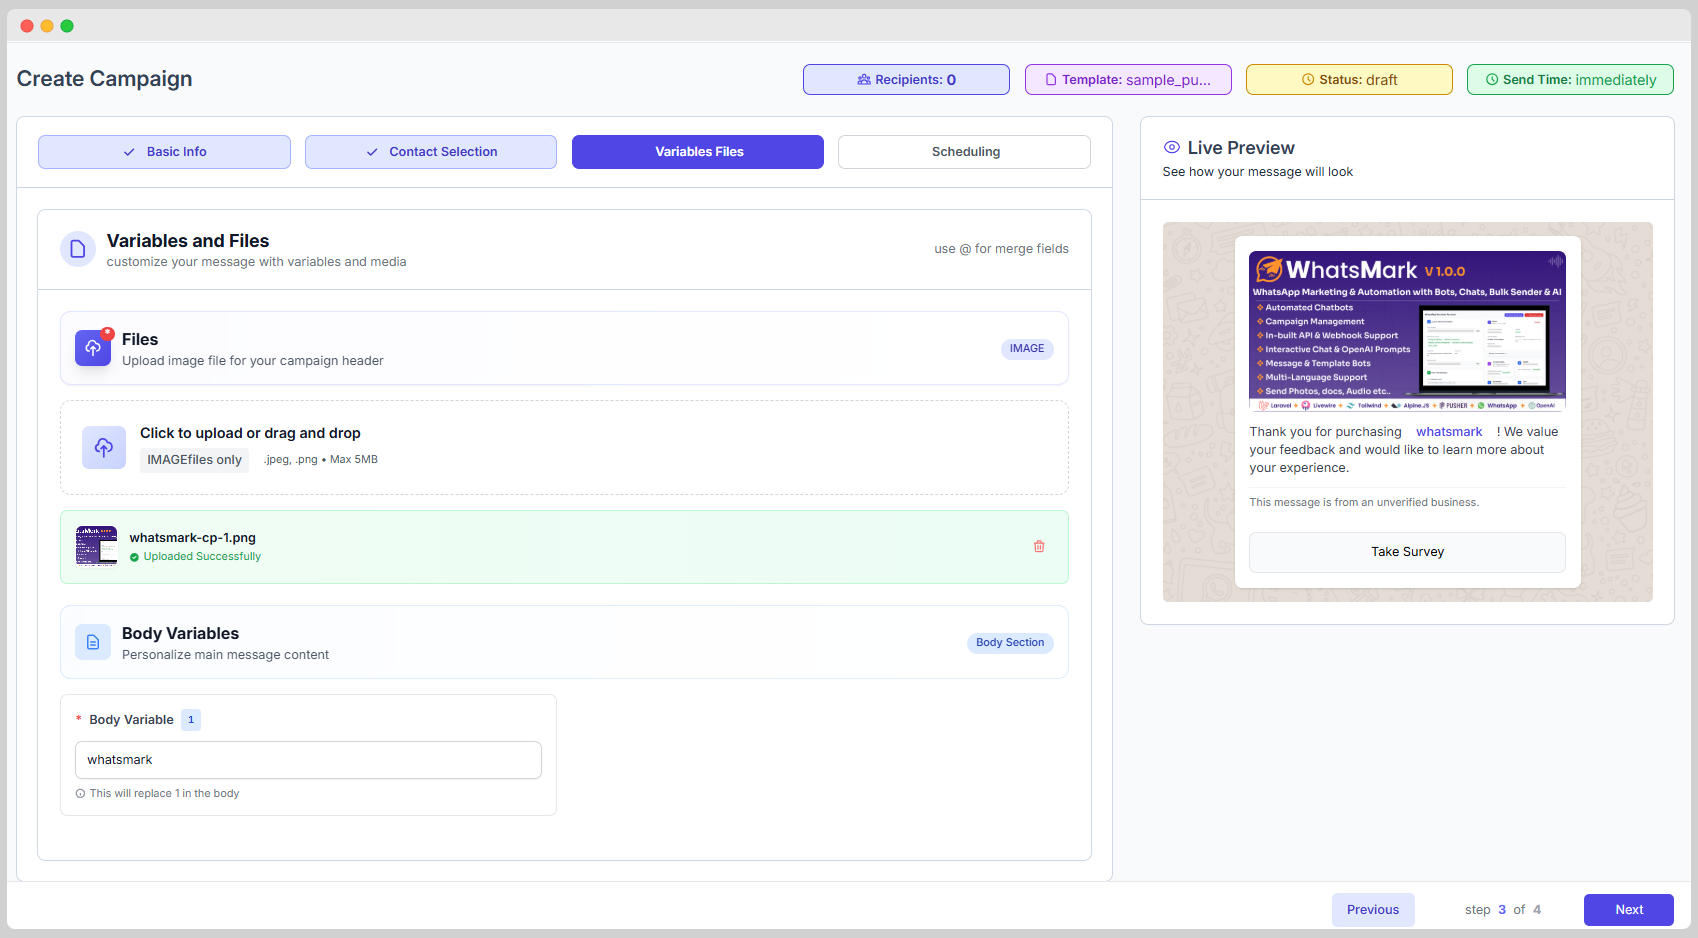
Step 3: Variables and Files
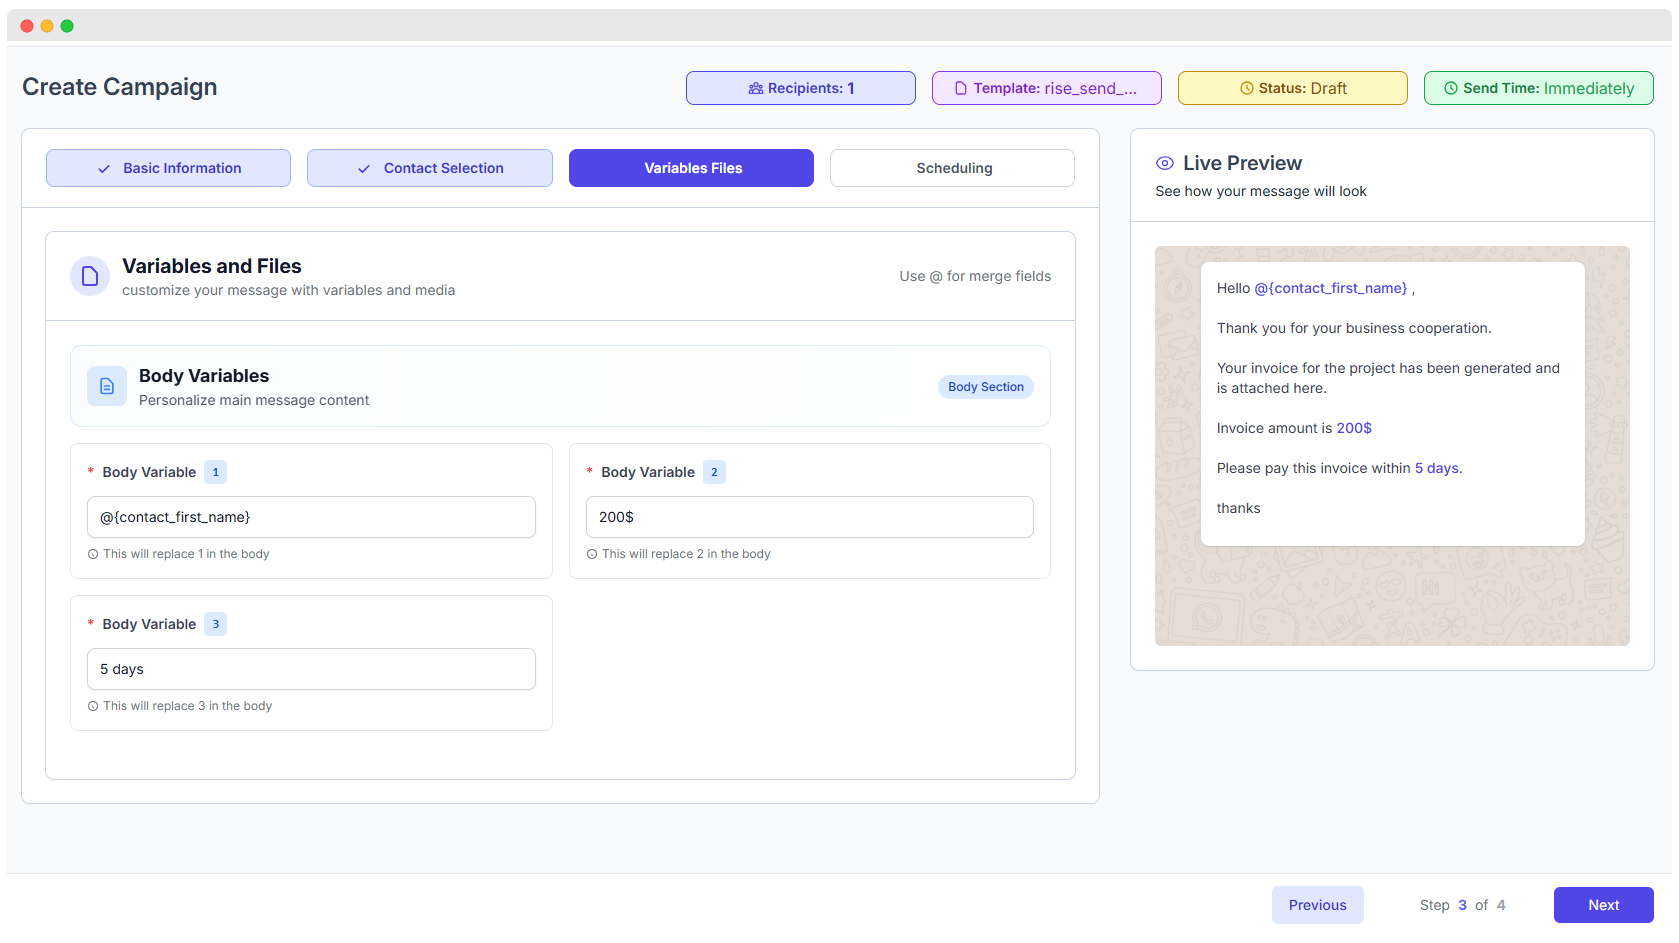
This step allows you to personalize your message by assigning values to variables used in the selected WhatsApp template. These variables replace placeholders like [variable 1], [variable 2], and so on.
Body Variables
Under the Body Variables section, you will map real values to the dynamic placeholders used in your WhatsApp message template.
Each field corresponds to a variable used in the message body and is numbered accordingly (e.g., 1, 2, 3).
Example from the image
| Body Variable | Value | Replaces in Message |
|---|---|---|
| 1 | @{contact_first_name} | Replaces [variable 1] |
| 2 | 200$ | Replaces [variable 2] – Invoice amount |
| 3 | 5 days | Replaces [variable 3] – Payment period |
Whatever value you type in the Body Variable input fields will instantly update the Live Preview on the right side, reflecting how the message will appear to the recipient.
How It Works
- The variable values can be typed manually (for one-off messages) or uploaded via a CSV file in the next step if you are sending personalized messages to many recipients.
- Use @merge fields such as
@{contact_first_name}to insert dynamic CRM/contact data.
Step 4: Scheduling
The final step before launching your WhatsApp campaign is choosing when to send it. You can either send the campaign immediately or schedule it for a future date and time.
Scheduling Options
Send Immediately
- When selected, the campaign will be sent right after creation.
- Ideal for urgent messages or real-time updates.
- Labeled as "Instant Delivery".
Use this when you want to quickly reach your contacts without delay.
Schedule for Later
- Allows you to pick a specific date and time to send your campaign.
- Useful for:
- Campaigns tied to events or promotions
- Reaching customers during optimal engagement times
- Avoiding off-hours communication
Ensure your system time and timezone settings are correctly configured for accurate scheduling.
Live Preview
The right panel continuously shows how your message will look to the recipient, using the variables you’ve configured in Step 3.
Hello @{contact_first_name}, Thank you for your business cooperation. Your invoice for the project has been generated and is attached here. Invoice amount is 200$ Please pay this invoice within 5 days. Thanks
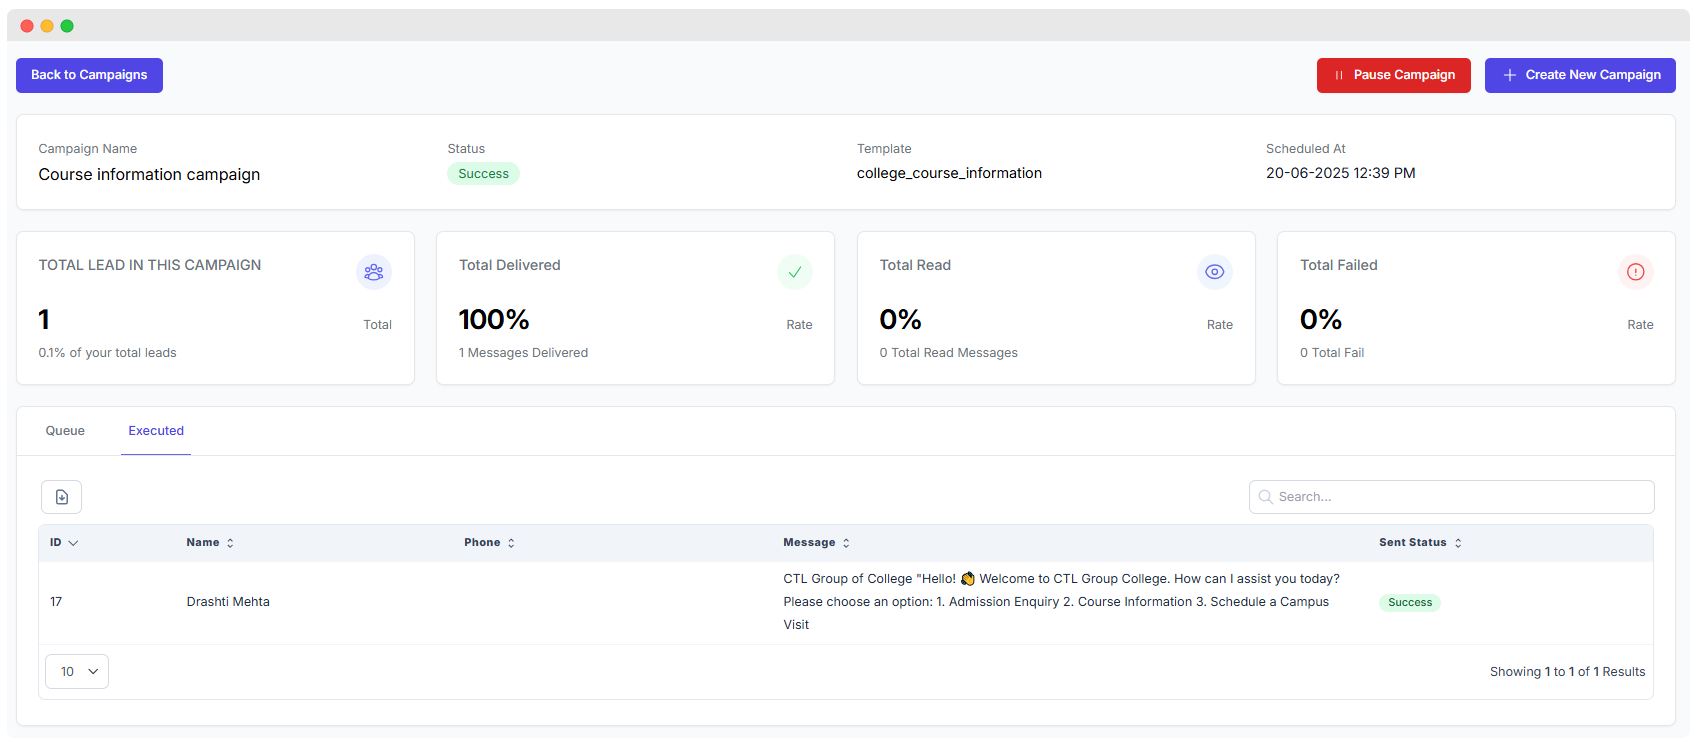
Campaign Execution Report
Once a WhatsApp campaign has been created and scheduled, the execution report allows you to monitor its performance in real-time.
Campaign Overview
- Campaign Name:
Course information campaign - Status:
Success - Template Used:
college_course_information - Scheduled Time:
20-06-2025 12:39 PM
Campaign Performance Metrics
| Metric | Value | Description |
|---|---|---|
| Total Leads | 1 | Number of leads targeted in this campaign |
| Delivered | 100% | All messages were successfully delivered |
| Read | 0% | No recipients have read the message yet |
| Failed | 0% | No delivery failures occurred |
Message Delivery Table
Below is the execution log showing message-level delivery status:
| ID | Name | Message Preview | Sent Status |
|---|---|---|---|
| 17 | Drashti Mehta | CTL Group of College: "Hello! Welcome to CTL Group College. How can I assist you today?" ... | Success |
Message offers multiple options to interact with, such as:
- Admission Enquiry
- Course Information
- Schedule a Campus Visit
Media Display Note
If your template contains a media header (image, document, video), the uploaded file is shown in the message preview as illustrated in the screenshot.
NOTE
WhatsApp templates support specific file formats and size limits for headers and media files.
For full compatibility, refer to the official Supported Media Types from Meta.
Document-Based Campaign Template

In this step, you can upload a document file that will be shown in the header of the message preview, along with custom body content using variables.
Uploaded Document
- File Name:
INV202506-000003 (1).pdf - Status: Uploaded Successfully
- Allowed Document Types:
.pdf,.doc,.docx,.txt,.xls,.xlsx,.ppt,.pptx - Max File Size: 100MB
Body Variables
You can personalize your campaign content using variables. These variables will dynamically replace the corresponding placeholders in the message body preview.
| Variable Number | Placeholder Value |
|---|---|
1 | Mumbai |
2 | Goa |
3 | Jul 20, 2025 |
These values are rendered in the preview like this:
This is your flight confirmation for Mumbai → Goa on Jul 20, 2025
Live Preview
- The document file appears as an attachment header in the preview.
- The body message displays the inserted variables clearly.
- This preview shows how your final message will appear to recipients.
This message is from an unverified business.
Tip
Use @ notation when referencing variables in the template body to match them with the values entered in this section.
Using Merge Fields in Campaign Messages
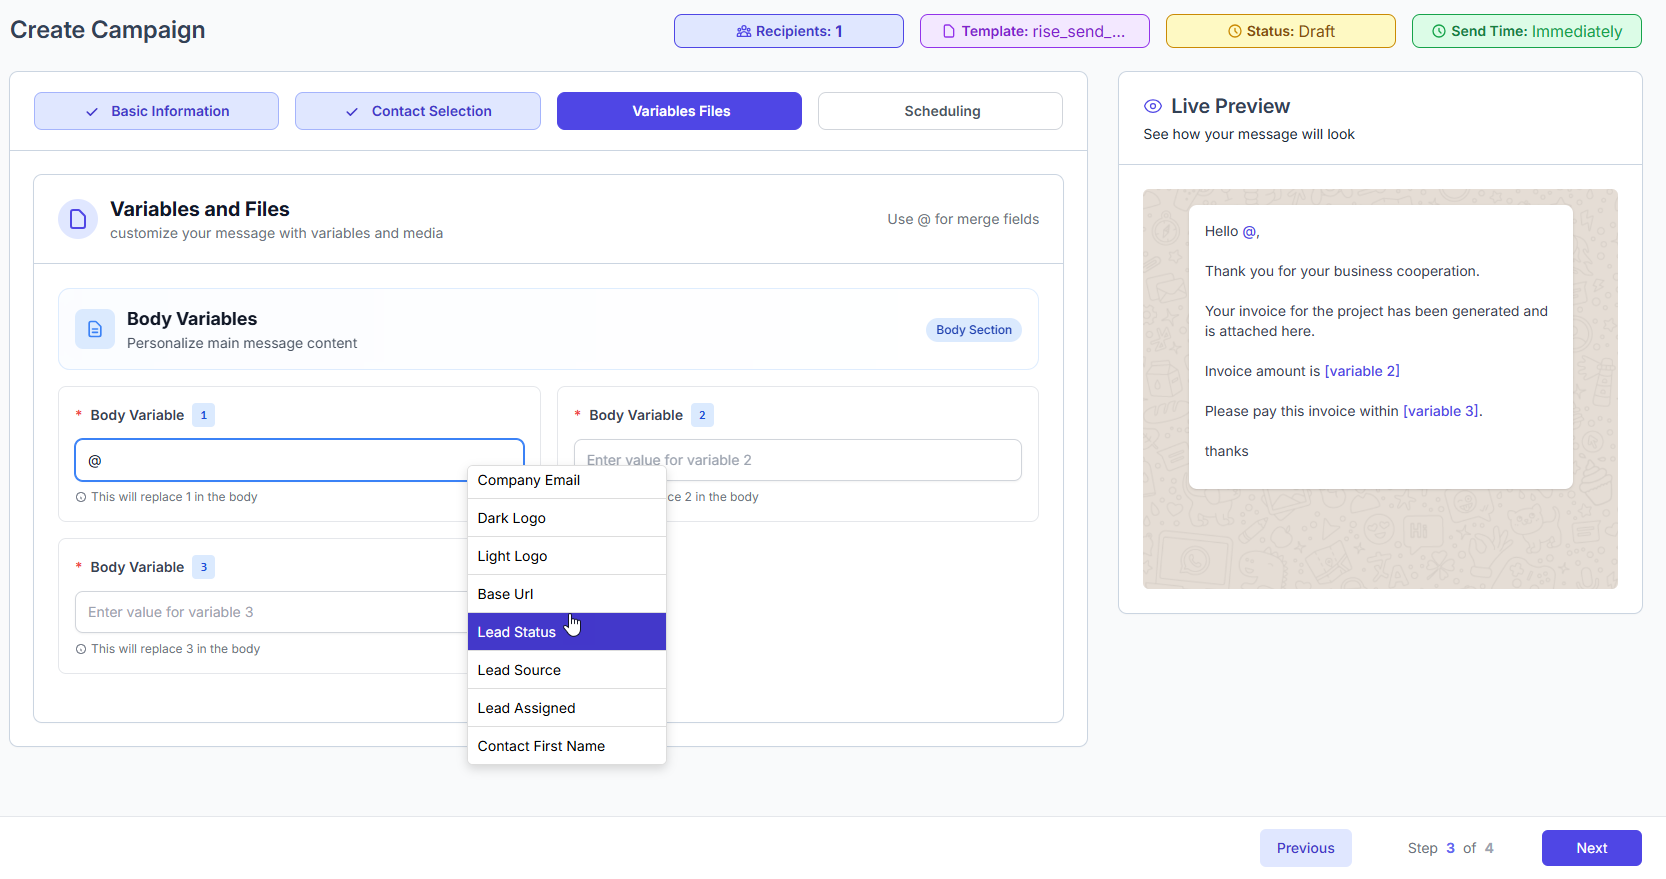
You can personalize your campaign messages using merge fields. These fields allow dynamic data insertion, such as the lead’s name, status, or email.
How It Works
- In the Body Variables section, type
@in a variable input field. - A dropdown will appear showing available merge fields.
- Select the appropriate field from the list based on your campaign relation (Customers or Leads).
Example Merge Fields
- Contact First Name
- Lead Status
- Lead Source
- Company Email
- Base URL
- Lead Assigned
- Dark Logo / Light Logo
Example Message Preview
This is how the message appears using variables and merge fields:
Hello
@Lead Status,Thank you for your business cooperation.
Your invoice for the project has been generated and is attached here.
Invoice amount is
[variable 2]Please pay this invoice within
[variable 3]Thanks
Tip
- If Customers is selected as the relation type, you'll see customer-related fields.
- If Leads is selected, you'll see lead-specific fields like status, source, etc.
This helps tailor each message for the right audience—automatically.
Added Campaign
Once you click Send Campaign, you will receive a notification saying Campaign added successfully. The campaign will then appear in the table entry, where you can edit or delete it as needed.
Campaign Overview
| Field | Details |
|---|---|
| Campaign Name | Course information campaign |
| Status | Success |
| Template | college_course_information |
| Scheduled At | 20-06-2025, 12:39 PM |
Campaign Performance Summary
| Metric | Value | Description |
|---|---|---|
| Total Leads | 1 (0.1% of total) | Number of leads included in this campaign |
| Total Delivered | 100% (1 message) | Messages successfully delivered |
| Total Read | 0% (0 messages) | Messages read by the leads |
| Total Failed | 0% (0 messages) | Messages that failed to deliver |
Detailed Message Information
| ID | Name | Phone Number | Message Content | Sent Status |
|---|---|---|---|---|
| 17 | Drashti Mehta | +916359692202 | CTL Group of College "Hello! Welcome to CTL Group College. How can I assist you today? Please choose an option: | Success |
| 1. Admission Enquiry 2. Course Information 3. Schedule a Campus Visit |
Available Actions
- Back to Campaigns: Return to the main campaigns list.
- Pause Campaign: Temporarily stop the campaign.
- Create New Campaign: Start configuring a new campaign.
Note: The message has been successfully delivered to one lead, but it has not yet been read.
How Campaign Works
Export Campaign
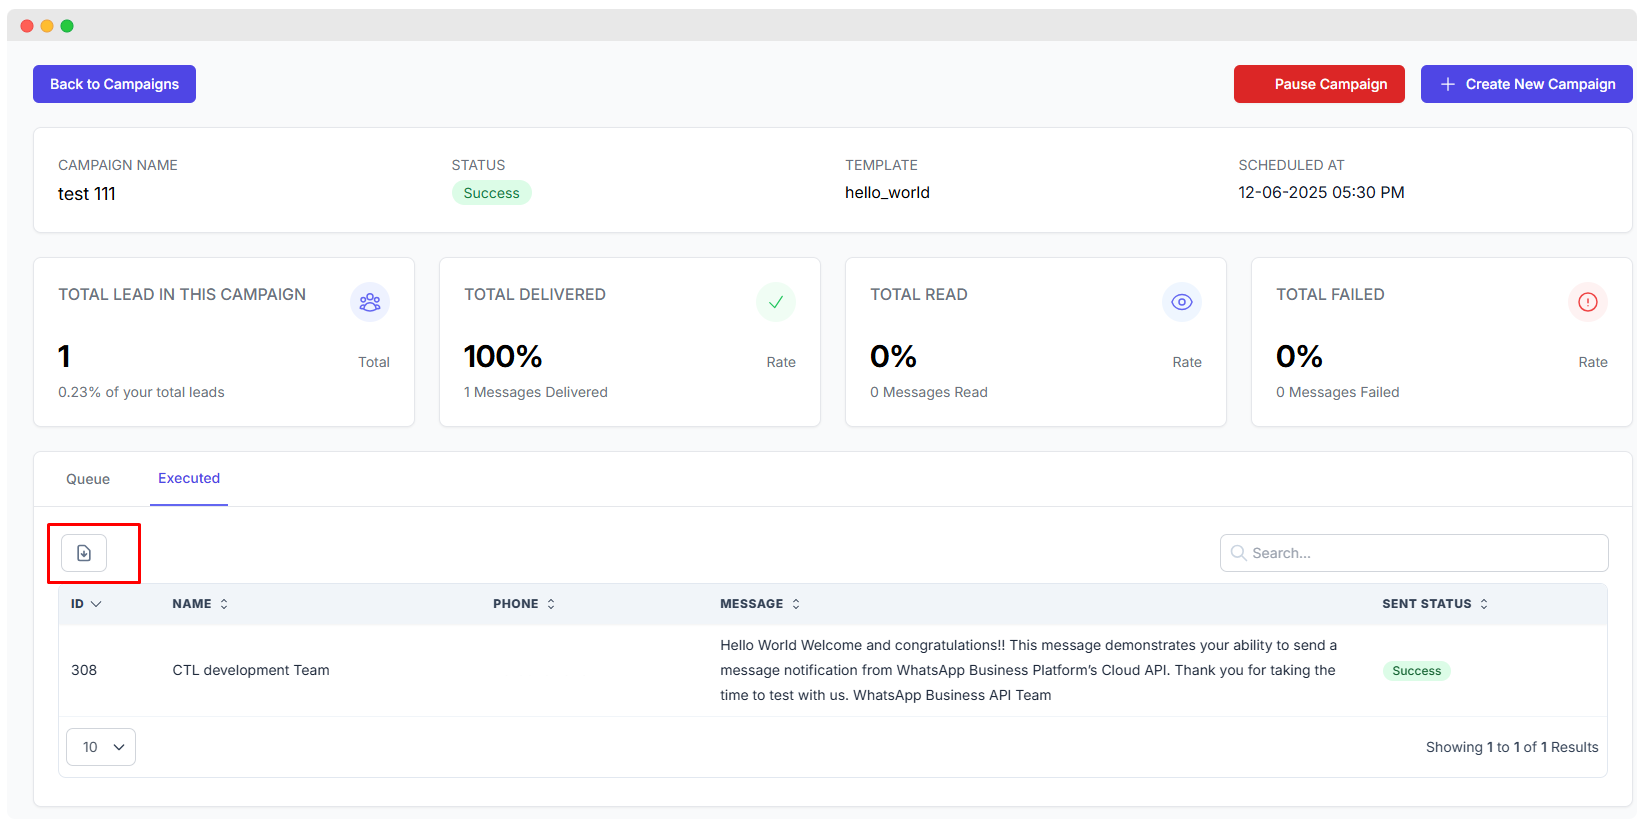
- You can export your campaign reports as a CSV file using the Export button.
- To export, navigate to:
Campaigns→View→ Export CSV - This allows you to download detailed campaign performance data for offline analysis or sharing.