Contacts
Organize and manage contacts across different platforms like WhatsApp and SaaS and also can add, edit, filter, import, export, and manage contacts with ease.
1. Adding New Contacts
View contact list and create new contacts.
Contact List View
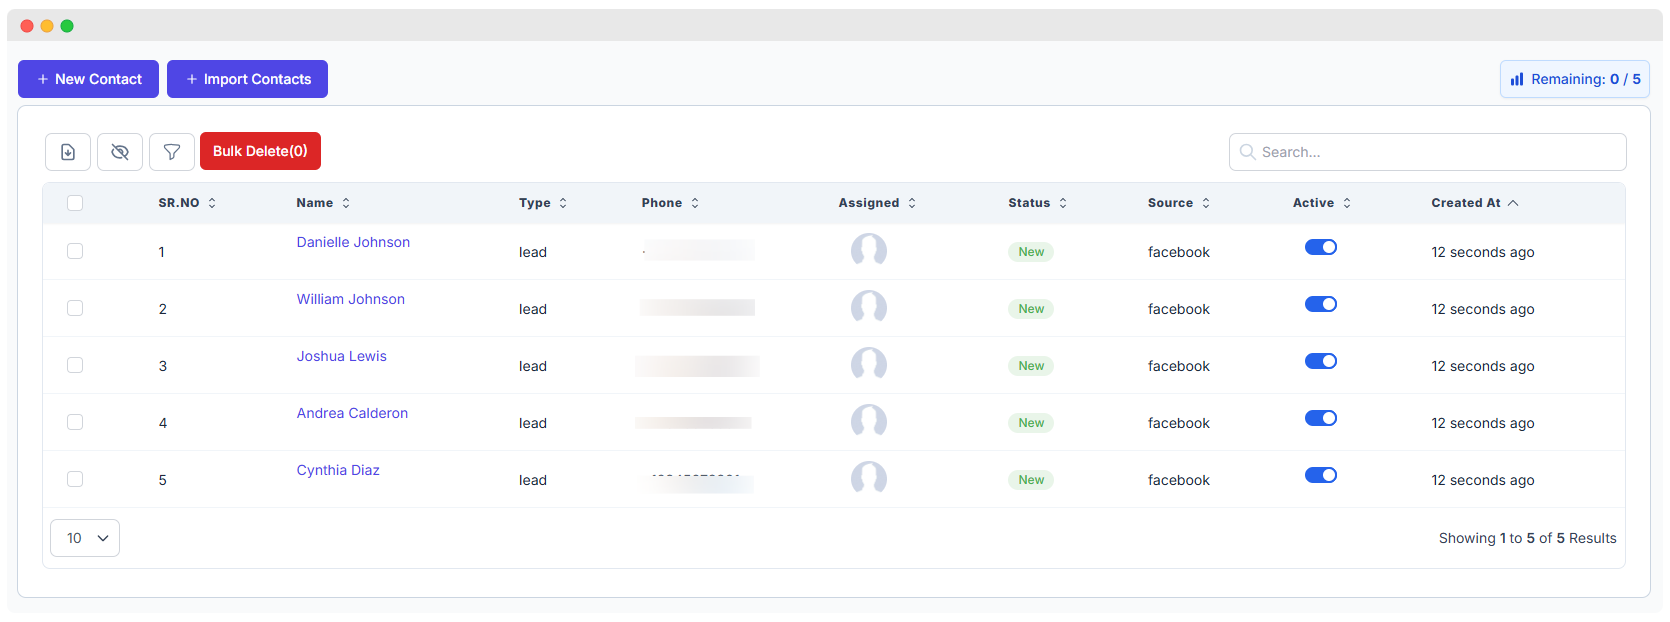
All created contacts will appear in the Contact List table.
Contact List Column Breakdown
| Column | Description |
|---|---|
| SR.NO | Serial number of the contact in the list |
| Name | Full name of the contact (clickable to view details) |
| Type | Contact classification: lead, customer, or guest |
| Phone | Contact’s phone number (partially masked for privacy) |
| Assigned | The user or team assigned to the contact |
| Status | Contact's current progress status (e.g., New, In Progress) |
| Source | Where the contact came from: Facebook or WhatsApp |
| Active | Toggle switch to activate/deactivate contact visibility |
| Created At | Shows how recently the contact was added |
Additional Actions in the Contact List
- Activation Toggle: Use the blue switch to turn a contact on/off.
- Search: Use the top-right search box to find contacts quickly.
- Bulk Delete: Select multiple checkboxes and click
Bulk Deleteto remove them. - Hide Fields: Click the Hide Field icon to show or hide table columns.
- Import Contacts: Click
Import Contactsto upload contacts in bulk from CSV or Excel.
Only active contacts may appear in downstream workflows or reports.
How to Create a New Contact
This guide walks you through the process of creating a new contact using the Add New Contact form.
Step 1: Open the Contact Form
- Click the
+ New Contactbutton on the contacts page. - A form titled Add New Contact will open.
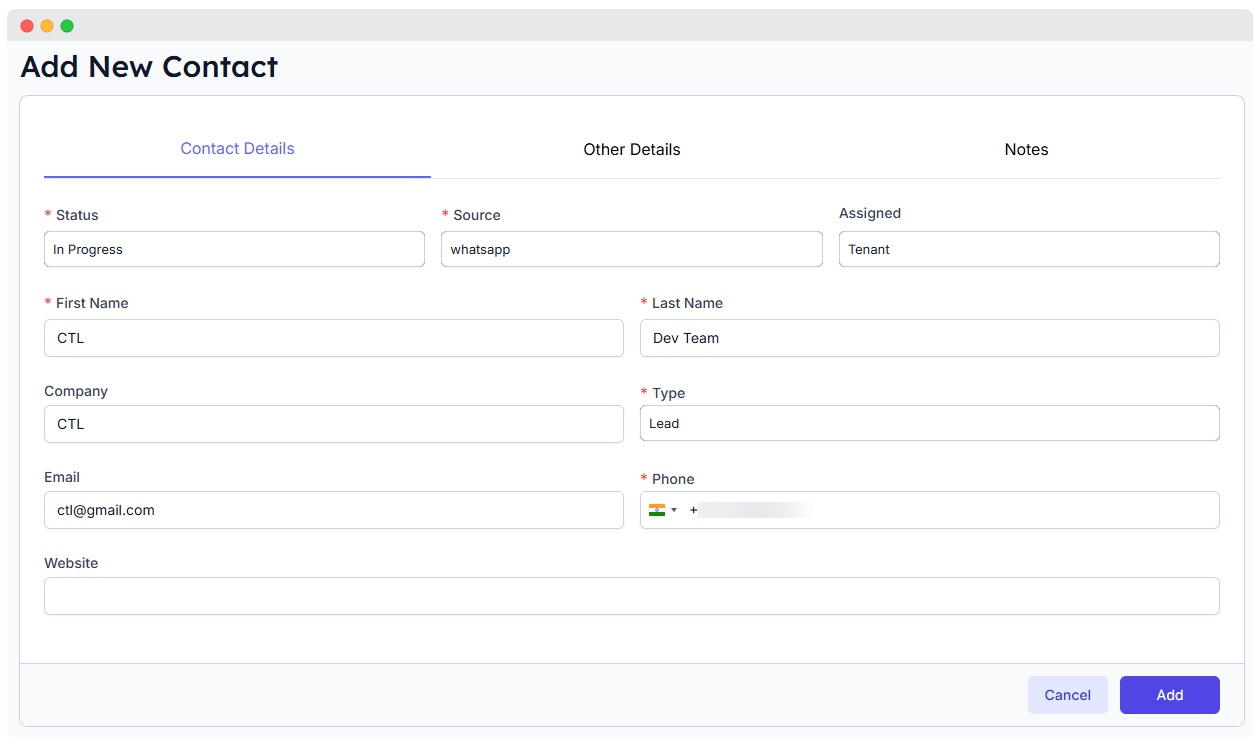
Step 2: Fill in Contact Details
In the Contact Details tab, enter the following:
Required Fields (* marked)
| Field | Description |
|---|---|
| Status* | Select the contact’s current status: • New• In Progress• Contacted• Qualified• Closed |
| Source* | Choose where the lead came from: • Facebook• WhatsApp |
| First Name* | Enter the contact’s first name |
| Last Name* | Enter the contact’s last name |
| Type* | Select the contact type: • Lead• Customer• Guest |
| Email* | Provide a valid email address |
| Phone* | Enter the contact’s phone number with country code |
Optional Fields
| Field | Description |
|---|---|
| Assigned | Assign the contact to a team or user (e.g., Staff members) |
| Company | Enter the associated company name |
| Website | Provide a website URL if applicable |
Step 3: Fill in Other Details (Optional)
Switch to the Other Details tab to add additional background information:
| Field | Description |
|---|---|
| City | Contact's city |
| State | State or province |
| Country | Country name |
| Zip Code | Postal or ZIP code |
| Address | Street address or location |
| Description | Internal notes or contact background |
Step 4: Save the Contact
- Once all required fields are completed, click the
Addbutton to save. - To discard the form, click
Cancel.
Understanding Contact Types
WhatsMark SaaS supports three types of contacts to help you categorize and manage your interactions effectively:
Contact Type Definitions
| Type | Description | Usage |
|---|---|---|
| Lead | Potential customers who have shown interest in your business | Used for prospecting and nurturing campaigns |
| Customer | Existing clients who have made purchases or established business relationships | Used for customer support, retention, and loyalty programs |
| Guest | Users who have sent messages but haven't been converted to leads or customers yet | Automatically assigned to new message senders |
Guest Type Behavior
Auto-Classification
When someone sends a message to your WhatsApp Business number for the first time, they are automatically stored as a Guest type if the WhatsApp Auto Lead setting is not enabled.
- Default Storage: All new incoming messages from unknown numbers are stored as guests
- Auto Lead Setting: When Auto Lead is enabled, contacts are created as Lead type instead of guests
- Manual Conversion: You can manually convert guests to leads or customers at any time by editing their contact details
- Usage in Automation: Guest contacts can be targeted in:
- Message Bots
- Template Bots
- Campaigns
- Bulk messaging operations
Best Practice
Review your guest contacts regularly and convert promising prospects to leads for better tracking and follow-up workflows.
Notes (Available After Contact Is Created)
Once the contact is successfully added, a Notes tab will become available. You can use this tab to:
- Add follow-up information
- Track conversation history
- Write internal remarks
Important: You must first create the contact before accessing the Notes section.
Notes Section (Only in Edit Mode)
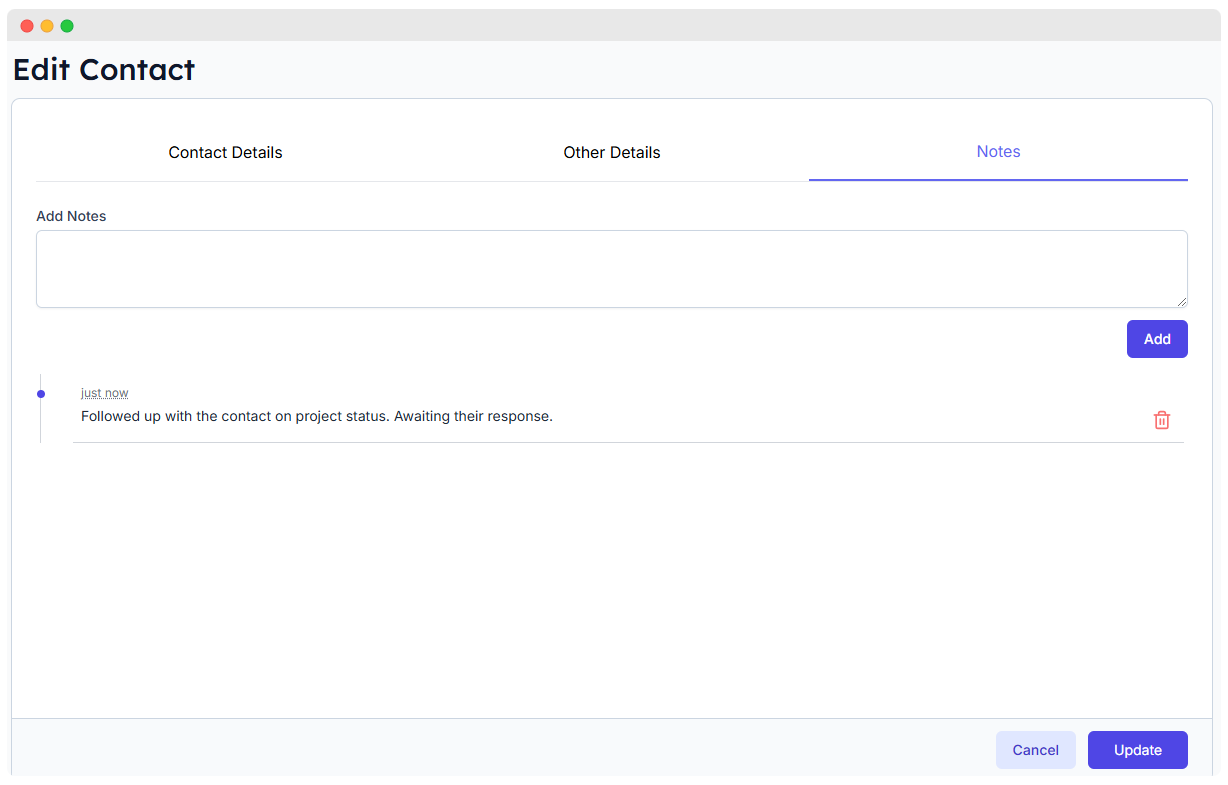
Note: The Notes tab is available only after a contact is created. You cannot add notes during contact creation.
Adding Notes
- Open the contact in Edit mode.
- Navigate to the Notes tab.
- Use the Add Notes input to write comments, updates, or follow-ups.
- Click
Addto save the note.
Notes List
- All previously added notes appear in chronological order.
- Each note shows a timestamp and can be deleted using the trash icon.
2. Export Contacts
Export your contact data for reporting, backup, or external processing.
How to Export
- Click the
Exportbutton located in the top-right area of the contact list view (button may vary depending on layout). - A CSV file will be generated for download.
Export Options
Export All: If no filters are applied, clicking Export will download all contacts in the system.
Export Filtered Results: Apply filters (e.g. by status, type, source) using the filter or search tools, then click Export to download only the filtered list.
File Format
- The export file is in CSV (Comma-Separated Values) format.
- Each row represents a contact, and columns include:
- Name
- Phone
- Type
- Source
- Status
- Assigned
- Created At
- Active Status
- ...and any other visible/custom fields.
Tip: Open the CSV file with Excel, Google Sheets, or any spreadsheet software for easy viewing and analysis.
3. Filtering Contacts

Use filters to quickly find specific contacts based on defined criteria.
How to Use Filters
- Click the Filter icon on the contact list toolbar.
- A set of filter dropdowns will appear below the toolbar.
- Choose from any of the available filter options.
Available Filter Options
You can filter contacts based on the following fields:
Type: Filter by
Lead,Customer, orGuest.Assigned: Filter contacts assigned to a specific user or team.
Status: Options include:
New,In Progress,Contacted,Qualified,Closed.Source: Filter contacts coming from
Facebook,WhatsApp, etc.Created At: Select a specific date or date range to view contacts created within that time.
Additional Tips
- Click
Clear allto remove all applied filters. - Combined filters can help you narrow down contacts to very specific groups.
- Filtering affects what gets exported — only filtered results will be included in the export if filters are active.
4. Import Contacts
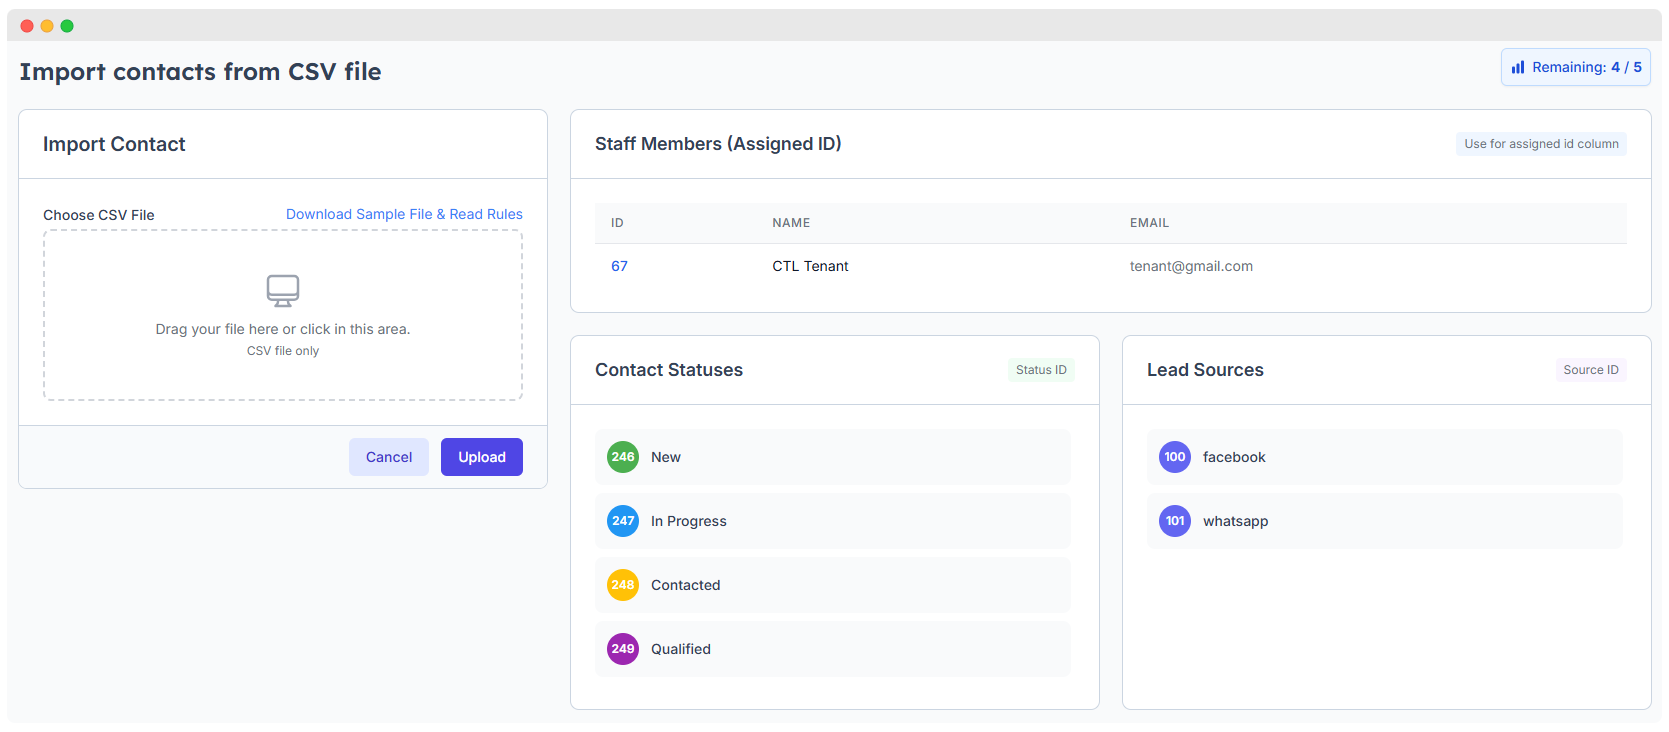
Import multiple contacts at once by uploading a properly formatted CSV file.
Preview
How to Import
- Click the Import button from the main Contacts screen.
- On the Import Contact panel:
- Drag and drop your
.csvfile or click to upload it manually. - Use the Download Sample File link to get a pre-formatted example.
- Drag and drop your
Preparing Your CSV File
Your CSV file must contain valid IDs for certain fields. These IDs can be found on the right-hand side of the import screen:
| Field | Example Value | Description |
|---|---|---|
| Status ID | 131 | e.g., 131 = New, 132 = In Progress |
| Source ID | 54 | e.g., 54 = Facebook, 55 = WhatsApp |
| Assigned ID | 41 | e.g., 41 = Drashti Mehta |
Make sure to insert the correct numeric IDs (not names or labels) in your CSV for:
status_idsource_idassigned_id
Contact Kanban Board
The Contact Kanban Board is a drag-and-drop interface that helps you visually manage the progress of your contacts across different stages. Each contact is represented as a card that you can move between status columns to update their current state.
Key Features
- Drag and drop contacts between status columns
- Instant visual feedback on contact progression
- Automatic status updates upon drop
- Responsive design for desktop and mobile
- Customizable status stages
Status Columns
The board organizes contacts into the following stages:
- Contacted – The contact has been reached out to
- Qualified – The contact meets the desired criteria
- In Progress – Communication or process is ongoing
- In Setup (formerly "In s") – Preparation phase before final closure (optional / customizable)
- Closed – The contact has reached a final state (deal closed, process complete, etc.)
All status labels are fully configurable based on your workflow.
How It Works
- Each contact appears as a draggable card in their current status column.
- Drag a contact card and drop it into another column to change its status.
- The backend updates the contact's status automatically once dropped.
- All changes are reflected in real time.