Connect WABA
This guide will help you connect your WhatsApp Business Account (WABA) to WhatsMarkSaaS using Meta from the webhook configuration stage to full message testing. This screen provides key details related to authentication, phone numbers, messaging capabilities, and account health.
Whether you're a tenant or a customer, this step-by-step guide ensures you can:
- Properly configure your webhook and verify it with Meta
- Connect your Meta App and WhatsMarkSaaS channels
- Test message sending using approved templates
- Troubleshoot and verify your integration
This is ideal for:
- Businesses who already created their Meta WhatsApp App
- SaaS owners using WhatsMark (Multi-Tenant SaaS) as a WhatsApp CRM or marketing platform
- Developers or admins setting up WhatsApp Cloud API inside the WhatsMark system
You’ll only need:
- A Meta App with WhatsApp product enabled
- A verified business and phone number
- Access to your WhatsMarkSaaS Admin Panel
Let’s start from the webhook configuration and go all the way to message testing and FAQs.
WhatsApp Integration Setup
To complete your integration with WhatsMarkSaaS, you must provide two essential credentials obtained from your Meta Developer account:
- WhatsApp Business Account (WABA) ID
- Permanent Access Token
For ID and Access Token
You need two essential credentials obtained from your Meta Developer account and for that you have to follow the steps:
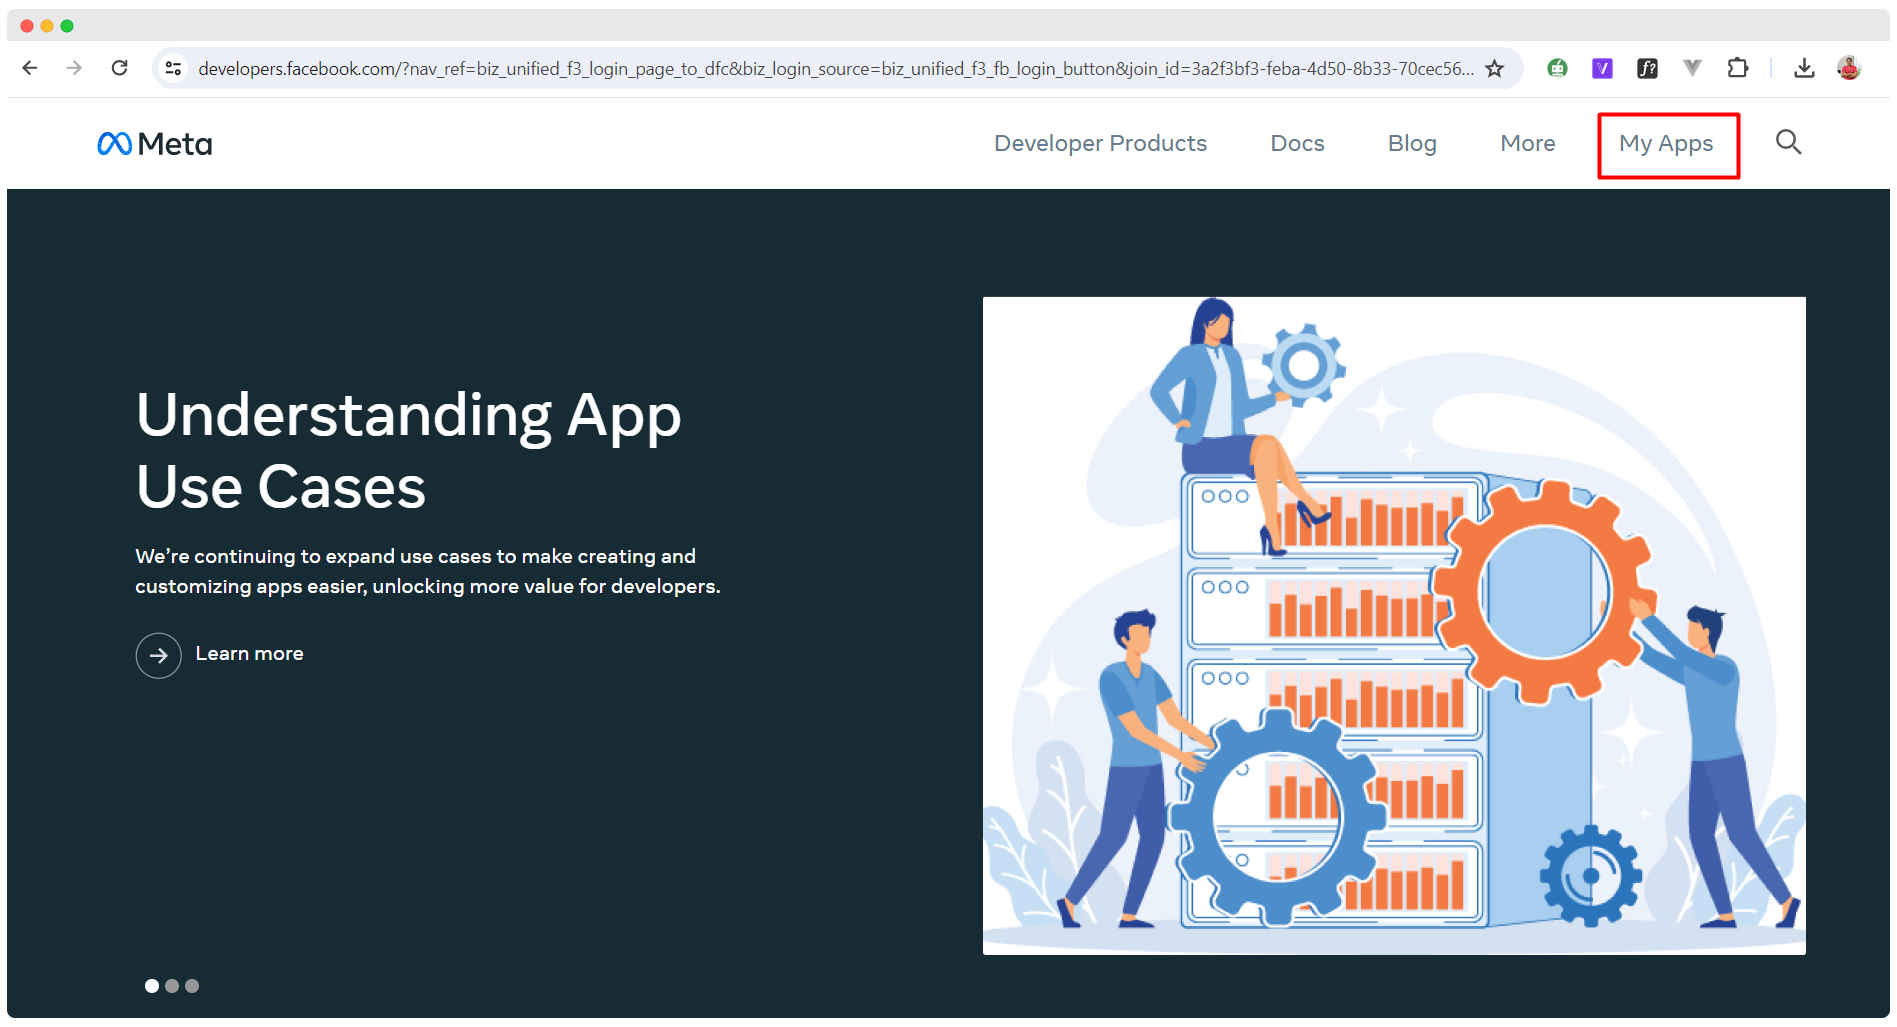
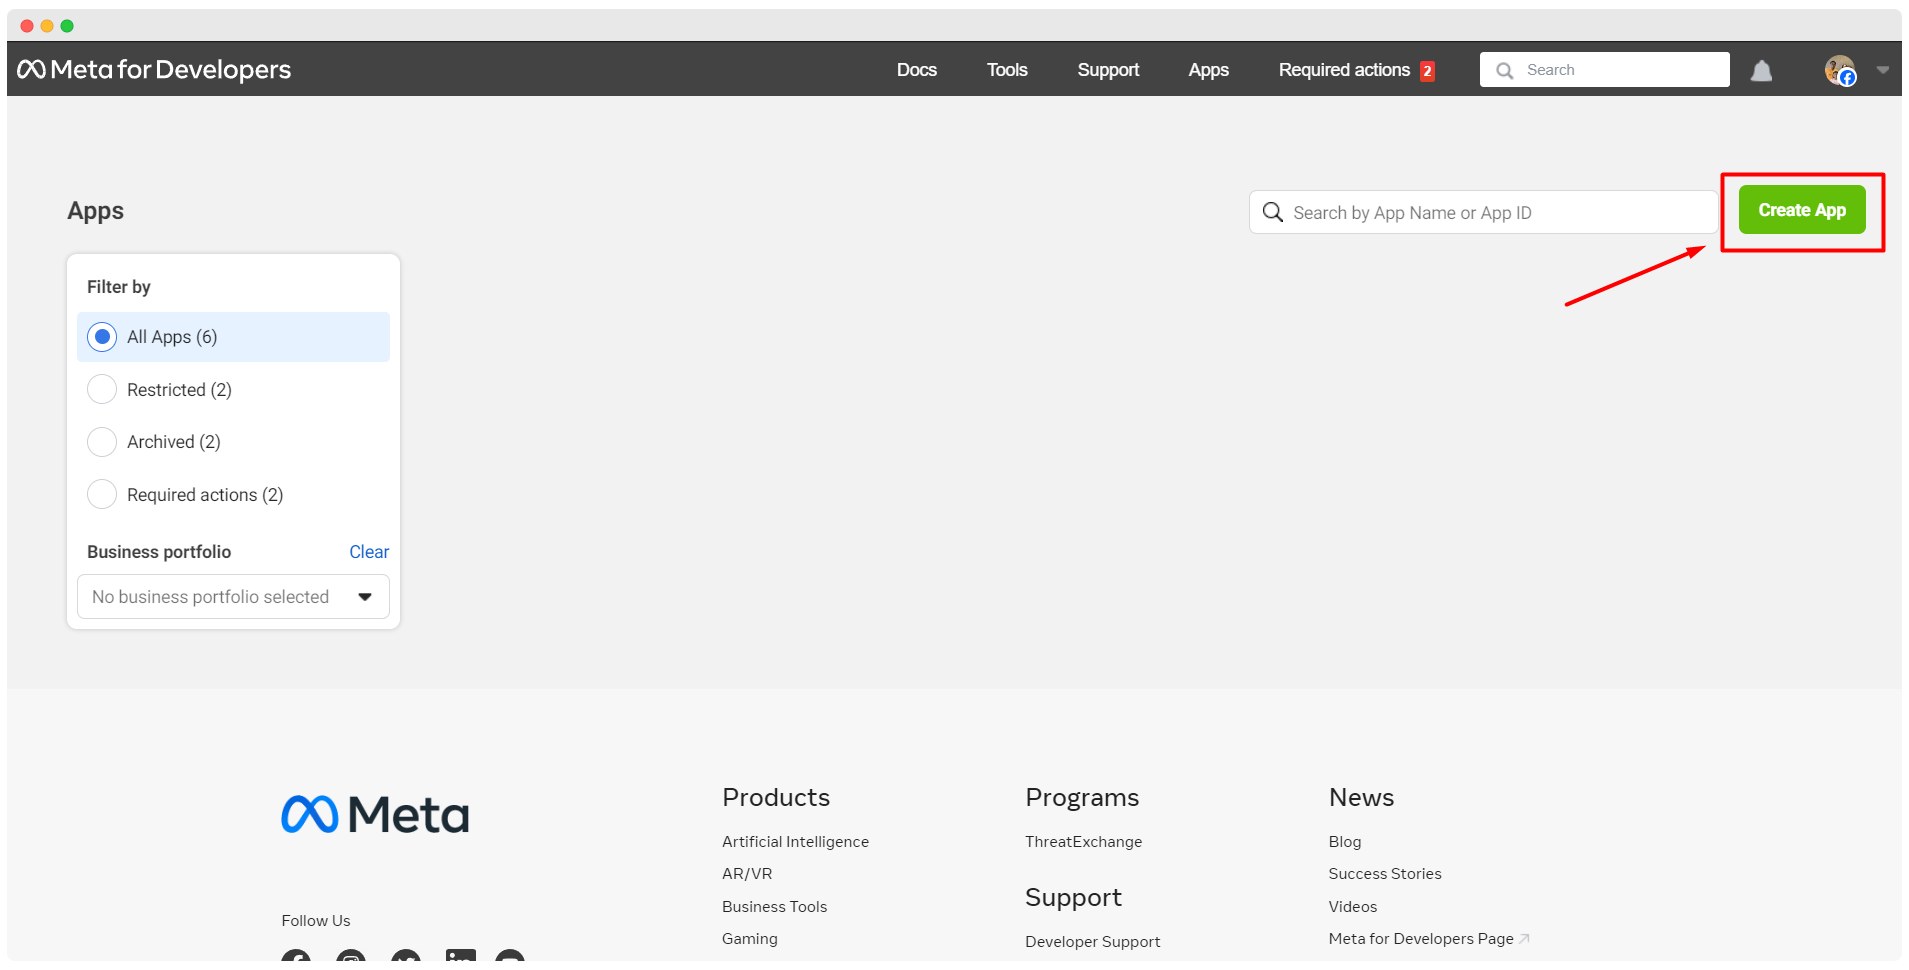
The first step in creating a WhatsApp bot is to link it to our module. Additionally, you must create a WhatsApp Cloud API in order to link your bot. Visit Facebook for Developers to start a new app, then select the page's "My Apps" tab.
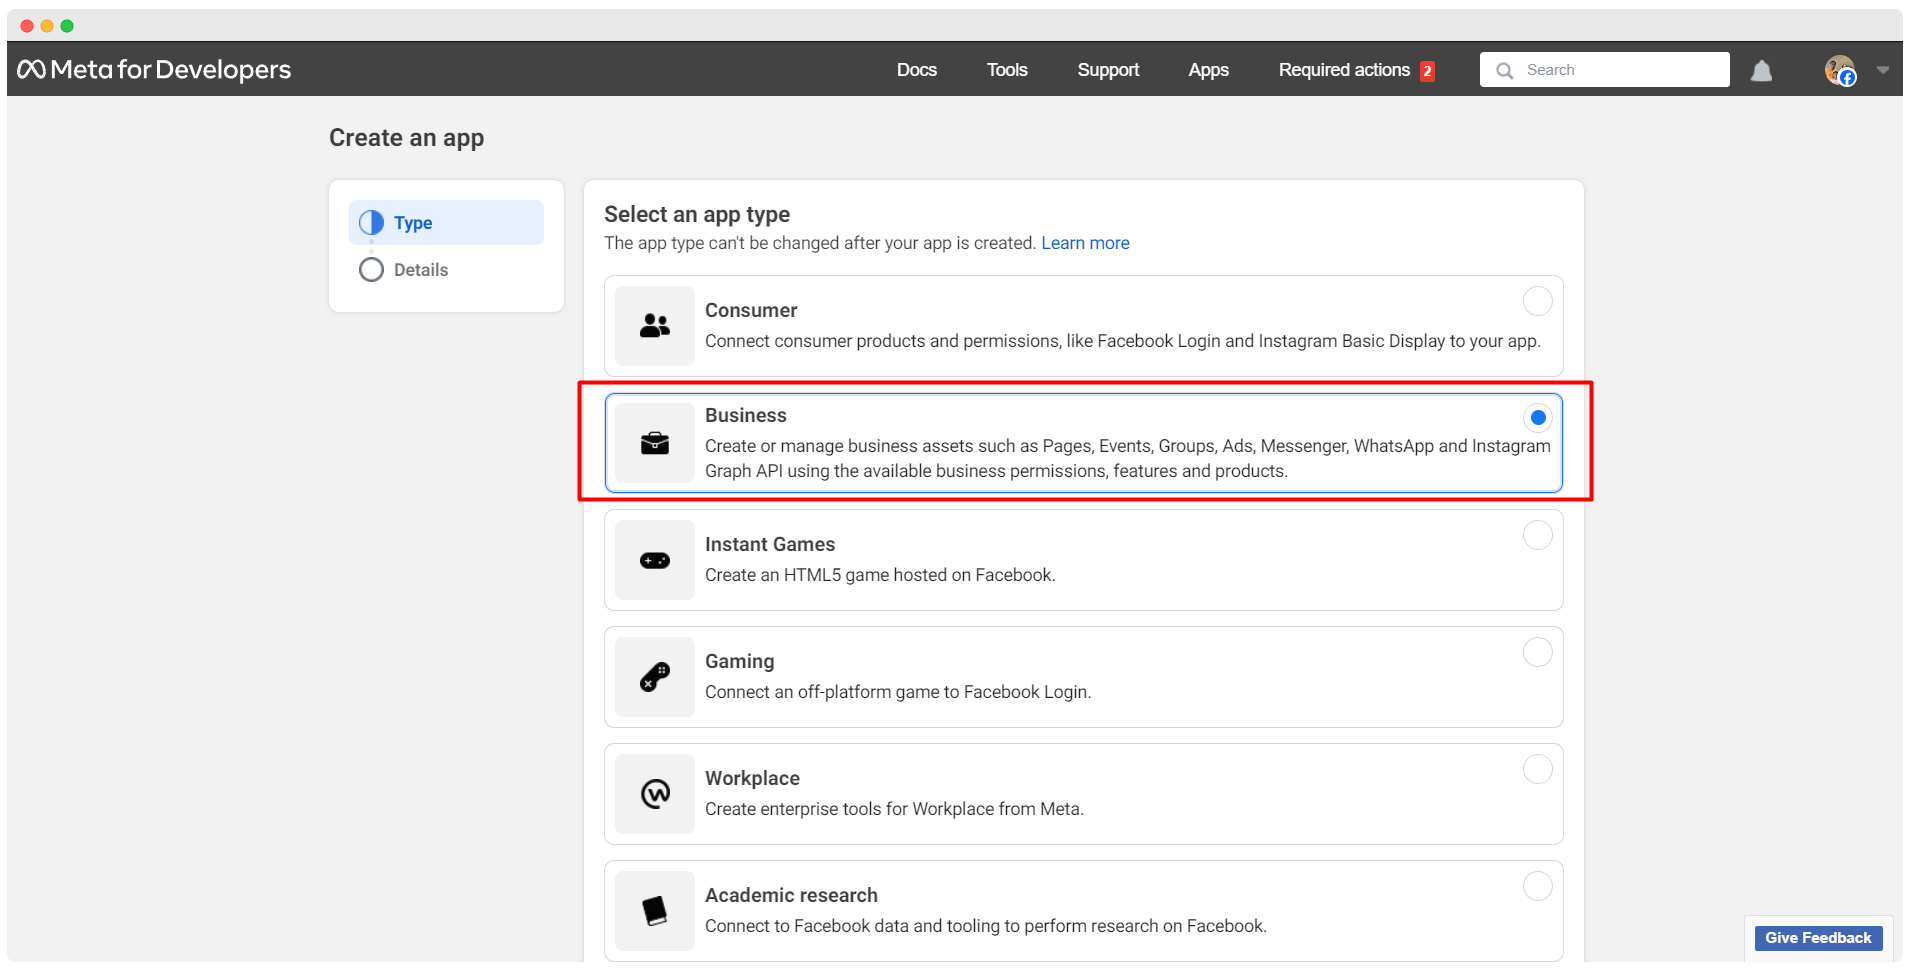
A page named "Create an App" with a list of available app types will appear instantly.
Select "Business" as the application type, then press the next button.
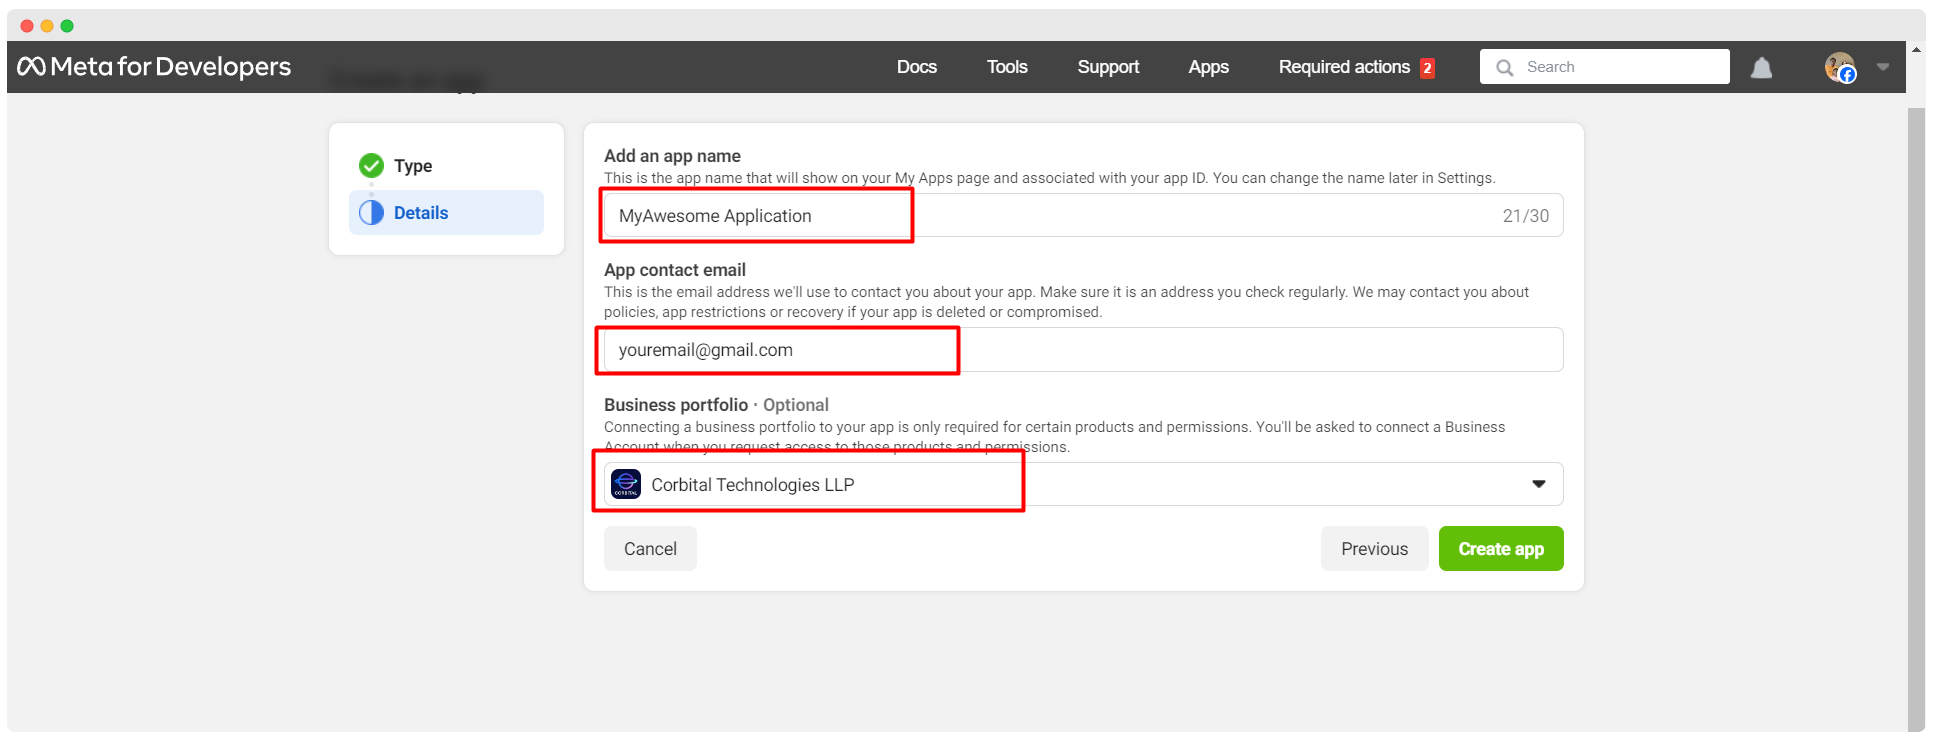
Complete the form by entering your basic details:
- Display Name: Provide a display name for your business account.
- App Contact Email: Enter an email address.
- Business Account: Choose a Business account if needed (optional).
Click the "Create App" button.
You will need to enter your Facebook password again in the password area. Click the submit button after entering your password. The product page will load instantly.
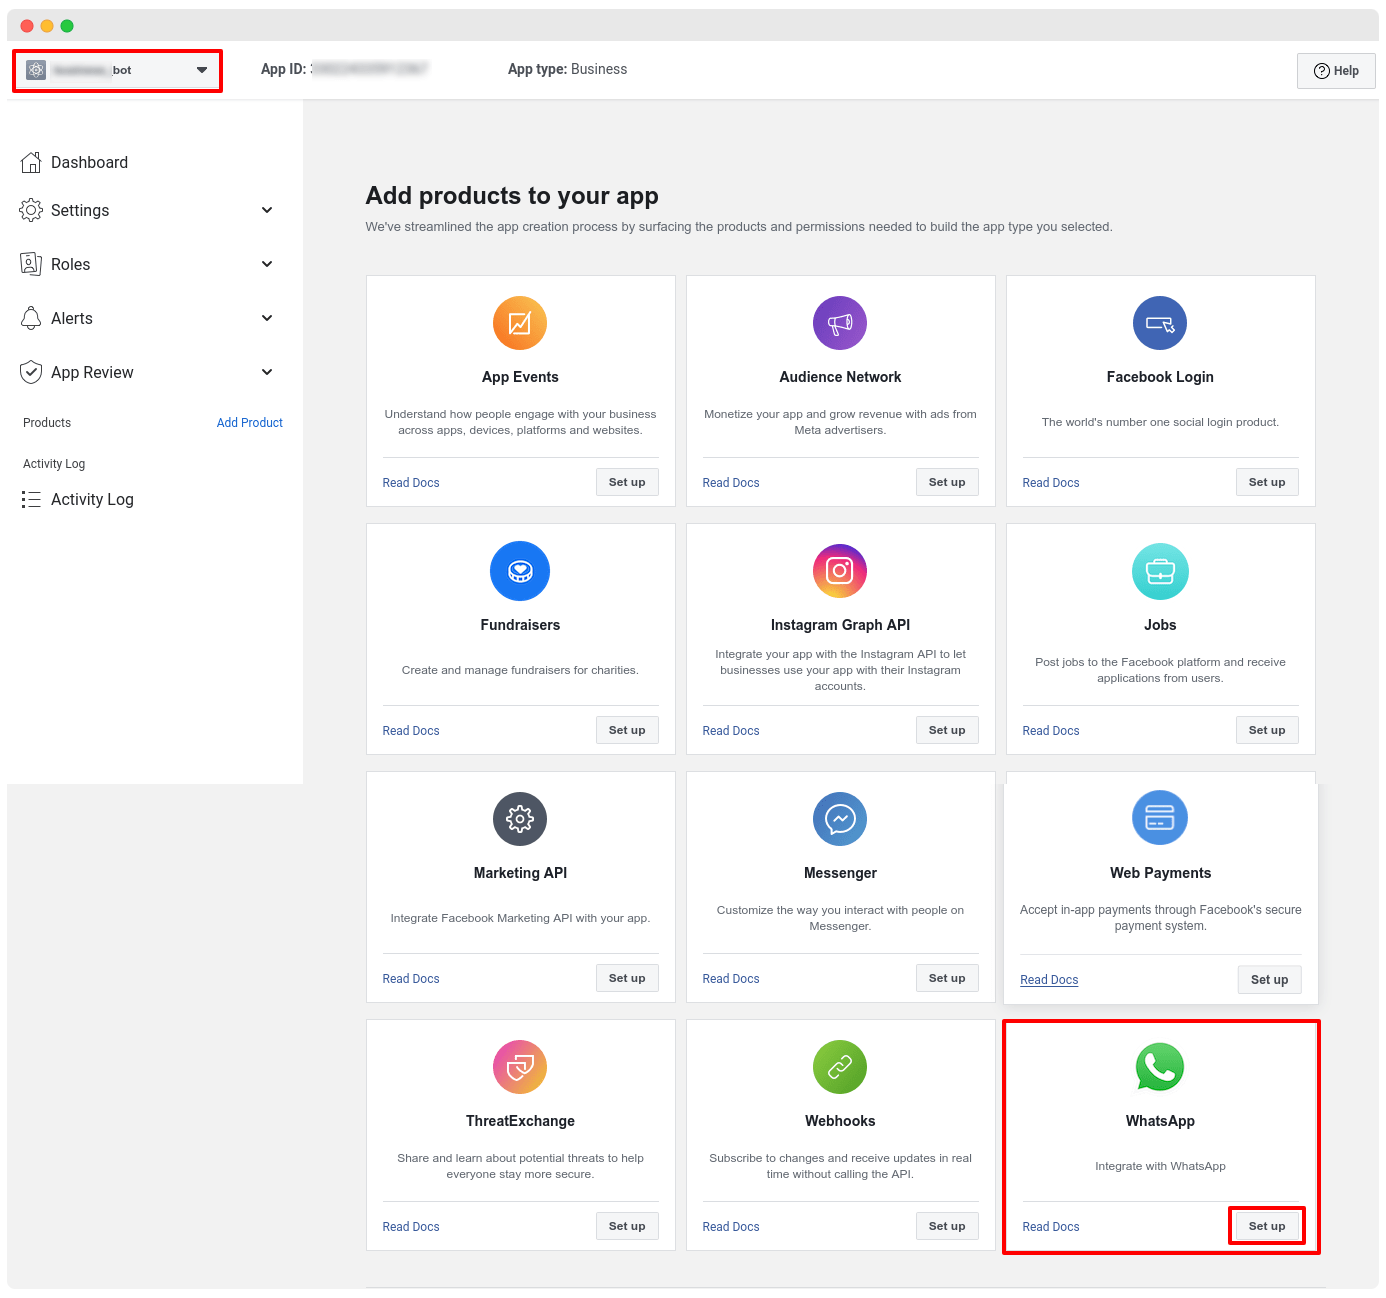
You must add a product to the app using the page. Include WhatsApp since you will be developing one for a business account on WhatsApp. Scroll down to find the WhatsApp section and click the "Set up" button.
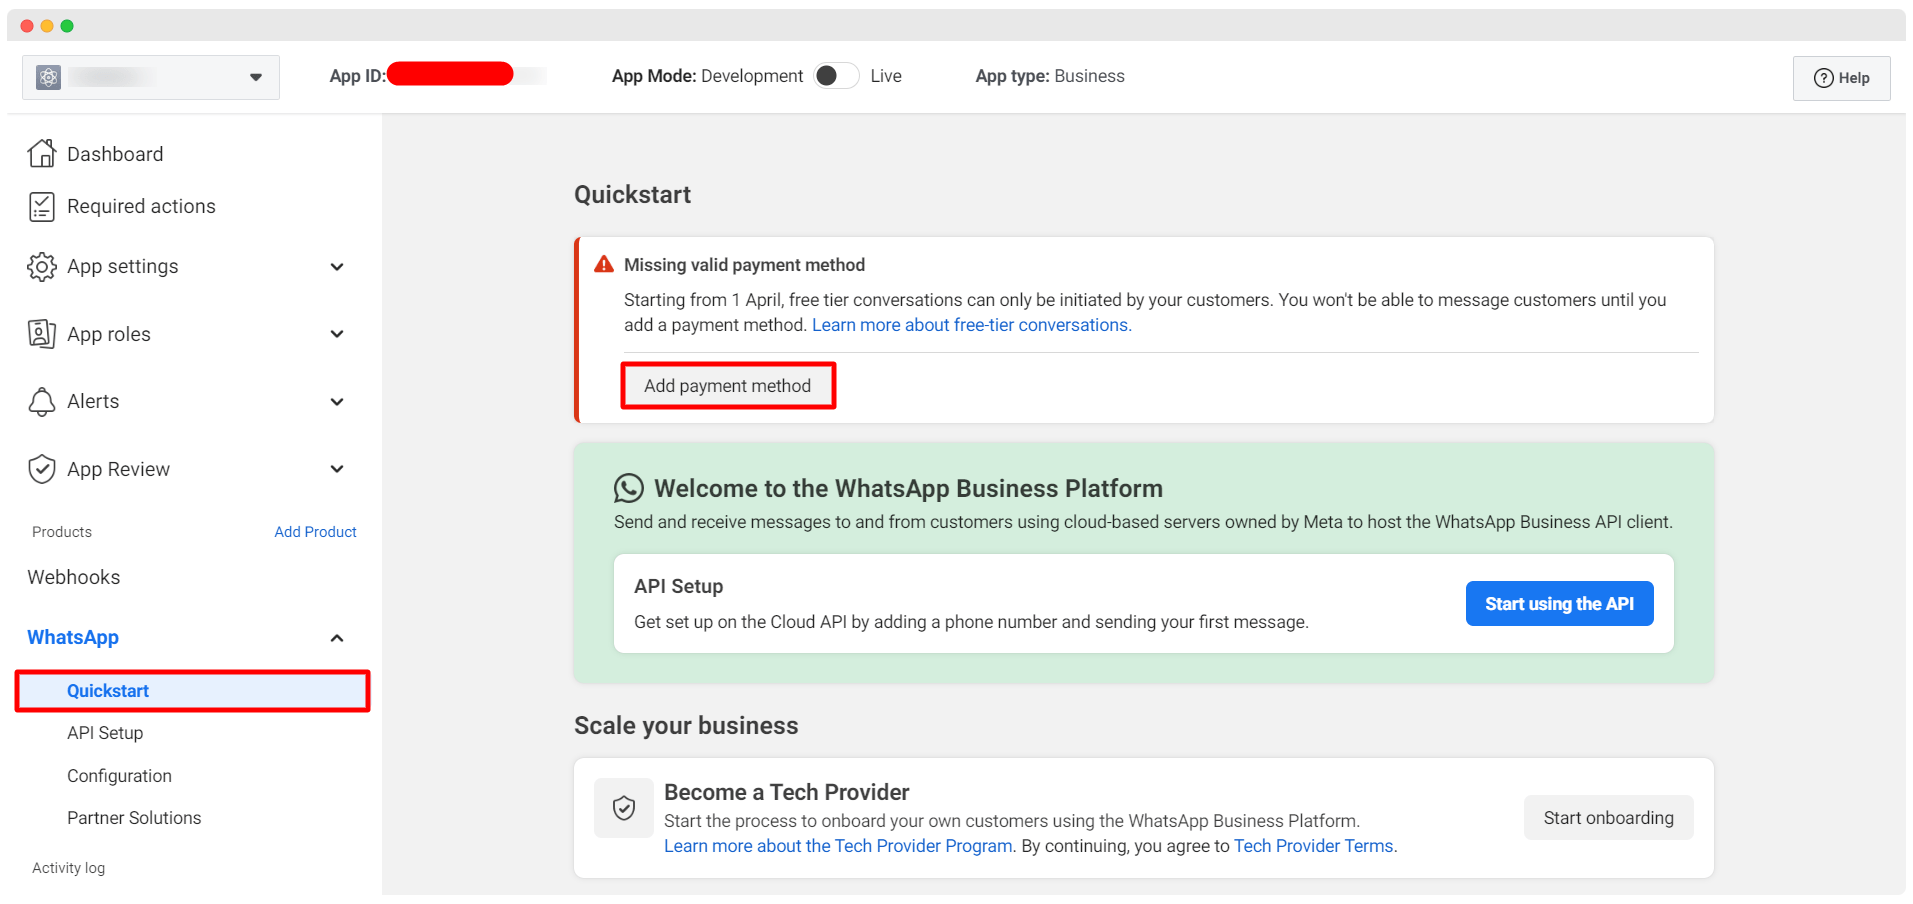
A page will appear for the next steps. You can add a payment method here, but it can be added later.
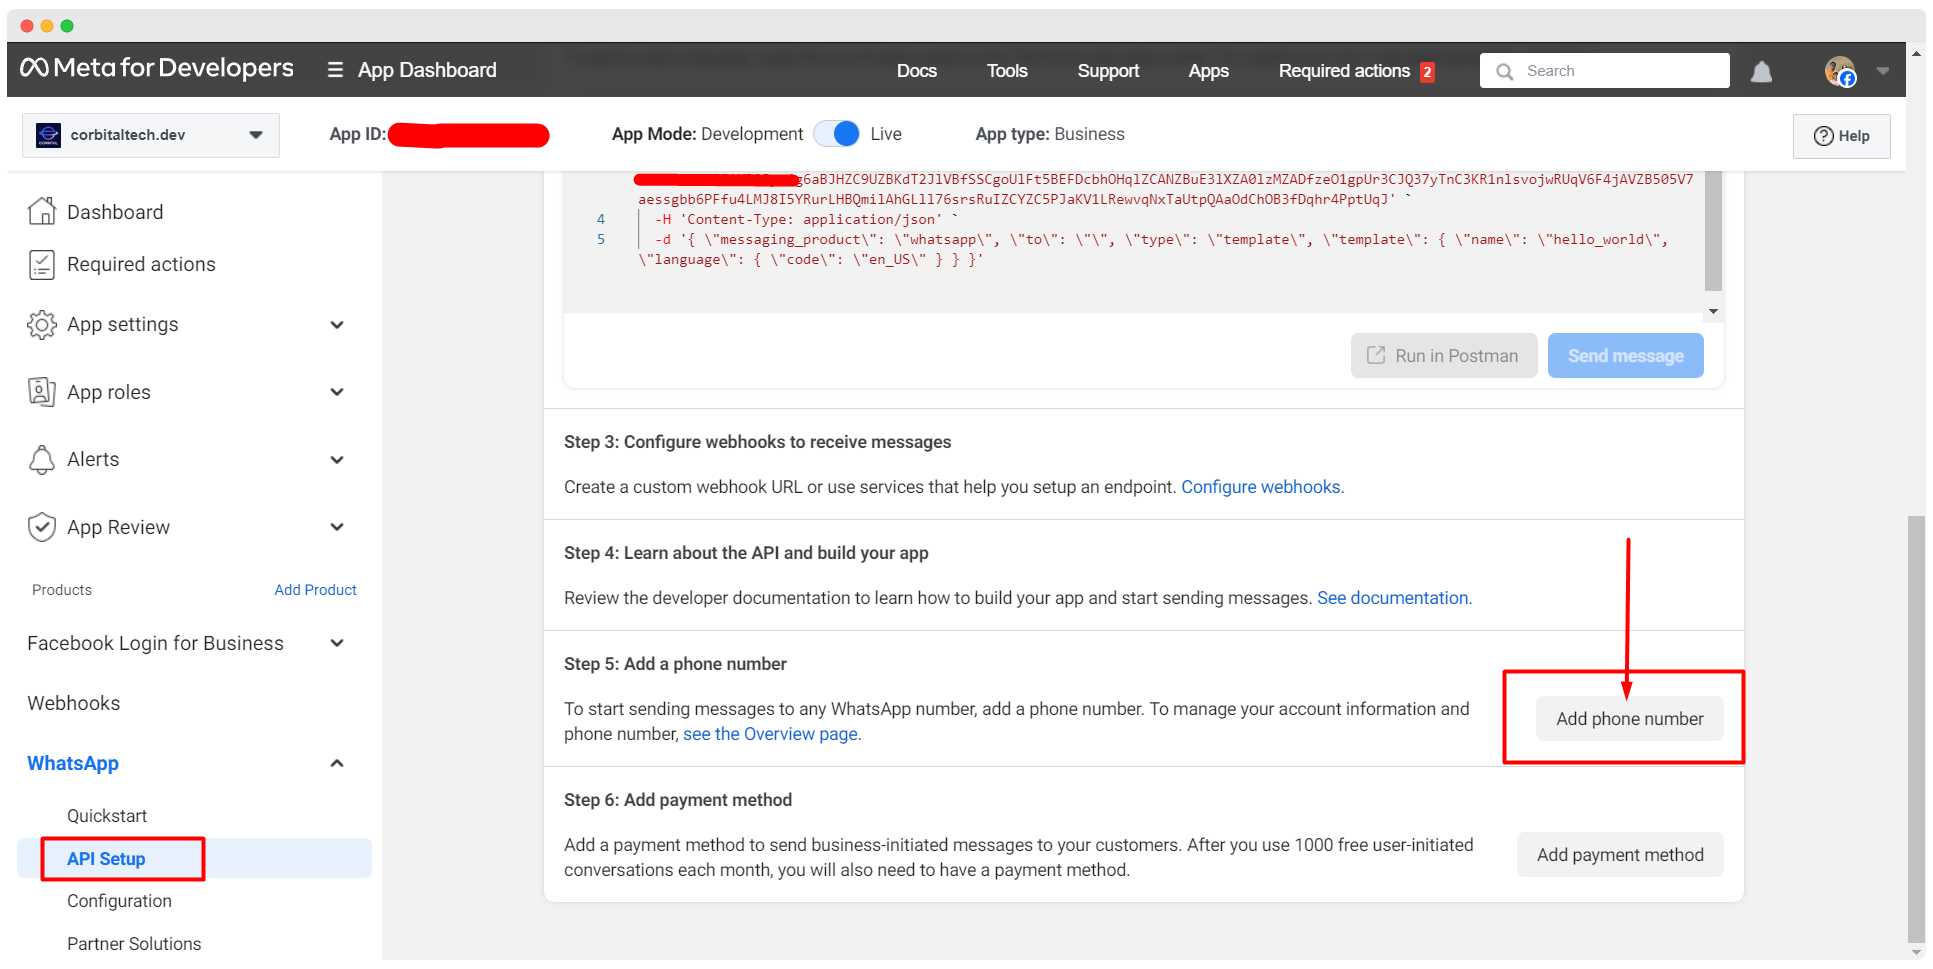
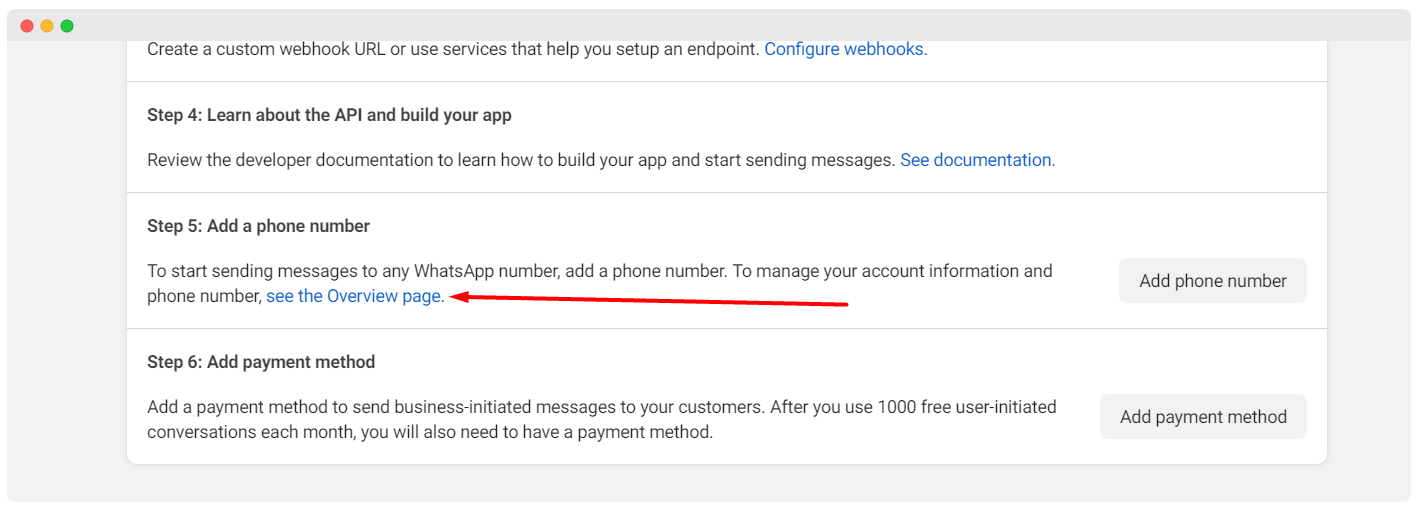
Add Phone Number
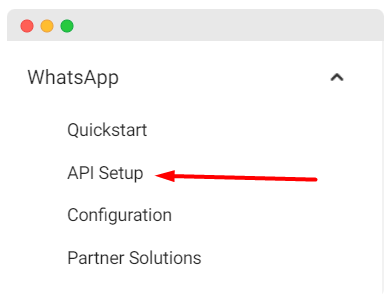
Go to API setup from the left menu and click on the “Add phone number” button to add the phone number for WhatsApp Cloud API.
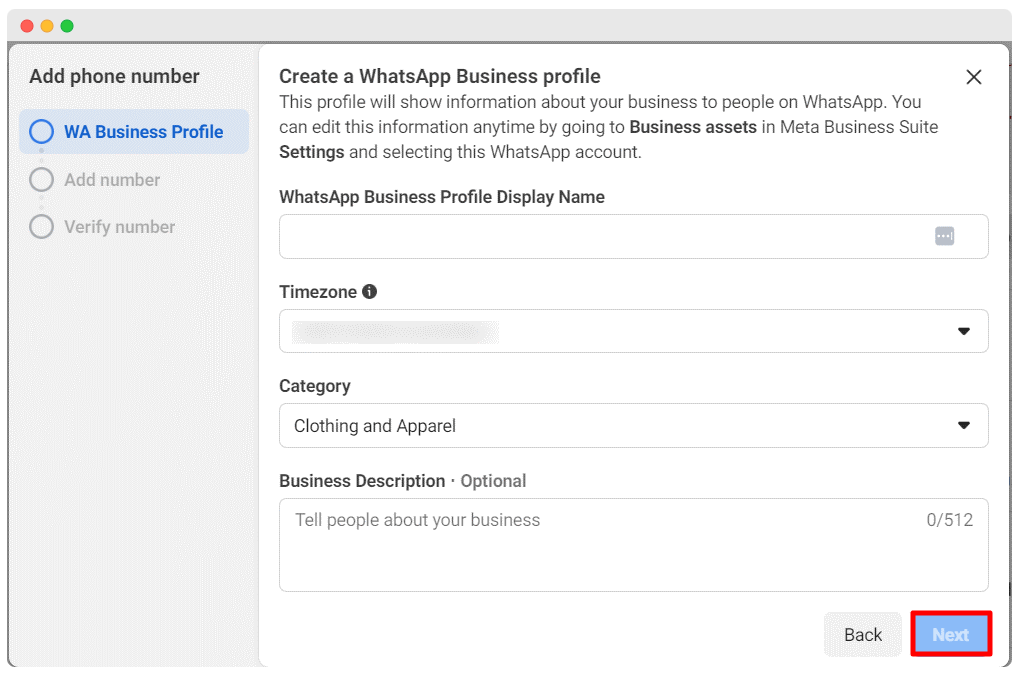
A modal form will appear. Provide profile information visible to people on WhatsApp:
- WhatsApp Business Profile Display Name: Enter a display name.
- Timezone: Select a timezone.
- Category: Choose a category from the dropdown list.
- Business Description: This field is optional.
Click the next button.
Enter your phone number and choose how you would like to verify it—via text message or phone call.
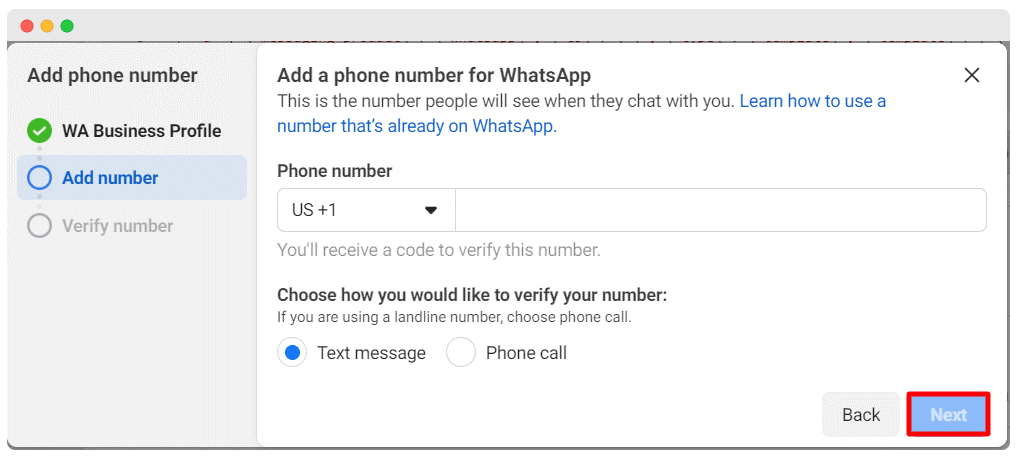
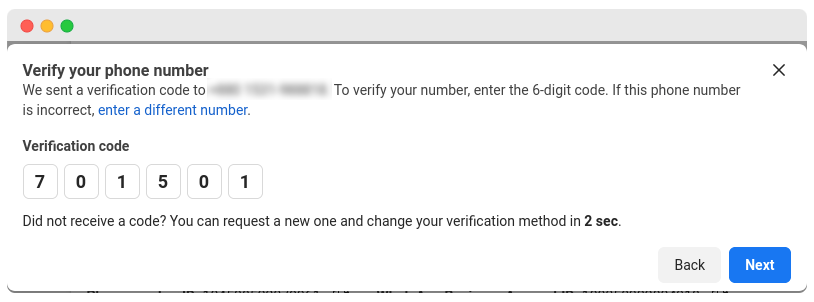
After providing your phone number and selecting the verification option, click the next button. Verify your phone number.
click the “Save changes” button.
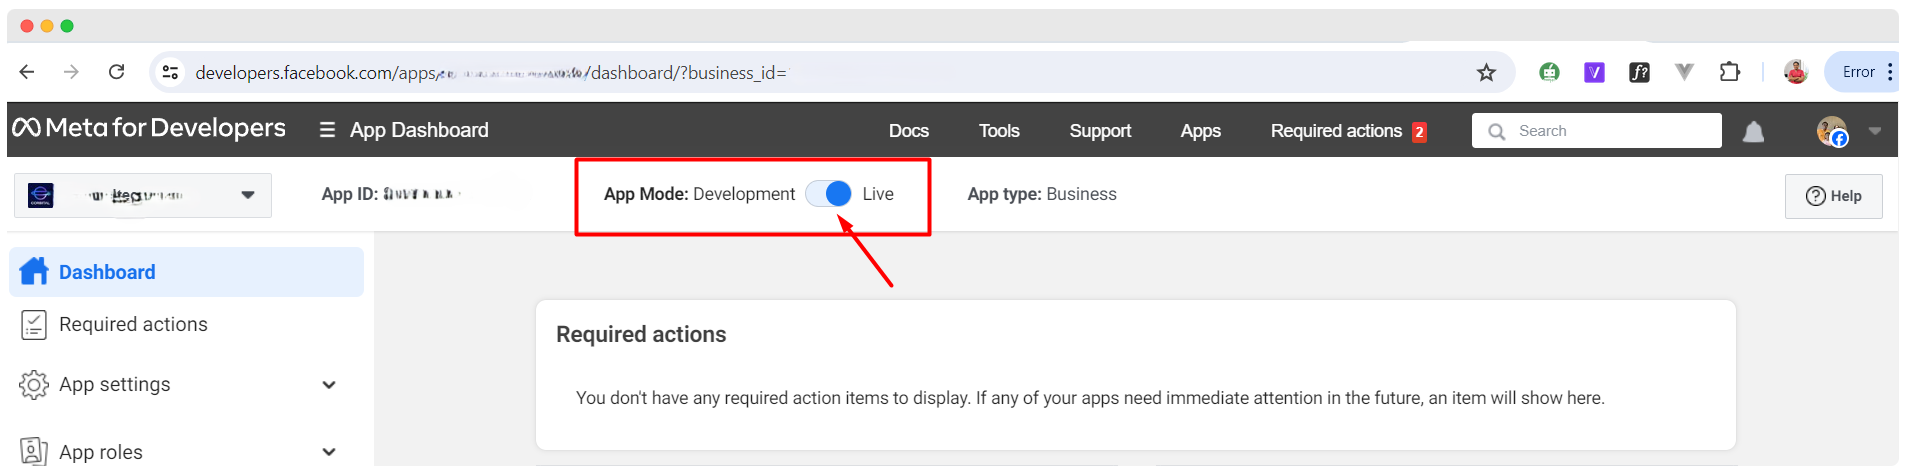
Enable live mode by clicking on the toggle button.
Return to the API Setup page by clicking on the API Setup menu on the left sidebar.
Collect Access Token
Collect a permanent access token to connect your bot. In step 5, click the "See the overview page" button.
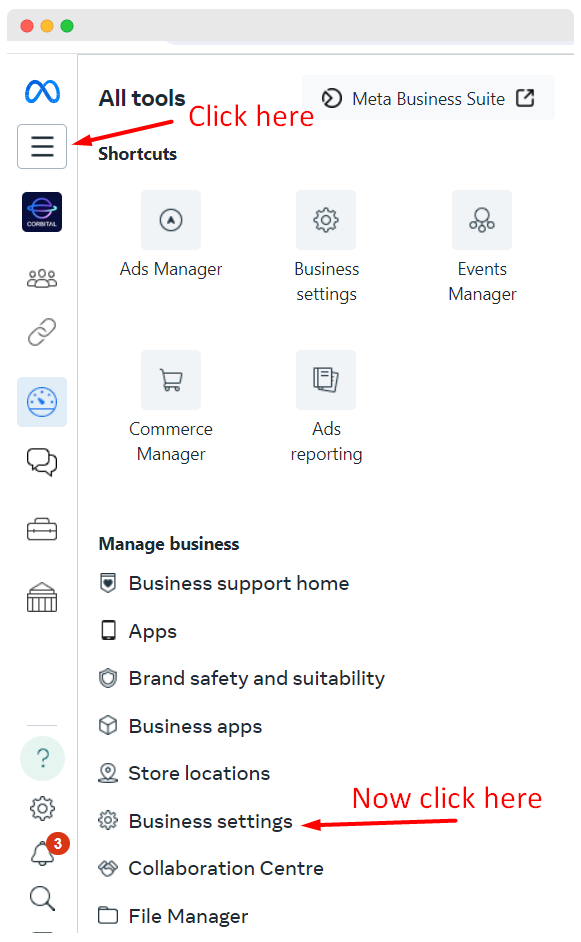
You will be directed to the business Facebook site's summary page. Select the Business Settings from the menu on the overview page.
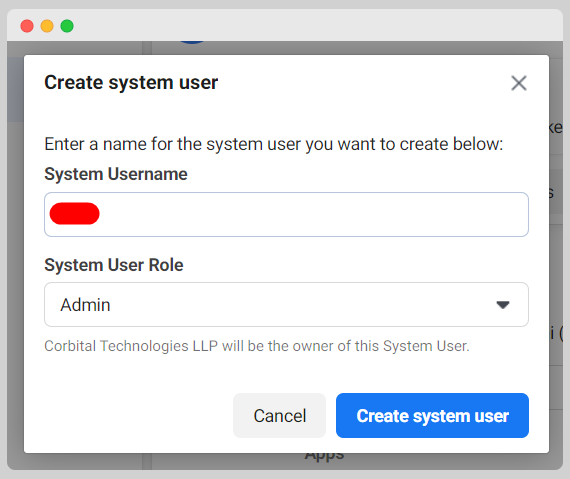
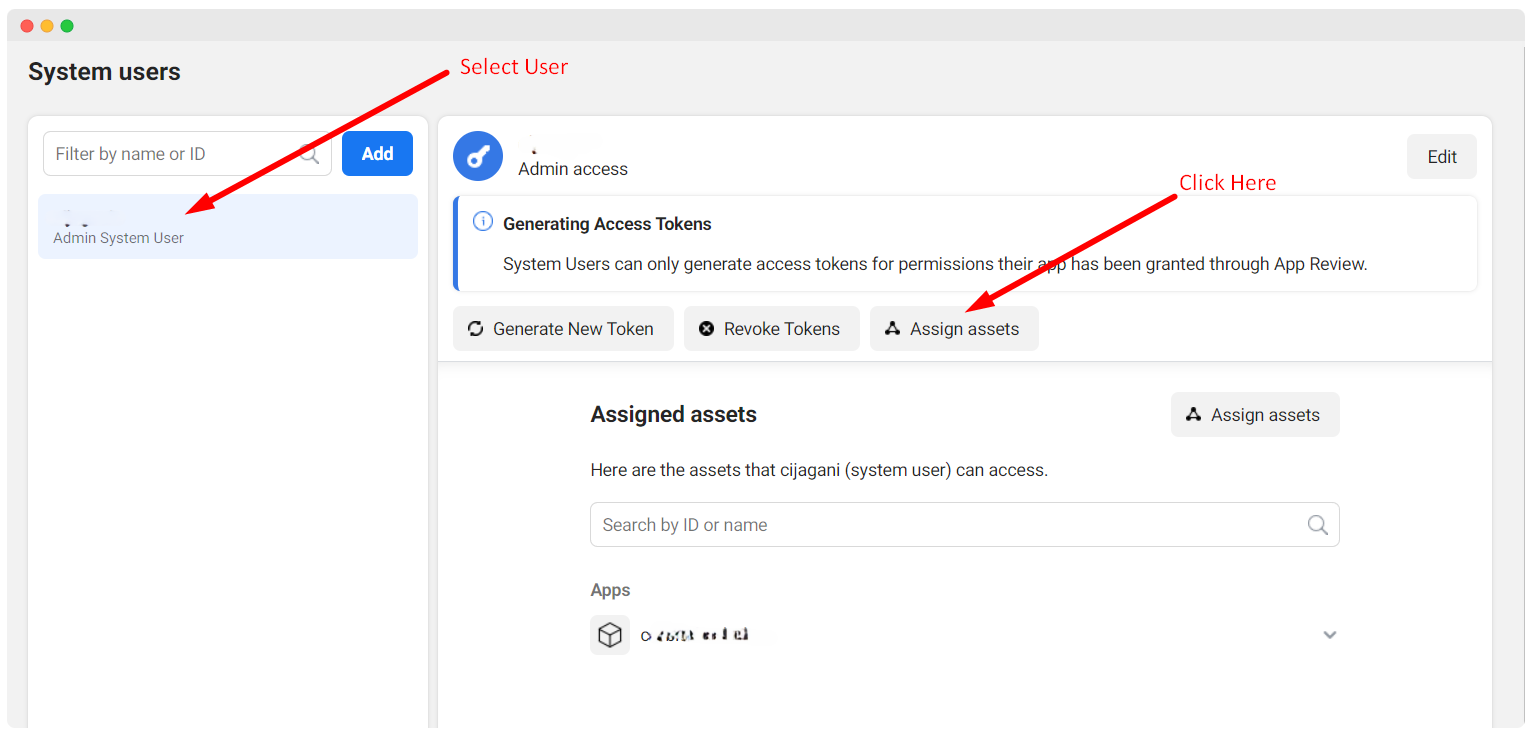
Create a user by selecting System user in the left sidebar of the business setting page. Click on the add button.
Enter the system user name and choose a role (employee or admin). Click the button to create a system user.
After creating a user, add assets by selecting the user and clicking on the Add Assets button.
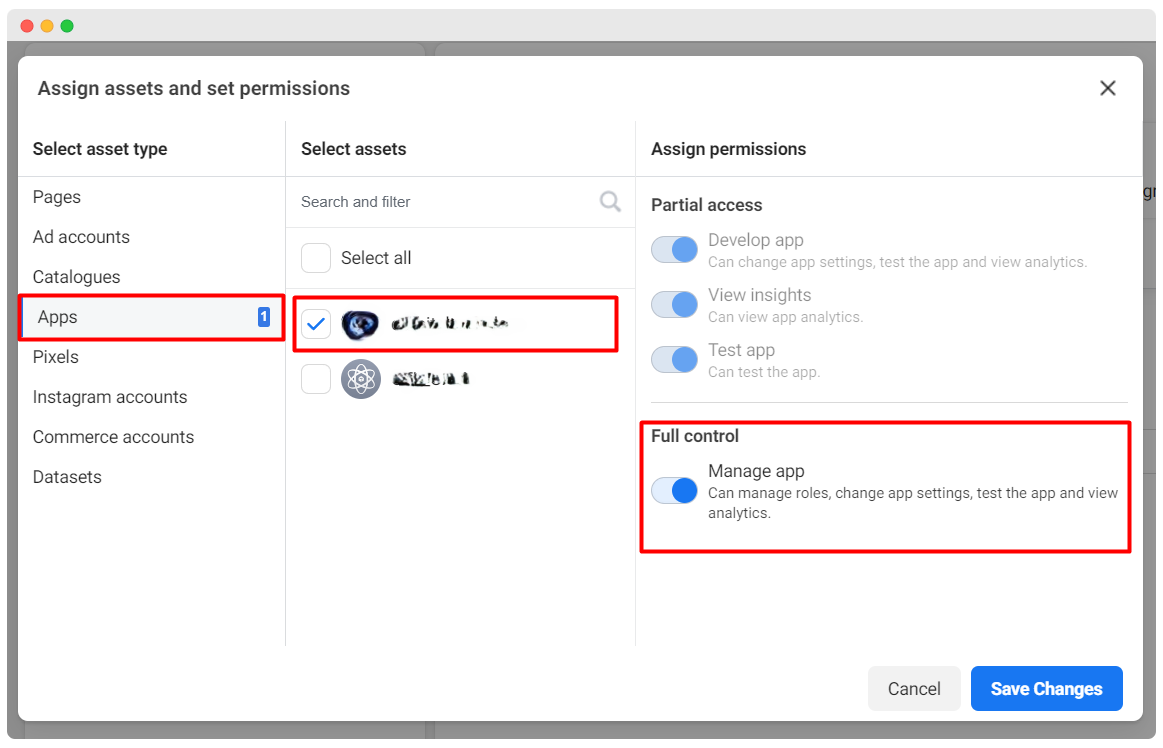
Select the Apps menu from the Select asset type section of the modal. Choose the app and give full control permission. Click the "Save changes" button.
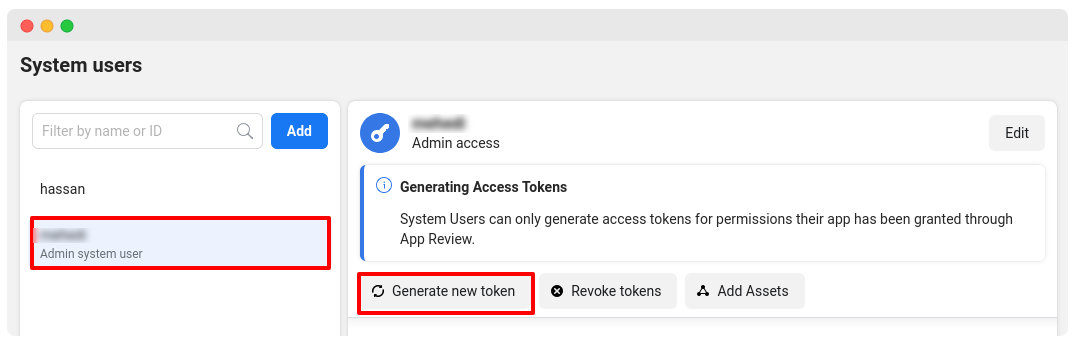
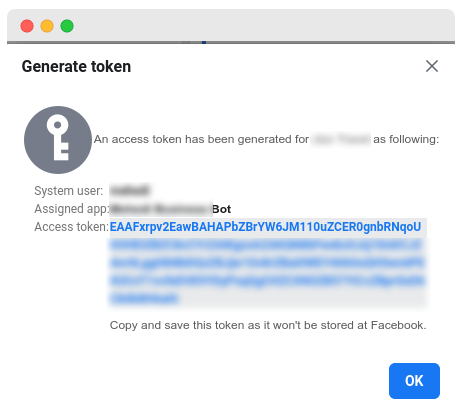
Generate an access token by clicking on the Generate new token button.
Select the app from the drop-down list in the modal. Choose permissions: Business management, Catalog management, WhatsApp business messaging, and WhatsApp business management. Click the Generate token button.
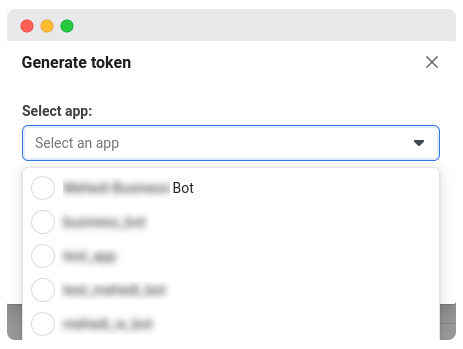
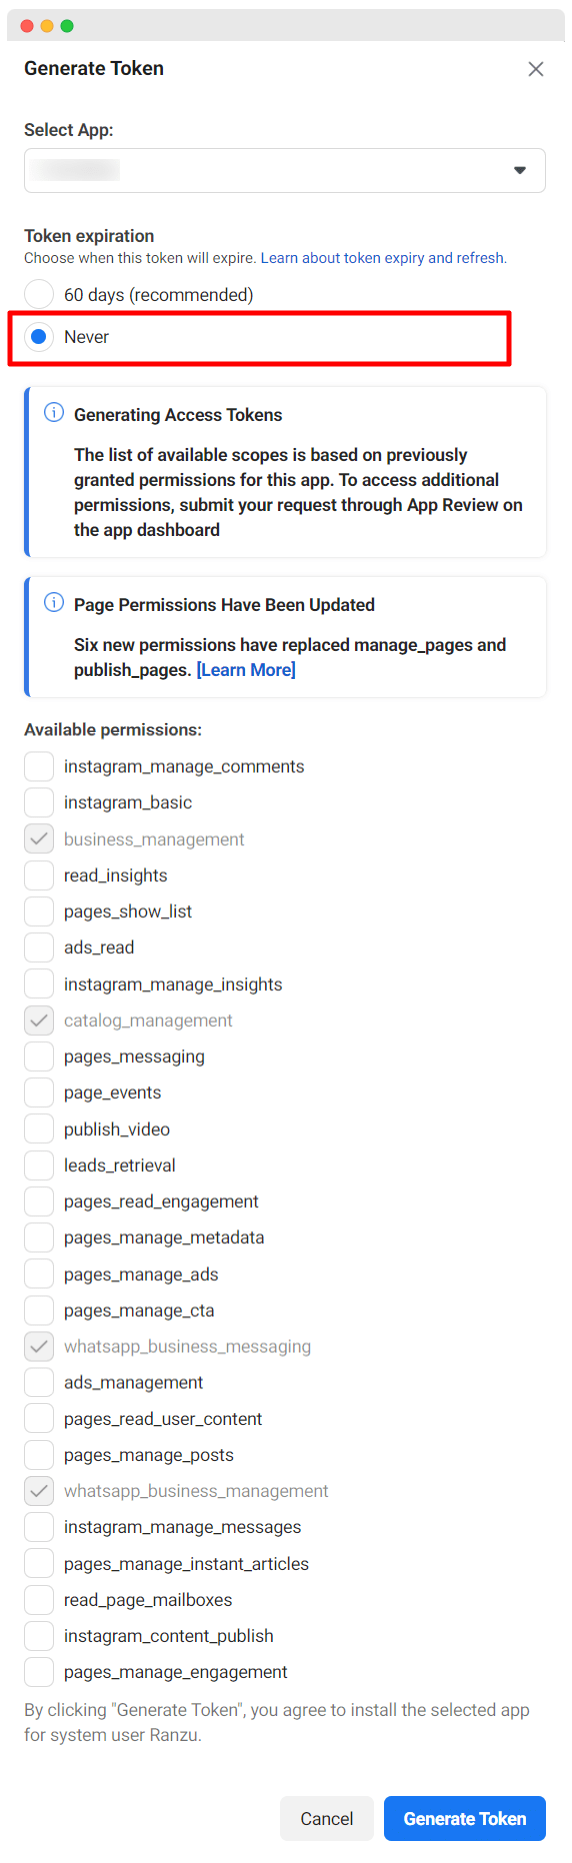
Copy and save the access token.
Proceed to the dashboard. Click the connect WhatsApp menu in the left sidebar's WhatsApp area. Enter the access token and WhatsApp business account ID.
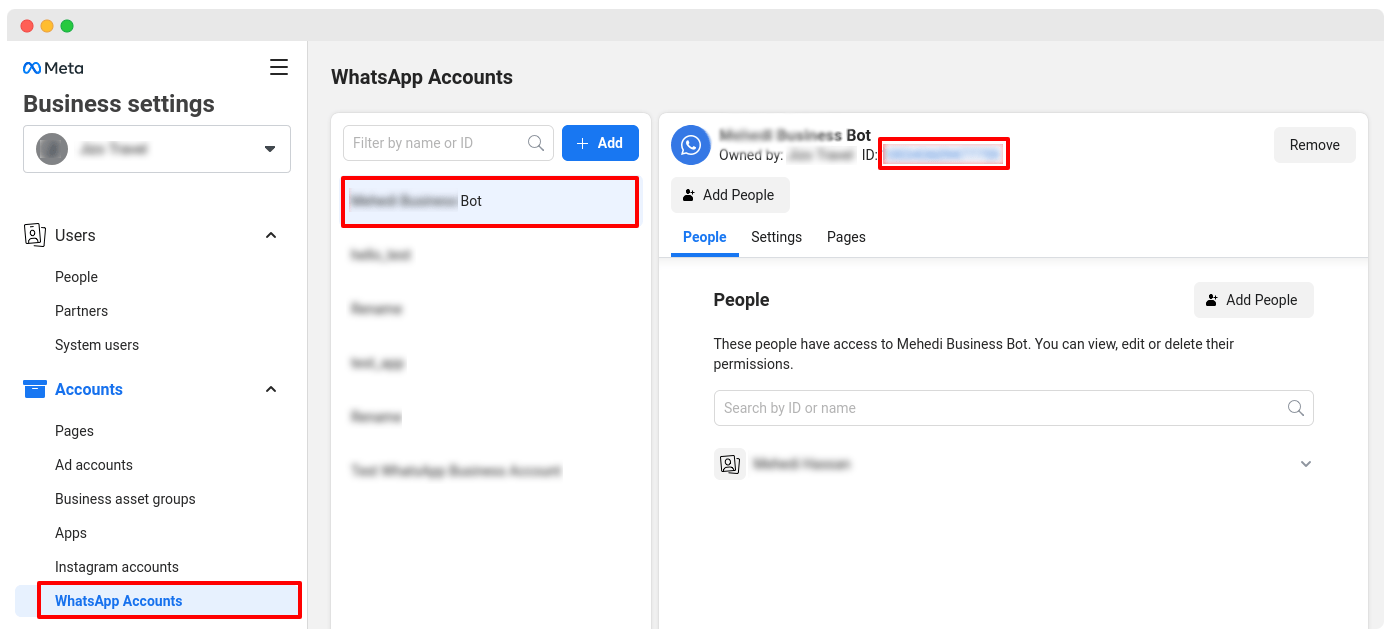
Go to the Business settings tab to obtain the WhatsApp Business Account ID. Select the WhatsApp account menu in the left sidebar. Copy the WhatsApp Business Account ID.
Watch the Tutorial how to find App ID and App secret
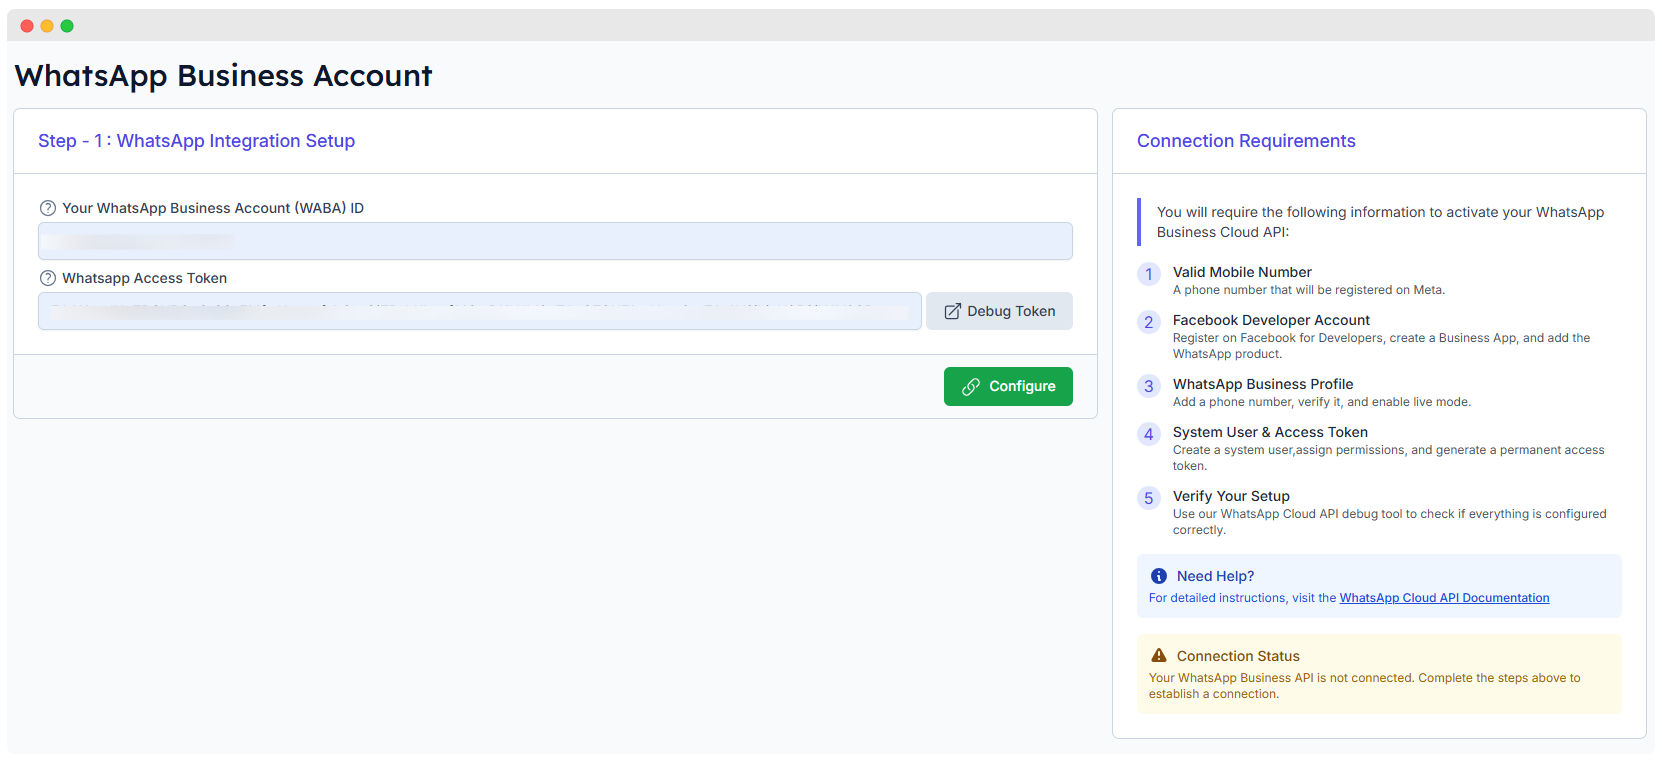
Enter the WhatsApp business account ID and access token, then click the Connect button.
After Successful connection a success message will appear.
You can also debug your access token by clicking Debug Token. After entering details, click on Configure to finalize the setup.
Connection Requirements
To activate your WhatsApp Business Cloud API, follow the steps given below:
- Mobile Number – Registered phone number on Meta.
- Facebook Developer Account – Business app with the WhatsApp product added.
- WhatsApp Business Profile – Verified phone number with live mode enabled.
- System User & Access Token – Create a system user, assign permissions, and generate a permanent token.
- Verify Your Setup – Use WhatsApp Cloud API debug tools to check the configuration
- After connecting using the above screen, you will able to see the following screen.
WhatsApp Business API Integration - Connect WABA
- Click on icon to take screenshot of your configure page.
- It helps you to check your server application and configuration.
1. Access Token Information
- A unique token (partially visible) used to authenticate API calls to WhatsApp.
- A Copy button allows users to quickly copy the token.
- Permission Scopes: Defines the level of access granted, including:
catalog_management– Manages WhatsApp product catalogs.business_management– Allows managing business settings.whatsapp_business_management– Controls WhatsApp business account settings.public_profile– Grants access to public profile details.
- Issued At: Shows the exact date and time when the access token was generated.
- Expiry: Indicates when the token will expire. If it’s marked as N/A, implying no fixed expiration.
- Webhook URL:
- The webhook URL is provided for receiving WhatsApp events (e.g., message delivery, status updates).
- Users can copy this URL for external integrations.
2. Phone Information
- This section displays the default registered phone number for the WhatsApp Business Account.
- Display Phone Number: It displays phone number.
- Verified Business Name: shows the officially verified name.
- Phone Number ID: WhatsApp’s internal identifier for this phone number.
- Quality Indicator:
- Status: GREEN – Indicates good message delivery with WhatsApp policies.
- Message Limit:
- Shows how many messages can be sent per day.
- Status: EXPIRED
- Manage Phone Numbers Button: Allows users to modify linked phone numbers.
3. WhatsApp Business Account (WABA) Health & Status
- This section provides an overview of account health and message-sending capabilities.
- Overall Health:
- Last checked: Monday, 3rd March 2025, 10:11 AM.
- WhatsApp Business ID: 315064115026195.
- Status: AVAILABLE (indicating no major issues).
- Message-Sending Capability:
- Three different identifiers are displayed, each marked as AVAILABLE, meaning they can send messages:
- Refresh Health Status Button:
- Users can manually check the current account health by clicking this button.
4. Sending Test Messages
- This section allows users to send a test WhatsApp message to any phone number to verify the integration.
- Input Field: Enter a phone number with the country code.
- Send Message Button: Sends a test message to the specified number.
5. Webhook Verification
- Webhooks are used to receive real-time updates from WhatsApp.
- Verify Webhook Button: Ensures the webhook is correctly set up and active.
6. QR Code for WhatsApp Chat
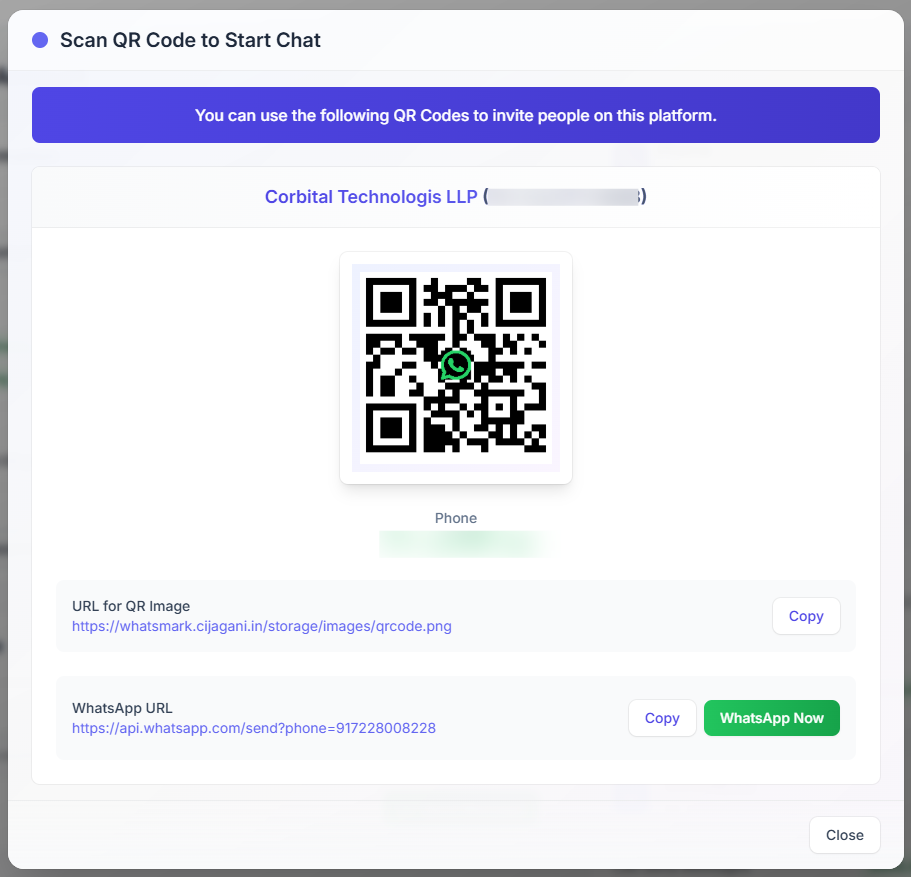
QR Code: Scan qr code to start a chat with Corbital Technologies.
- A Copy button is available to copy the URL easily.
WhatsApp URL:
- A WhatsApp Now button is used to quick access to the chat.
Next Steps
After connect accout with WABA, proceed to System Settings to configure other essential platform settings.