Support Tickets
Introduction
- Establishes a direct line of communication with the support team
- Enables organized tracking of all tenant-reported issues
- Improves efficiency in handling and resolving problems
Location: Tenant Dashboard → Support Tickets
Accessing Support System
Navigation Path
- Login to the Tenant Dashboard
- Go to Support → Tickets
- View all your existing tickets or click on Create Ticket to open a new one
Ticket Overview Dashboard

The dashboard provides a quick overview of your ticket statuses:
Total Tickets: Total number of support tickets created (All time)
Open: Tickets currently active and awaiting response or resolution
Answered: Tickets that have received a reply from the support team
Closed: Tickets that have been resolved and marked as completed
High Priority: Tickets flagged as urgent that require immediate attention
Tip: Use the "Create Ticket" button on the top right to raise a new request anytime!
Managing Support Tickets
Viewing All Tickets

Location: Support → All Tickets
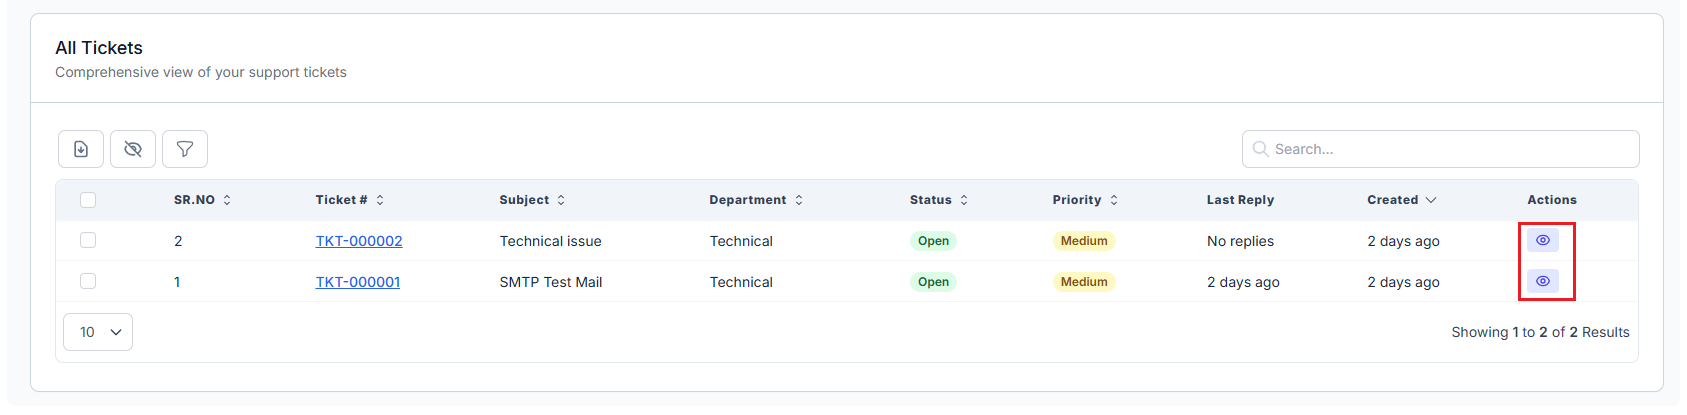
This section displays a comprehensive table of all support tickets submitted by the tenant. It provides detailed tracking and filtering to help users easily manage and follow up on open or past support cases.
Available Information in the Ticket Table:
| Column | Description |
|---|---|
| SR.NO | Sequential number of the ticket entry |
| Ticket # | Unique ticket identifier (e.g., TKT-000001) — clickable for detailed view |
| Subject | Short description of the issue or request |
| Department | The support team category handling the issue (e.g., Technical) |
| Status | Current state of the ticket (e.g., Open, Answered, Closed) |
| Priority | Urgency level (e.g., Low, Medium, High) |
| Last Reply | Timestamp of the most recent support team reply |
| Created | Date and time when the ticket was originally submitted |
| Actions | Quick access to view full ticket details |
Tip: Use the search bar to quickly find tickets by subject, ID, or keywords.
Filters: Use icons above the table to filter or manage the ticket list more effectively.
Creating a New Support Ticket
Ticket Creation Process
Location: Support Tickets → Create Ticket
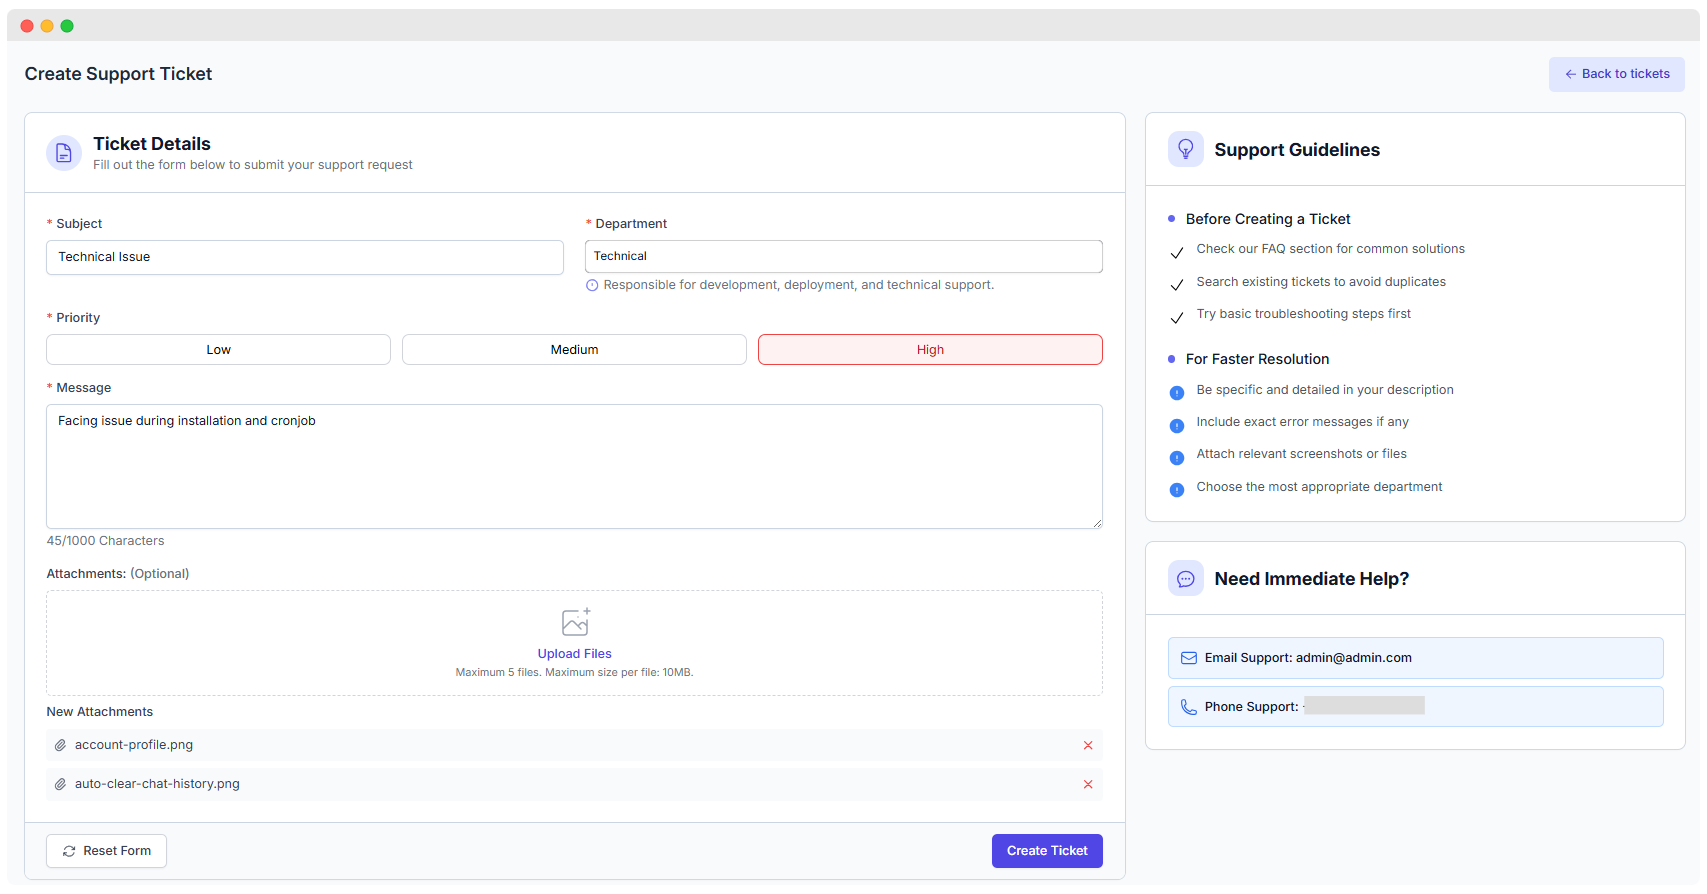
Fill out the form to submit a new support request. Providing detailed and accurate information helps the support team resolve your issue more efficiently.
Required Fields
Subject:
- A clear, descriptive title for your issue
- Be specific and concise
- Example:
"Technical Issue"or"SMTP Test Mail"
Department:
- Select the department most relevant to your issue
- Common options include:
- Technical – For development, deployment, and system-related issues
- Sales – For billing, subscription, and account matters
- General – For general inquiries or uncategorized topics
Priority Level: Choose the urgency of your issue:
- Low – Non-urgent, general queries
- Medium – Important, but not time-sensitive
- High – Critical problems needing immediate attention
Message:
- Provide a full description of the issue
- Mention relevant error messages or logs
- Explain steps to reproduce the problem, if applicable
- Character Limit:
1000 - Tip: Use clear, concise language
Attachments (Optional):
- Upload relevant files or screenshots
- Maximum:
5 files - Size limit:
10MBper file - Supported formats:
.png,.jpg,.pdf,.zip, etc.
Support Guidelines
Before Creating a Ticket
- Check the FAQ section for common issues and solutions
- Search for existing tickets to avoid duplicates
- Try basic troubleshooting steps when possible
For Faster Resolution
- Be clear and detailed in your description
- Include error messages, logs, or screen captures
- Choose the correct department to avoid delays
- Attach supporting files if needed
Ticket Communication
Effective communication is key to resolving your support requests quickly. Each ticket maintains a full history of all interactions between you and the support team.
Viewing Ticket Details
Access Path: Support → All Tickets → Click the View icon () next to the relevant ticket in the Actions column.
What You Can See:
- Complete Ticket History: A chronological log of all messages exchanged
- All Communications: Both your messages and support responses
- Attached Files: View or download any documents, screenshots, or logs
- Ticket Details: Includes subject, department, current status, and assigned priority
Reply Management
When the support team responds or requests more information, you can add your reply directly in the ticket thread.
How to Reply:
- Scroll to the bottom of the ticket thread
- Type your response in the Message field
- (Optional) Click Upload Files to attach relevant images or logs
- Click Send Reply
Reply Notes:
- All messages are timestamped for easy tracking
- You can edit or delete attachments before sending
- Your replies are immediately visible to the support team
Viewing Status Updates
You can monitor your ticket’s progress at a glance:
- See if the support team has viewed your reply
- Check the last response time
- Track the overall resolution progress
Status Tracking
Understanding your ticket’s current status helps manage expectations and plan follow-up actions accordingly.
Ticket Status Types
| Status | Description |
|---|---|
| Open | The ticket has been created and is awaiting an initial support response |
| Answered | The support team has replied and is waiting for your input or confirmation |
| Closed | The issue has been resolved, and the ticket is archived |
Priority Levels
Each ticket is assigned a priority to help the support team address the most urgent matters first.
| Priority | Use Case Examples |
|---|---|
| Low | Feature requests, documentation questions, minor feedback |
| Medium | General technical support, non-critical bugs, configuration questions |
| High | Service outages, security concerns, system-critical issues |
Tip: Be honest and accurate when selecting a priority level to ensure fairness in response times.
How to Create Support Ticket
Best Practices
Creating Effective Tickets
Clear Subject Lines
- Use descriptive and specific titles
- Highlight key problem indicators
- Example: "Webhook Failure on Deployment" instead of "Help!"
Detailed Descriptions
- Explain the issue step by step
- Mention any troubleshooting you’ve already done
- Include exact error messages if possible
Proper Priority Selection
- Choose based on urgency and business impact
- Use High only for critical issues (e.g., downtime, data loss)
- For general questions, use Low or Medium
Helpful Attachments
- Attach screenshots, logs, or documents to clarify the issue
- File limits: 5 files, 10MB each
- Accepted formats: .jpg, .png, .pdf, .txt, .zip
Communication Tips
Response Times
- Check for support replies regularly
- Respond promptly when follow-up is requested
- Update the ticket if the situation changes
Professional Communication
- Be clear, respectful, and concise
- Provide only the relevant details
- Confirm resolution when the issue is fixed
Need Immediate Help?
If your issue is urgent or time-sensitive, use these options:
- Email Support
- Phone Support: Available during business hours
- Priority Support: For outages or security-related issues only
Troubleshooting Common Issues
Ticket Submission Problems
- Make sure all required fields are filled (subject, message, department, priority)
- Check that file sizes and types are within the allowed limits
- Ensure your tenant account is active and not expired
Communication Issues
- Look in your spam/junk folder if you're not seeing responses
- Double-check your registered email for typos
- Attachments must be compatible formats and under 10MB
Email Notifications
Stay updated via automatic email alerts:
Ticket Reply Notification: Sent when a support/admin member responds, includes message content and any attachments.
Ticket Status Change Notification: Alerts you when the ticket moves between statuses (e.g., Open → Answered → Closed).
Notification Triggers
- New reply from support
- Ticket reassignment
- Status update (Open, Answered, Closed, etc.)
- Priority level changes
Tip: To avoid missing updates, add support emails to your contacts and whitelist them.
This support ticket system ensures a reliable, traceable way to get help with any issue you encounter on the WhatsMark SaaS platform. For the best experience, follow the practices outlined above.