Bot Flow
This documentation explains the entire process of managing Bot Flows in WhatsMark SaaS — starting from the Bot Flow list page, through component usage, flow creation, and activation.
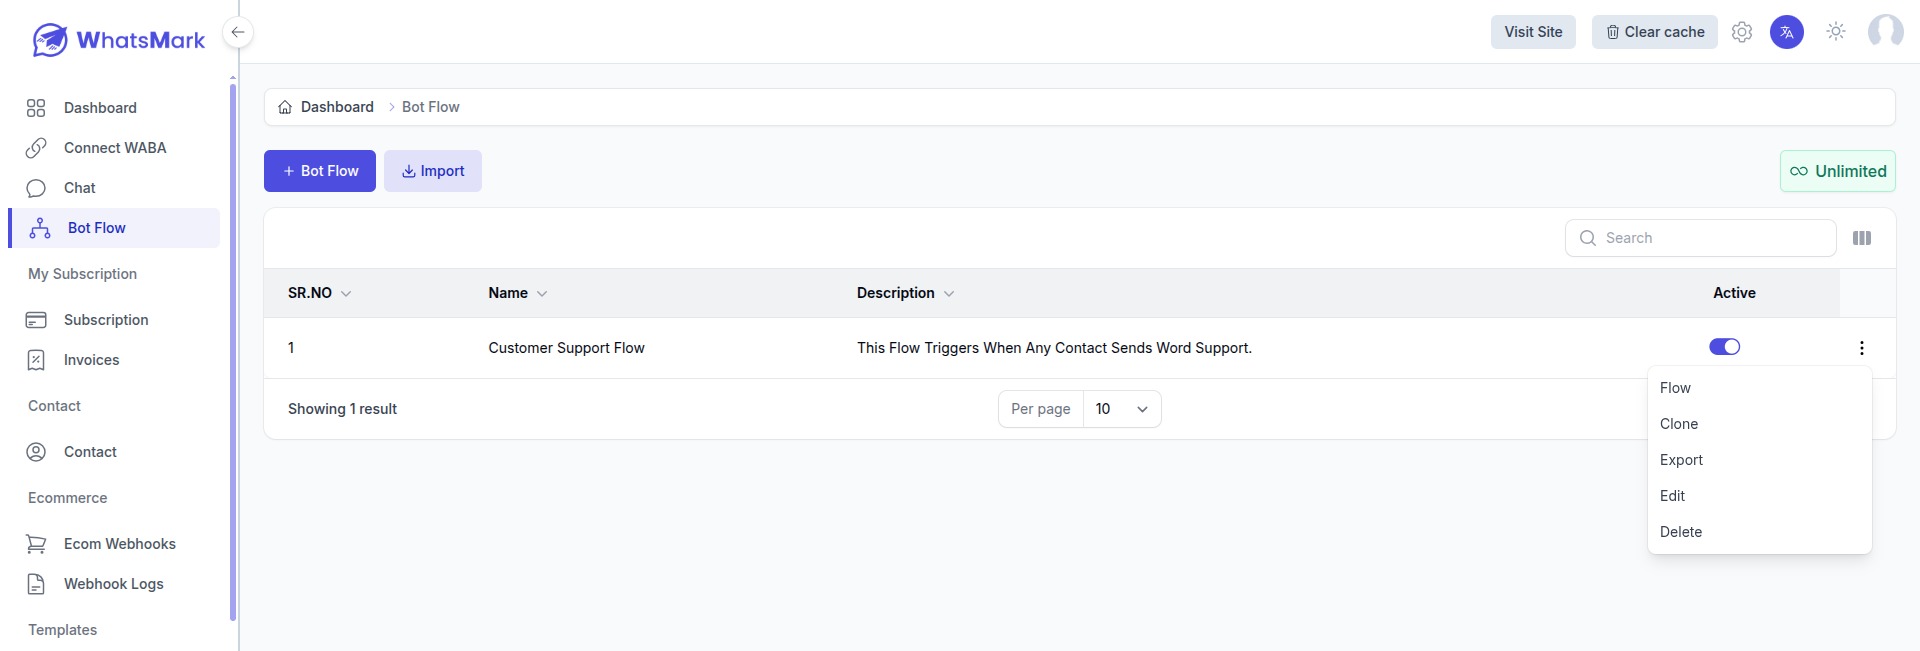
1. Bot Flow List Page
The Bot Flow List page is where you can see all your existing bot flows. From here, you can:
- Create a new bot flow by clicking the + Bot Flow button.
- View existing flows with details like name, description, and activation status.
- Activate or deactivate flows using the toggle in the "Is active" column.
- Edit or delete existing flows with the Edit and Delete buttons.
- Enter a flow to see or modify it by clicking the green Flow button.
2. Creating A New Bot
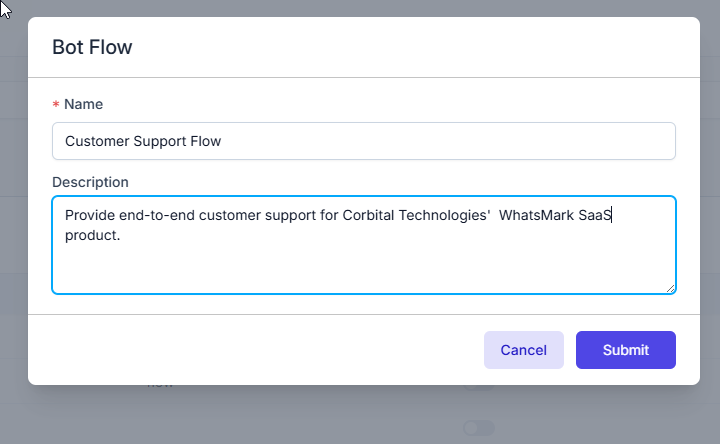
After clicking the + Bot Flow button on the Bot Flow List page, a popup appears prompting you to enter details for the new flow.
Bot Flow Creation Popup
- Name: Enter the name of your bot flow. For example,
Customer Support Flow. - Description: Provide a brief description of the flow. Example: "Provide end-to-end customer support for Corbital Technologies' WhatsMark SaaS product."
Click Submit to create the flow and move to the flow builder interface.
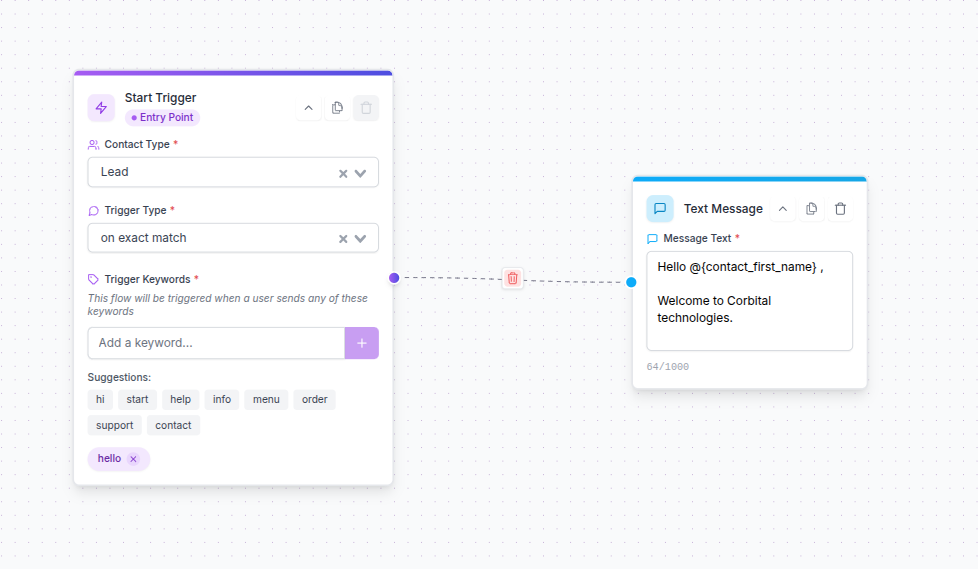
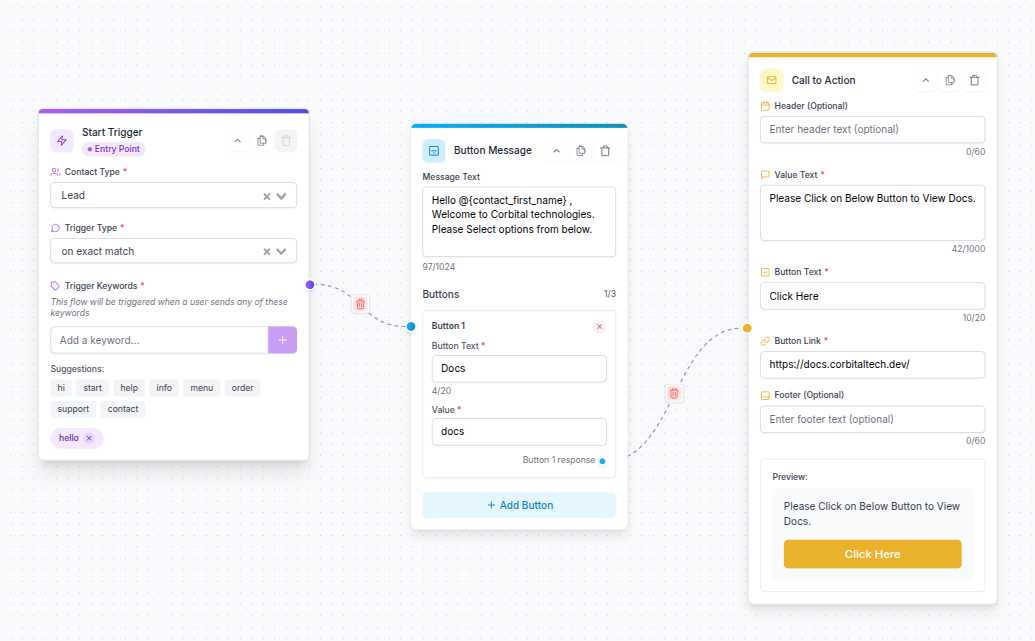
3. Creating Flow
Clicking the + Bot Flow button takes you to the bot flow creation interface.
Interface Overview
Available Components (Left Panel): Components you can add to your flow include:
- Text Message
- Button Message
- Call To Action
- List Message
- Media Message
- Location
- Contact Card
- API Request
- Delay Node
- Update Contact
Start Trigger (Center Block): This is the flow’s entry point. You must configure:
- Contact Type: Type of contact who will trigger the flow (e.g., Customer)
- Trigger Type: Trigger condition (e.g., on exact match)
- Trigger Keywords: Keywords users send to start this flow
Save Flow Button: Located at the top right, it activates once mandatory fields are filled.
4. Bot Flow Components Overview
Each component can be added to the flow canvas to build your conversation. Below is a summary of the key components:
4.1 Text Message
Used to send plain text messages.
4.2 Button Message
Sends a message with interactive buttons for users to choose from.
4.3 Contact Card
Shares contact information with the user.

4.4 Call To Action (CTA)
Sends a clickable button with a link for the user to take an action.

4.5 List Message
Sends a list with header, body, footer, and selectable options.
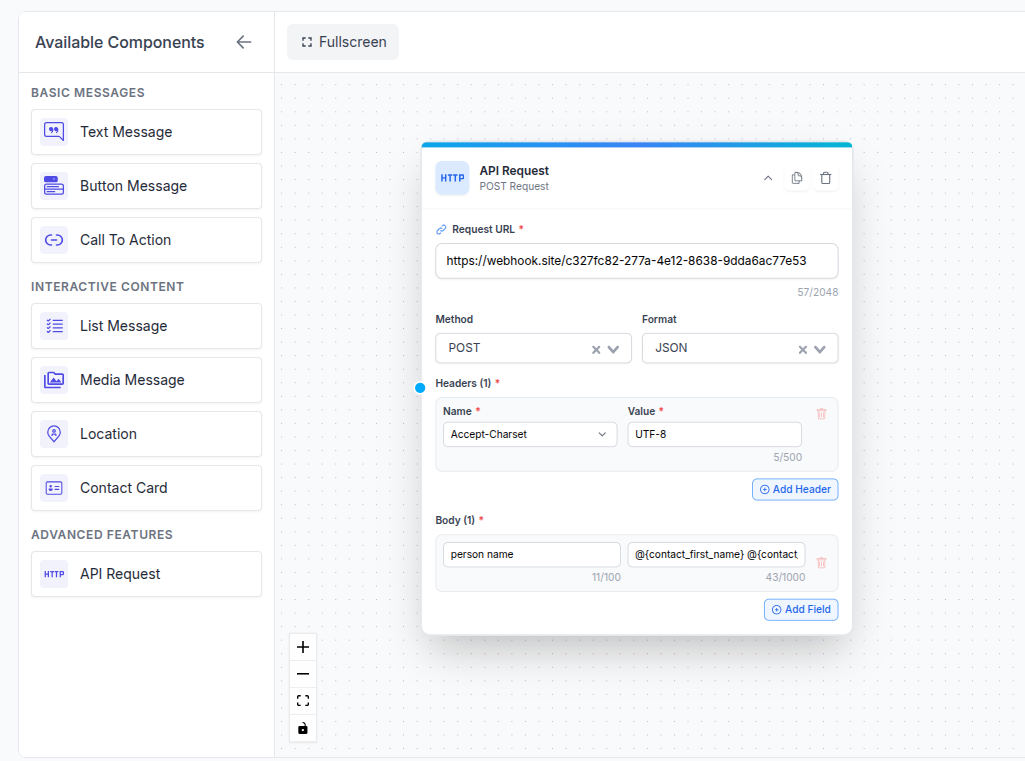
4.6 API Request
Sends data from your bot flow to external sources and automation platforms. This component enables you to push conversation data, user responses, and flow variables to external systems like n8n or any other software that can process and utilize the flow data.
Key Features:
- Request URL: Specify the webhook or API endpoint URL of your external system
- HTTP Method: Support for POST, PUT, PATCH methods for sending data
- Headers: Add custom headers (Accept-Charset, Authorization, Content-Type, etc.)
- Request Body: Send JSON data with dynamic variables from the conversation flow
- Data Integration: Pass user responses, contact information, and flow context to external systems
Common Use Cases:
- Send conversation data to n8n workflows for automation
- Push lead information to CRM systems
- Trigger external workflows based on user interactions
- Submit form data collected during the bot conversation
- Integrate with zapier, make.com, or custom automation platforms
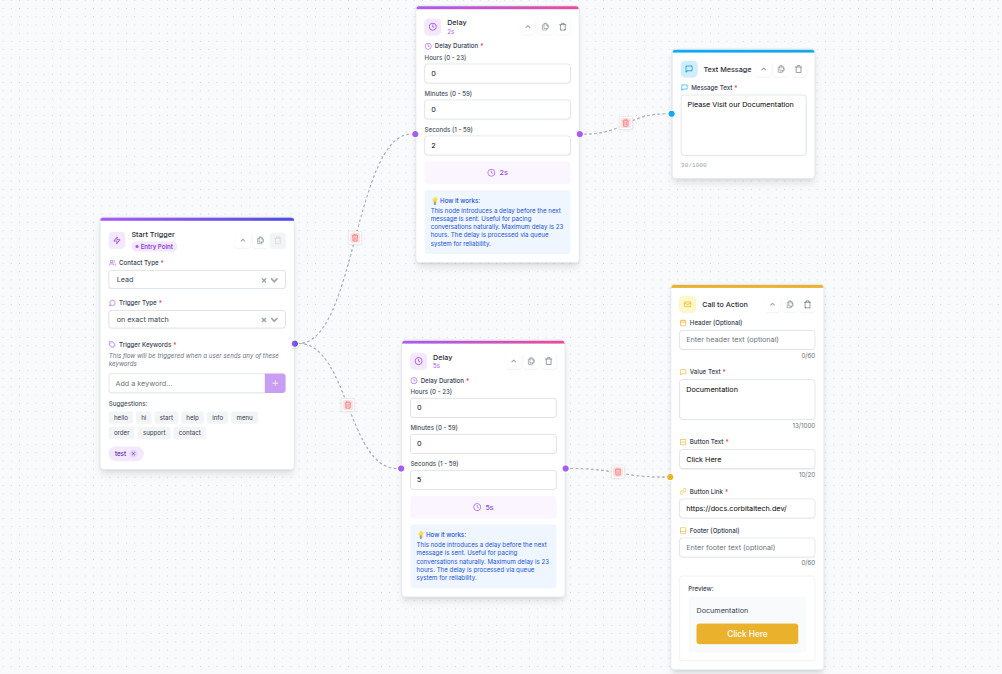
4.7 Delay Node
The Delay Node is a powerful feature that allows you to add time intervals between messages in your automation flow. This helps create more natural conversation patterns and prevents overwhelming users with multiple messages at once.
When to Use Delay Node:
- Add pauses between consecutive messages for better user experience
- Create timed sequences for drip campaigns
- Allow processing time between automated responses
How to Connect Delay Node:
Important Connection Rules
The Delay Node can only be connected after:
- Start Trigger Node
- Button Response Nodes
- List Selection Nodes
These nodes support back connections, which are required for the delay functionality to work properly.
Performance Requirements:
The Delay Node operates using cron jobs and queue management, which requires proper server configuration:
Cron Job Setup:
- Set up a cron job to run every minute for optimal performance
- This ensures delays are processed accurately and messages are sent on time
Queue Management (Optional but Recommended):
- Configure Laravel Horizon for Redis-based queue management
- This provides better performance, monitoring, and reliability
- Horizon dashboard allows you to track delayed jobs in real-time
Best Practice
For production environments, we strongly recommend using Redis with Horizon for queue management. This ensures reliable message delivery and provides visibility into your automation performance.
Setup Guides:
4.8 Update Contact Node
The Update Contact Node allows you to automatically update contact information during flow interactions. This is useful for maintaining accurate customer data and segmenting contacts based on their interactions.
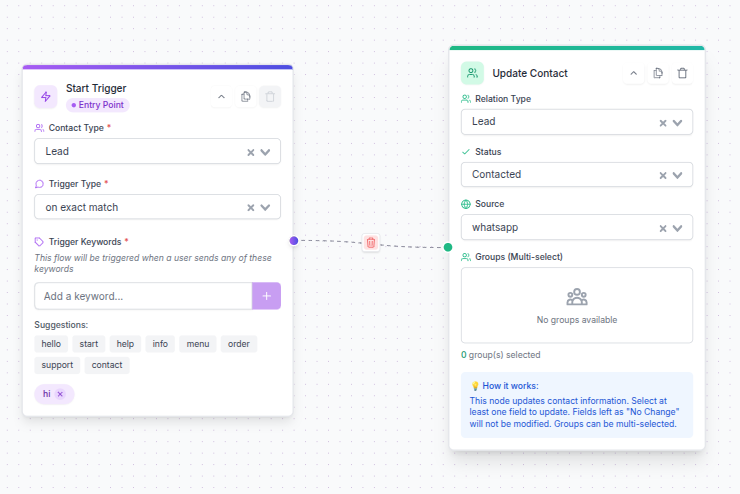
What Can Be Updated:
Using the Update Contact Node, you can modify:
- Relation Type: Change contact classification (e.g., Lead, Customer, Guest)
- Status: Update contact status (e.g., Contacted, Qualified, Converted)
- Source: Track where the contact came from (e.g., WhatsApp, Website, Campaign)
- Groups: Add contacts to specific groups for segmentation
Configuration Requirements:
Minimum Selection Required
When adding an Update Contact Node to your flow, you must select at least one field to update. You cannot add an empty Update Contact Node.
Choose at least one of the following:
- Status update
- Relation Type update
- Source update
- Group assignment
Group Management Behavior:
When updating contact groups through this node:
- Adding Groups: Contacts will be added to the specified groups
- Preserving Existing Groups: If a group doesn't exist, the node will skip it without errors
- No Removal: This node will not remove contacts from existing groups
- Multi-select Supported: You can add a contact to multiple groups simultaneously
Use Cases:
Example 1: Lead Qualification Flow
Start Trigger → User responds → Update Contact Node
- Status: "Contacted"
- Relation Type: "Lead"
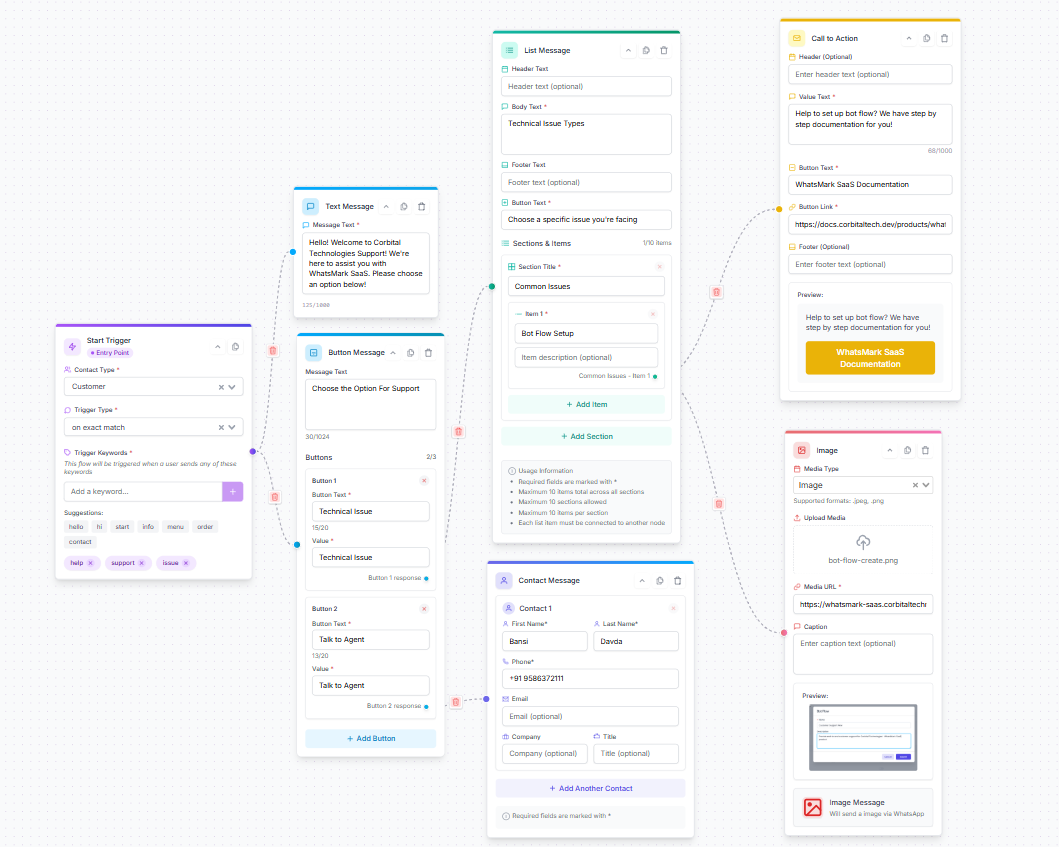
- Source: "WhatsApp"5. Example: Complete Bot Flow
This is an example flow where:
- The start trigger listens for keywords from Customers.
- A welcome text message is sent.
- A button message allows users to choose between "Technical Issue" or "Talk to Agent."
- If "Technical Issue" is selected, a list message with common issues appears.
- A call to action directs users to SaaS documentation.
- An image message shows a bot flow creation screenshot.
- A contact card shares an agent's contact info.
6. Activating Your Bot Flow
After creating and saving your flow, you return to the Bot Flow List page.
- Activate your flow by toggling the Is active switch to ON.
- This enables the flow so it can start responding to user messages based on your triggers.
7. Import & Export Bot Flows
The Import and Export functionality allows you to migrate bot flows between different tenants or WhatsMark SaaS installations. This is useful for:
- Transferring flows from development to production environments
- Sharing flows between different tenant accounts
- Backing up your bot flow configurations
- Replicating flows across multiple WhatsMark SaaS setups
7.1 Exporting a Flow
To export a bot flow:
- Navigate to the Bot Flow List page
- Click the three-dot menu (⋮) next to the flow you want to export
- Select Export from the dropdown menu
- The flow configuration will be downloaded as a JSON file to your computer
This exported file contains all the flow structure, components, settings, and configurations.
7.2 Importing a Flow
To import a bot flow:
- Navigate to the Bot Flow List page
- Click the Import button at the top of the page
- Select the exported JSON file from your computer
- The flow will be imported and added to your bot flow list
Verify After Import
After importing a flow, always verify all configurations before activating it. Some dynamic parameters may differ between installations, including:
- Contact Types: May have different IDs in the new installation
- Groups: Group IDs and names might not match
- Custom Fields: Custom field mappings may differ
- API Endpoints: External URLs or webhook endpoints need updating
- Phone Numbers: Contact card numbers may need adjustment
- Media Files: Images and media will need to be re-uploaded if paths differ
Important: Review each node carefully and update any installation-specific parameters before activating the imported flow.
7.3 Best Practices for Import/Export
- Test First: Always import flows to a test tenant or environment first
- Document Changes: Keep notes on what needs to be updated after import
- Update Variables: Check all dynamic variables and placeholders
- Verify Connections: Ensure all node connections are intact after import
- Test Thoroughly: Run complete tests before activating imported flows in production
7.4 Clone Bot Flow
Use the Clone feature to quickly duplicate an existing flow within the same tenant. Click the three-dot menu (⋮) next to any flow and select Clone to create an exact copy, which you can then modify as needed without affecting the original flow.
Summary
- Start at Bot Flow List: Create or manage flows.
- Create New Flow: Configure start trigger and add message components.
- Design Flow: Use text, buttons, lists, CTAs, images, and contact cards.
- Save Flow: Make sure all required fields are completed.
- Activate Flow: Toggle the active switch to enable.