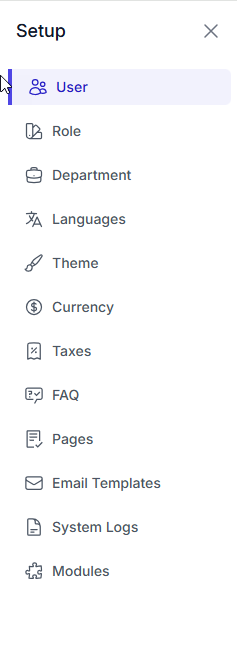
Set Up
Controls admin access and permissions to your SaaS platform and ensures secure, role-based access to administrative functions.
Location: Admin Panel → Setup
Required Permissions
| Permission Key | Description |
|---|---|
admin.users.view | View admin users |
admin.users.create | Create admin users |
admin.users.edit | Edit user details |
admin.users.delete | Delete admin users |
admin.roles.view | View roles and permissions |
admin.roles.create | Create new roles |
admin.roles.edit | Edit role permissions |
✅ User
User List
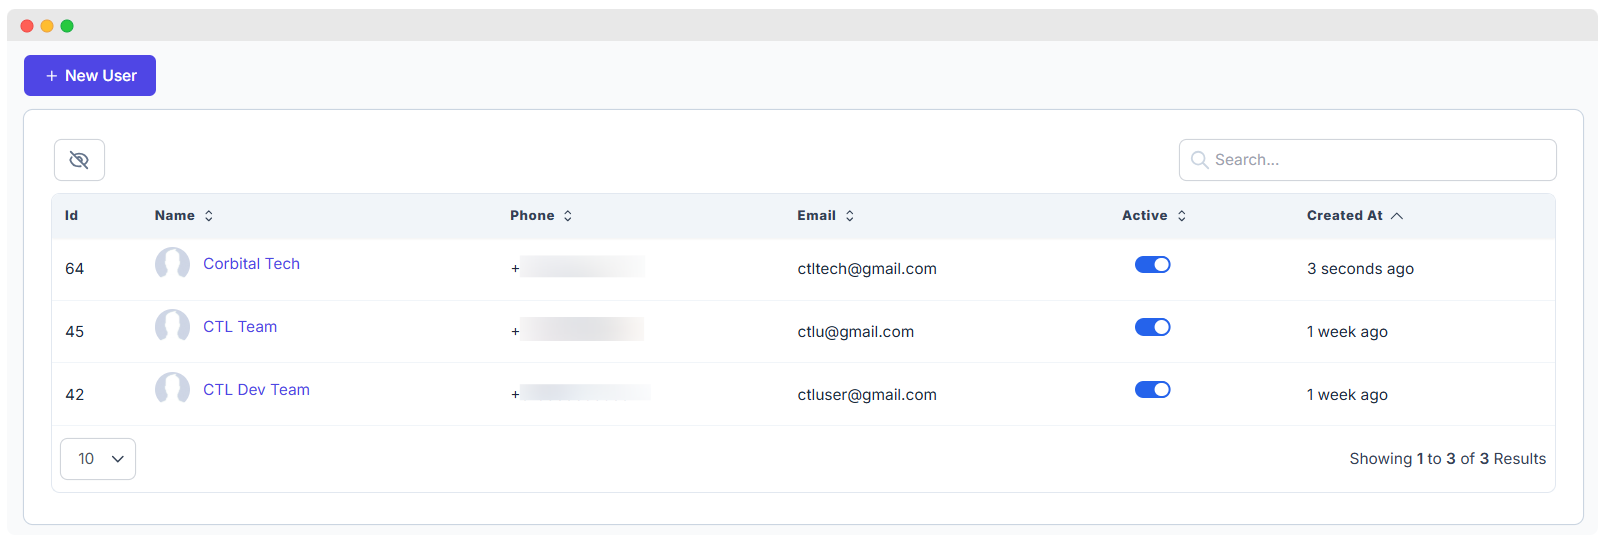
Location: Admin Panel → Setup → Users → User List
This page allows you to view and manage all administrative users.
| Column | Description |
|---|---|
| User ID | Unique identifier for each user |
| Name | Full name of the user |
| Phone | Contact phone number |
| User's email address | |
| Active | User's active status toggle |
| Created At | Account creation timestamp |
Filtering & Search Options:
| Filter Type | Purpose |
|---|---|
| Role | Filter users based on their assigned role |
| Status | Filter users by active or inactive status |
| Department | Filter users by department affiliation |
| Creation Date | Filter users by account creation date |
| Search | Search users by name or email |
Creating Admin Users
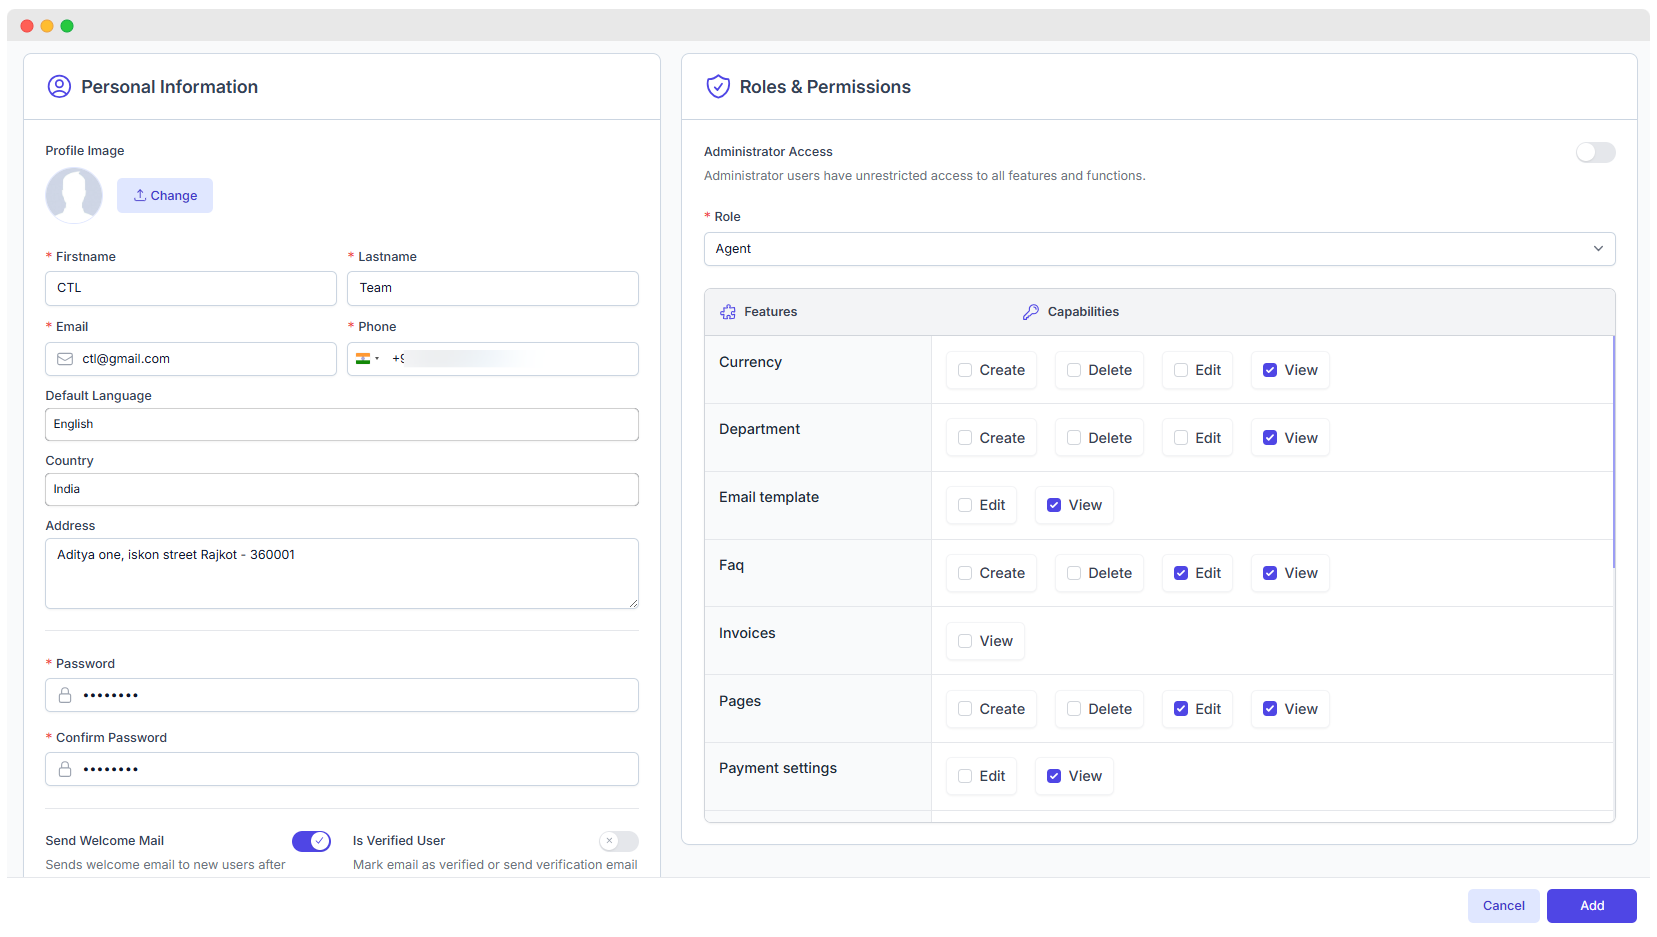
Location: Admin Panel → Setup → Users → Create User
Add new administrative staff to your platform by filling the form below:
| Field | Description | Required / Optional |
|---|---|---|
| First Name | User’s given name | Required |
| Last Name | User’s family/surname name | Required |
| Login email (must be unique) | Required | |
| Phone | Valid contact number | Required |
| Password | Initial login password | Required |
| Confirm Password | Confirm the password | Required |
| Role Assignment | Access control role for user | Required |
| Profile Picture | User’s avatar image (JPEG, PNG) | Optional |
| Default Language | User’s preferred language | Optional |
| Address | Physical or mailing address | Optional |
| Country | User’s country | Optional |
| Send Welcome Mail | Toggle to send welcome email | Optional |
| Is Verified User | Toggle to mark user as verified or not | Optional |
Editing Admin Users
Admin Panel → Setup → Users → Edit User
Modify existing user accounts with the following editable fields:
| Editable Field | Description |
|---|---|
| Personal Information | Name, email, phone, language, address |
| Role Assignments | Change user’s role and permissions |
| Department | Assign or update department |
| Status | Activate or deactivate user account |
| Password Reset | Set a new password for the user |
Important Notes:
- Changing the email requires verification.
- Role changes apply immediately.
- Activating or deactivating affects user sessions.
- Password changes will force the user to log in again.
Admin User Profiles
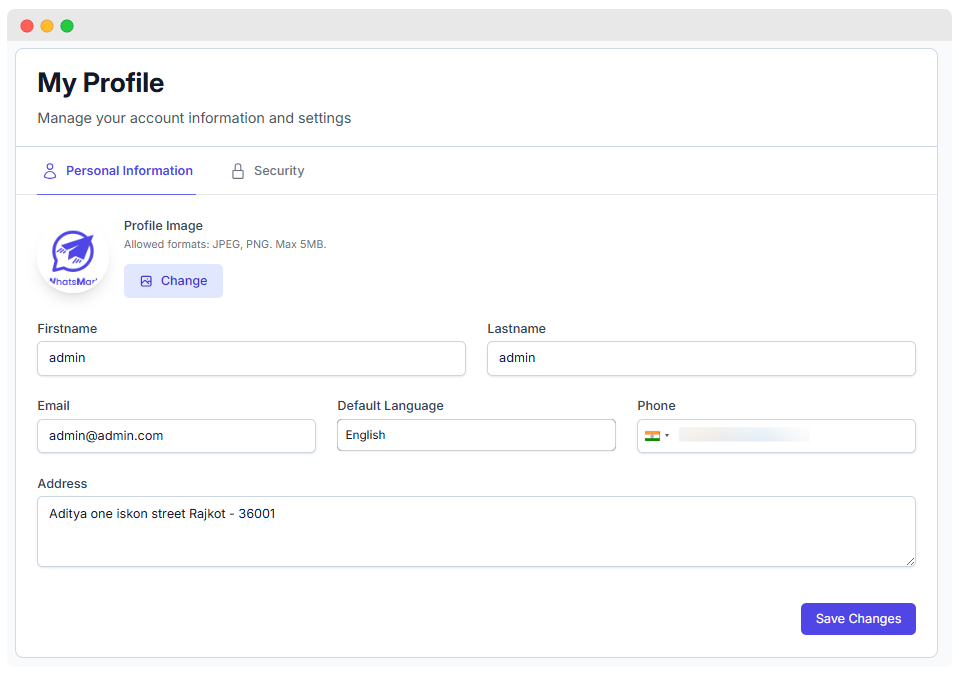
Location: Admin Panel → Profile
Each admin user has a dedicated profile page containing:
| Section | Details |
|---|---|
| Personal Information | Name, email, phone, profile image |
| Role & Permissions | Summary of assigned role and capabilities |
| Account Activity | Login history, recent activity |
| Session Management | Active sessions and ability to log out other sessions |
| Security Settings | Two-factor authentication (2FA) setup |
| API Token Management | Manage API tokens (if applicable) |
✅ Role
Role List
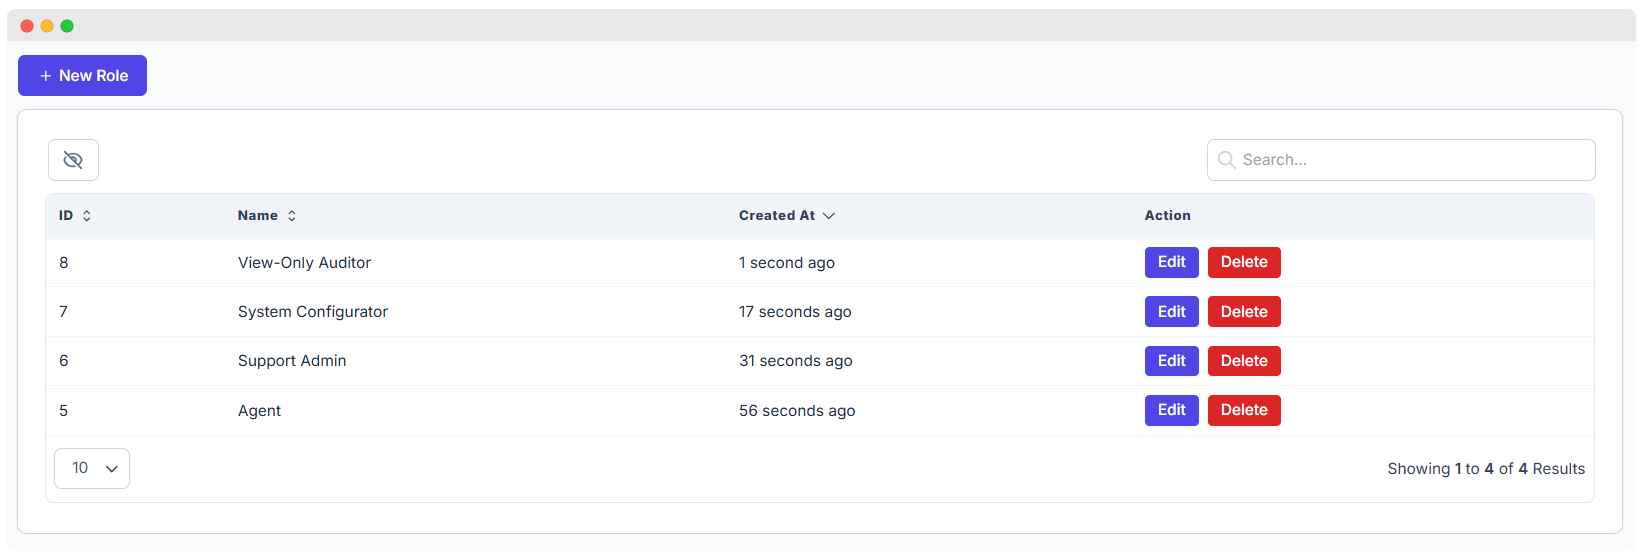
Location: Admin Panel → Setup → Role → Role List
| Feature | Description |
|---|---|
| Role Name | Displays the name of the role |
| Description | Short description of the role’s purpose |
| Permission Summary | Lists granted permissions |
| Assigned Users | Number of users assigned to this role |
| Default Role | Indicates if it’s set as default |
| Created/Modified Dates | Shows creation and last update timestamps |
Default Roles
| Role Name | Description |
|---|---|
| Super Admin | Full system access |
| Administrator | General administration rights |
| Support | Customer support functions |
| Billing | Payment and subscription management |
| Content | Website and content management |
Creating Custom Roles

Location: Admin Panel → Setup → Role → Create Role
| Field | Description |
|---|---|
| Role Name | Descriptive title of the role |
| Role Slug | URL-friendly identifier |
| Description | Brief explanation of the role’s purpose |
| Permission Selection | Choose features and capability levels |
Role Options
| Option | Description |
|---|---|
| Create from scratch | Define a new role manually |
| Clone existing role | Copy permissions from an existing role |
| Set as default | Apply this role automatically to new users |
| System role | Mark as protected and uneditable |
Permission Management
Location: Admin Panel → Users → Roles → Edit Permissions
Permission Categories
| Category | Description |
|---|---|
| Dashboard | Access to stats and reports |
| Tenants | Workspace and tenant management |
| Subscriptions | Payment and billing access |
| Plans | Subscription plan management |
| Users | User and admin account management |
| API and channel configurations | |
| Settings | System configuration and settings |
| Website | Website content and CMS management |
| Support | Help desk and support ticket management |
Permission Levels
| Level | Description |
|---|---|
| View | Read-only access |
| Create | Ability to add new items |
| Edit | Modify existing items |
| Delete | Remove items |
| Approve | Authorize actions or requests |
| Export | Download data |
| Import | Upload or ingest data |
✅ Department
Department Overview
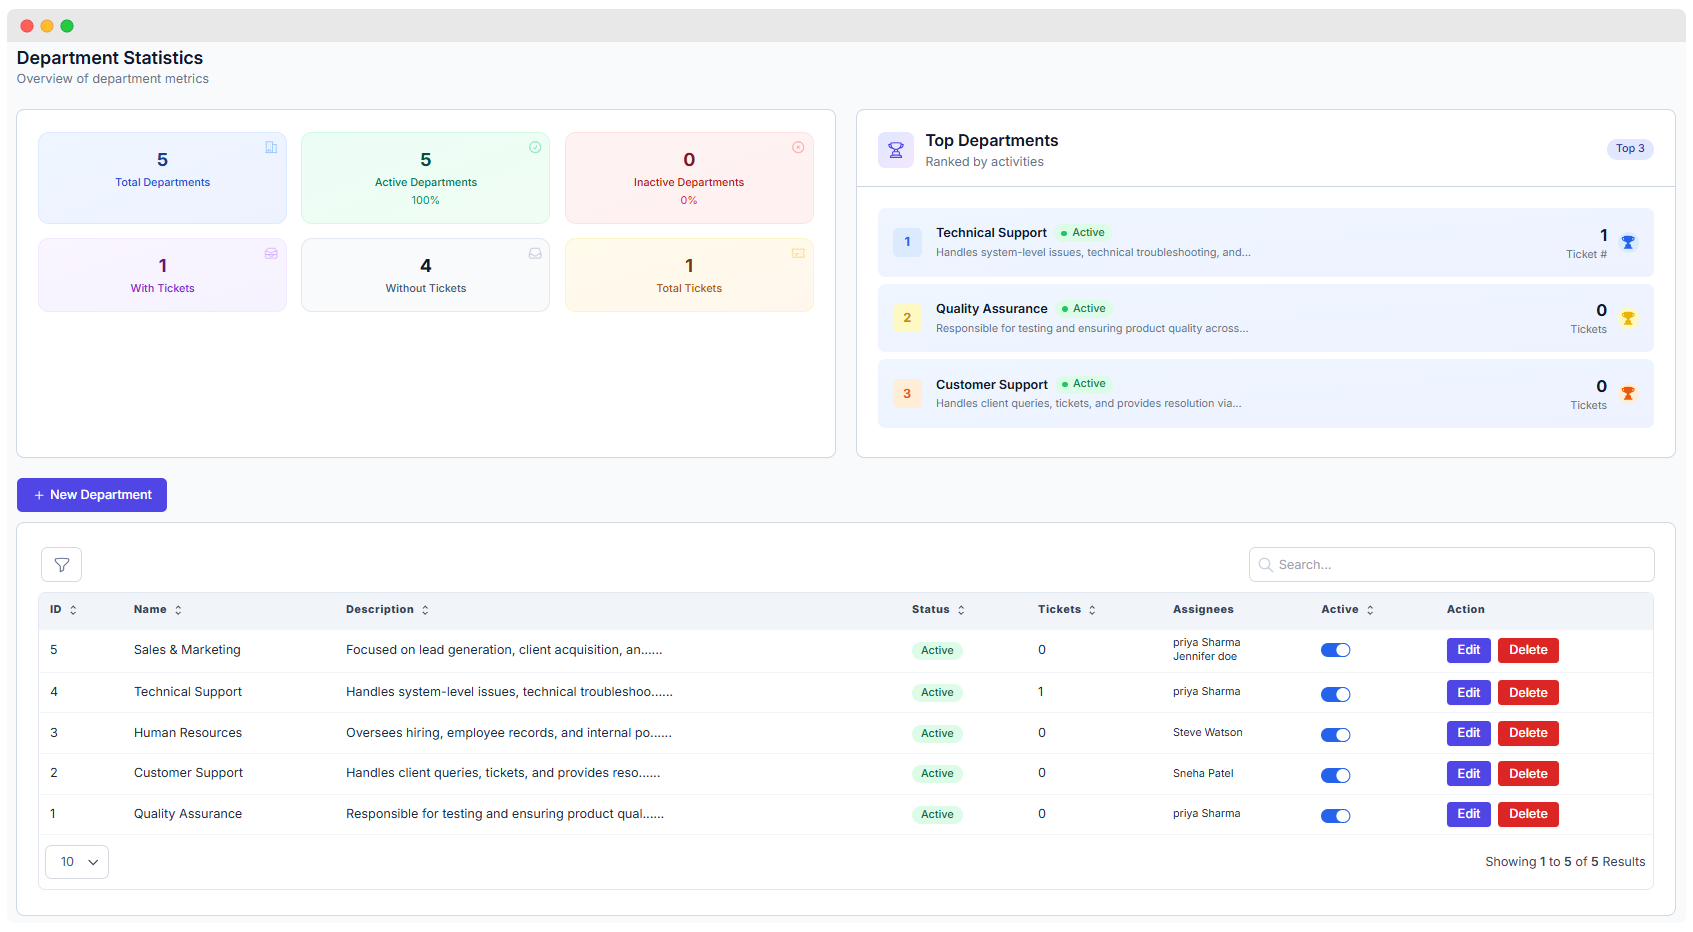
Location: Admin Panel → Setup → Department
| Metric | Value | Notes |
|---|---|---|
| Total Departments | 5 | Number of departments created |
| Active Departments | 5 (100%) | All departments are currently active |
| Inactive Departments | 0 | No departments marked as inactive |
| Departments with Tickets | 1 | Only 1 department currently has tickets |
| Departments without Tickets | 4 | Majority of departments have no tickets |
| Total Tickets | 1 | Across all departments |
Top Performing Departments
| Rank | Department Name | Status | Description | Tickets |
|---|---|---|---|---|
| 1 | Technical Support | ✅ Active | Handles system-level issues, technical troubleshooting, etc. | 1 |
| 2 | Quality Assurance | ✅ Active | Responsible for testing and ensuring product quality | 0 |
| 3 | Customer Support | ✅ Active | Handles queries, tickets, and customer resolution | 0 |
Department List
| ID | Name | Description | Status | Tickets | Assignees | Actions |
|---|---|---|---|---|---|---|
| 5 | Sales & Marketing | Focused on lead generation, client acquisition, and outreach | Active | 0 | Priya Sharma, Jennifer Doe | Edit / Delete |
| 4 | Technical Support | Handles system-level issues, technical troubleshooting | Active | 1 | Priya Sharma | Edit / Delete |
| 3 | Human Resources | Oversees hiring, employee records, and internal policies | Active | 0 | Steve Watson | Edit / Delete |
| 2 | Customer Support | Handles client queries, tickets, and resolution | Active | 0 | Sneha Patel | Edit / Delete |
| 1 | Quality Assurance | Ensures product quality and testing | Active | 0 | Priya Sharma | Edit / Delete |
Creating a New Department
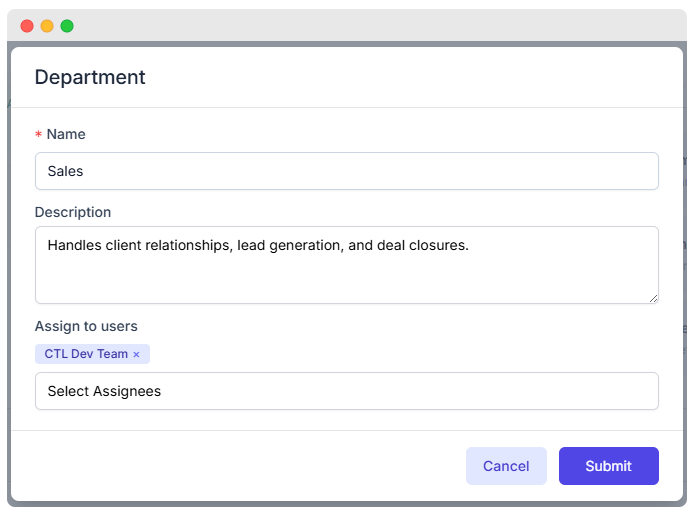
Location: Admin Panel → Setup → Departments → Create Department
| Field | Description |
|---|---|
| Department Name | The title of the department (e.g., Sales, HR, Support) |
| Description | Short summary of department responsibilities |
| Assign to Users | Select users or teams to be assigned to the department |
Example:
Department Name: Sales
Description: Handles client relationships, lead generation, and deal closures.
Assigned Users: CTL Dev Team
Default Departments (Suggestions)
| Department | Description |
|---|---|
| Management | Leadership and executive team |
| Support | Customer service and help desk |
| Sales | Business development and lead gen |
| Technical | IT and system administration |
| Finance | Payment, billing, and accounting |
✅ Language
Language Overview

The Languages screen displays a list of all supported languages in the system.
Each language entry includes:
| Field | Description |
|---|---|
| ID | Internal reference number |
| Name | Language name (e.g., English, French) |
| Code | Short code (e.g., en, fr) |
| Actions | Buttons to Translate, Edit, or Delete |
✅ Use standard ISO 639-1 codes (e.g.,
en,es,fr,de) for consistency.
Add a New Language
To add a new language:
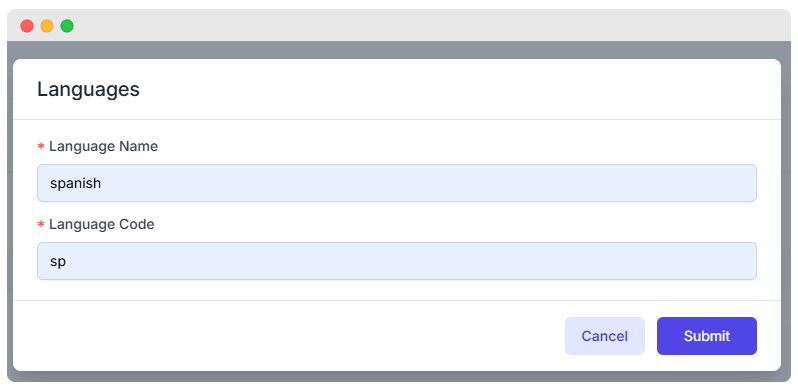
- Click the + Languages button.
- Fill in the following:
- Language Name: e.g., Spanish
- Language Code: e.g.,
es
- Click Submit to save.
📝 Tip: Avoid using non-standard or random codes like
sp. Useesfor Spanish,defor German, etc.
Edit or Delete a Language
From the language list:
- Click Edit to update the language name or code.
- Click Delete to remove a language permanently.
⚠️ Deleted languages cannot be recovered unless re-added manually.
Translate Language Texts
To translate system interface text:
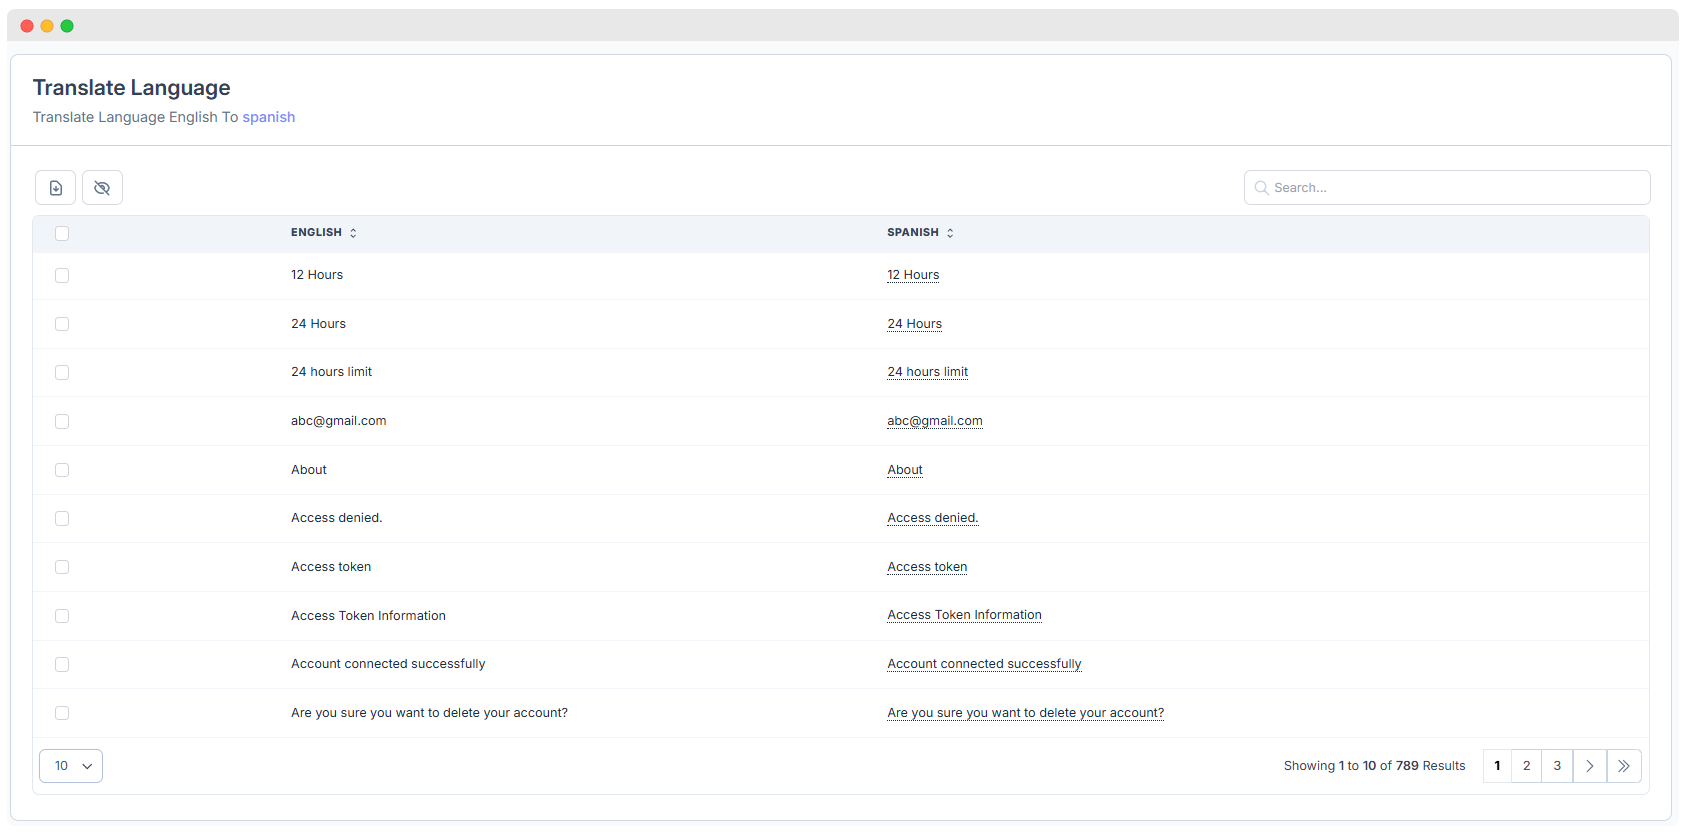
- Click the Translate button next to any language.
- A translation table will open:
- Left column: Original text (usually English)
- Right column: Editable translated text (e.g., Spanish)
Features:
- Inline editing of translations
- Bulk selection for exporting
- Export to CSV for external editing
- Hide columns for a cleaner view
🔄 After updating translations, refresh the cache for changes to apply.
Switch Between Languages
Users can select their preferred language from the interface:
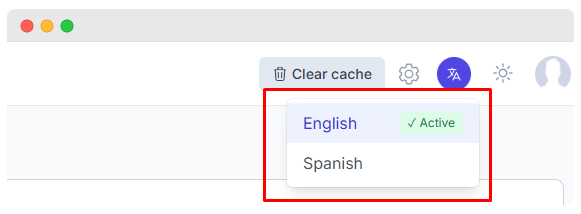
Steps:
- Click the language icon in the header.
- Choose a language from the dropdown.
- The interface updates instantly based on available translations.
🟢 The active language is marked with a green check.
✅ Currency
Configure multiple currencies:
Currency Options:
- Add/remove supported currencies
- Set exchange rates
- Configure display format
- Set default currency
- Enable/disable specific currencies
Currency List
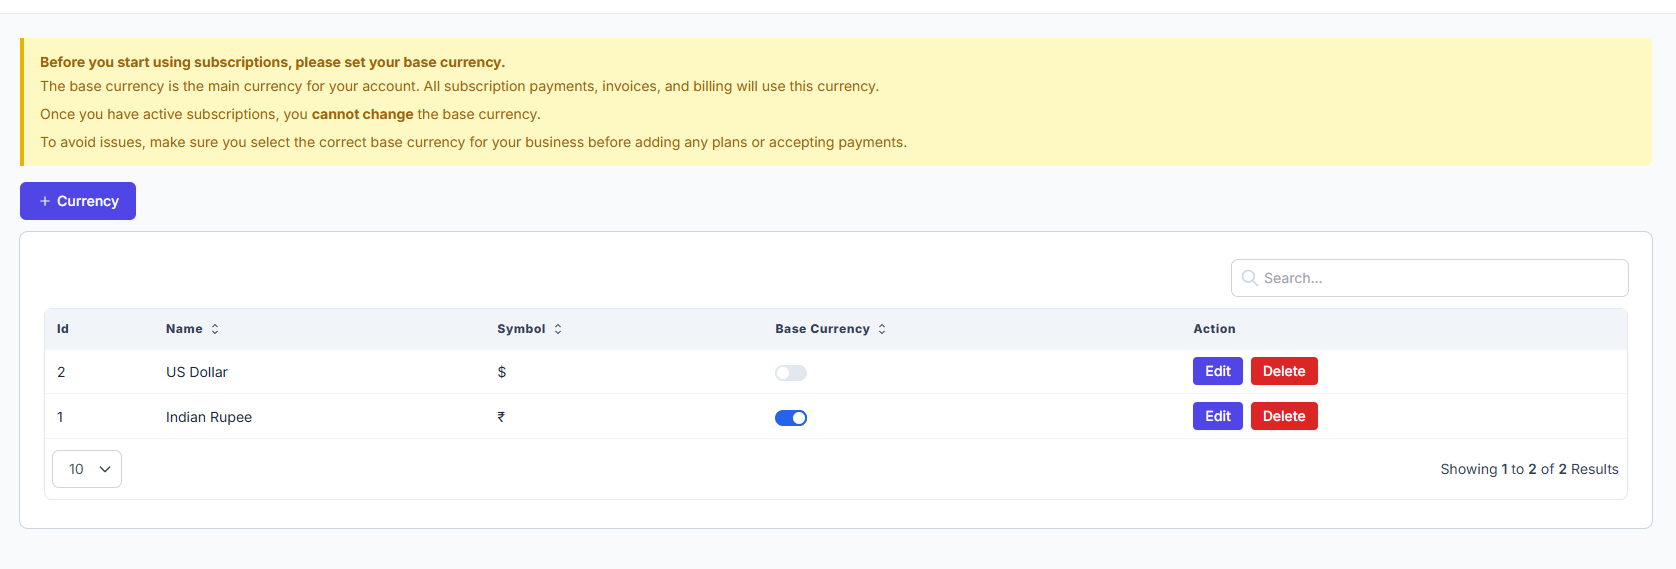
Location: Admin Panel → Setup → Currency
| Column | Description |
|---|---|
| Id | Internal currency reference number |
| Name | Currency name (e.g., US Dollar, Indian Rupee) |
| Symbol | Symbol used for display and pricing |
| Base Currency | Toggle to set one currency as default (only one allowed at a time) |
| Actions | Buttons to Edit or Delete the currency |
Currency Creation

Location: Admin Panel → Setup → Currency Create
| Field | Description |
|---|---|
| Currency Code | Full currency name (e.g., EURO) |
| Code | ISO code (e.g., EUR, USD, INR) |
| Symbol | Currency symbol (e.g., €, $, ₹) |
| Currency Placement | Determines if symbol appears before or after amount |
⚠️ Before you start using subscriptions, please set your base currency. Once you have active subscriptions, you cannot change the base currency. Make sure the correct base currency is selected before adding plans or accepting payments.
✅ Taxes
Tax Configuration
Configure how taxes are applied within the system. Use this section to define and manage tax types, percentages, and related settings.
Tax List
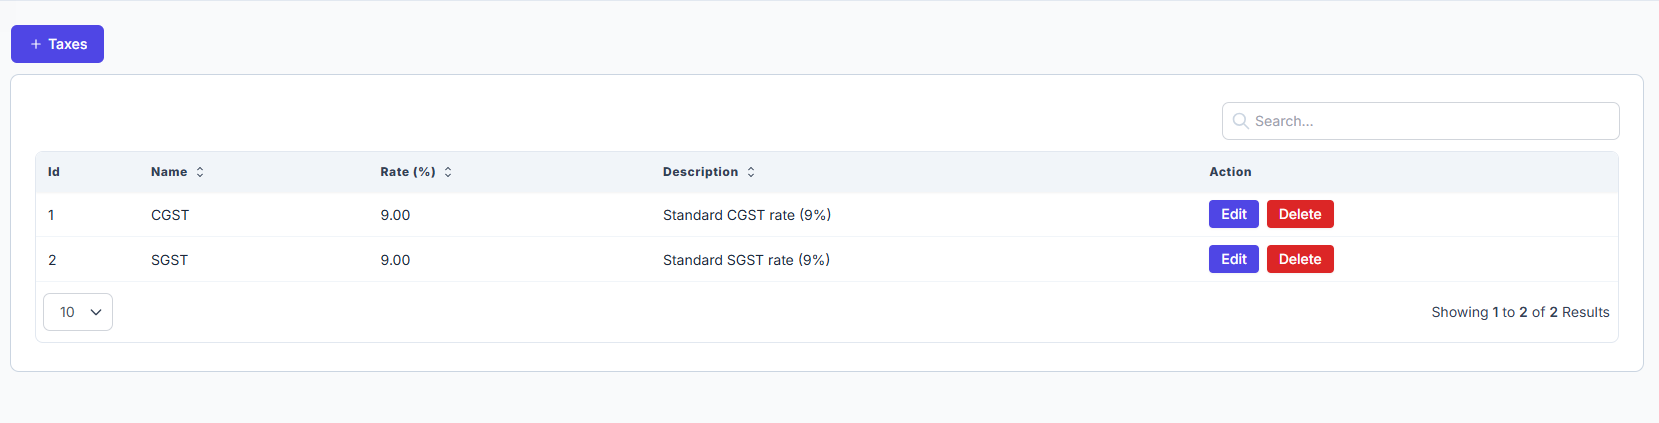
Location: Admin Panel → Setup → Taxes
Below is an example of configured tax records:
| ID | Name | Rate (%) | Description | Action |
|---|---|---|---|---|
| 1 | CGST | 9.00 | Standard CGST rate (9%) | Edit / Delete |
| 2 | SGST | 9.00 | Standard SGST rate (9%) | Edit / Delete |
Tax Options
- Tax Rates: Set percentage values applicable to different regions or tax types.
- Tax Names: Define labels such as VAT, GST, Sales Tax, etc.
- Tax Number Collection: Collect customer tax IDs during transactions.
- Tax Exemptions: Apply exemption rules based on conditions.
- Tax Reporting: Generate reports for audit and compliance.
Add Tax
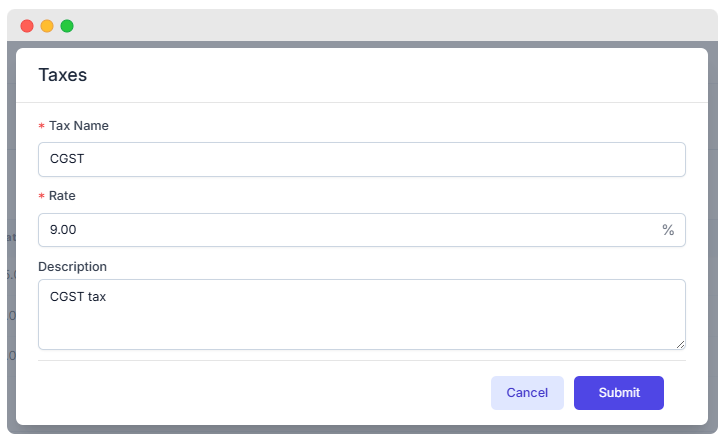
Location: Admin Panel → Setup → Create Tax
To add a new tax:
- Go to Admin Panel → Setup → Taxes → + Taxes.
- Fill out the following required fields:
- Tax Name (e.g., CGST)
- Rate (e.g.,
9.00%) - Description (optional but recommended)
- Choose Submit to save.
✅ Tip: Keep tax names standardized to ensure consistency across invoices and reports.
✅ FAQ
The FAQ (Frequently Asked Questions) management module allows administrators to create, edit, view, and manage FAQs efficiently. This feature improves customer experience by providing quick answers to common questions.
FAQ List Interface
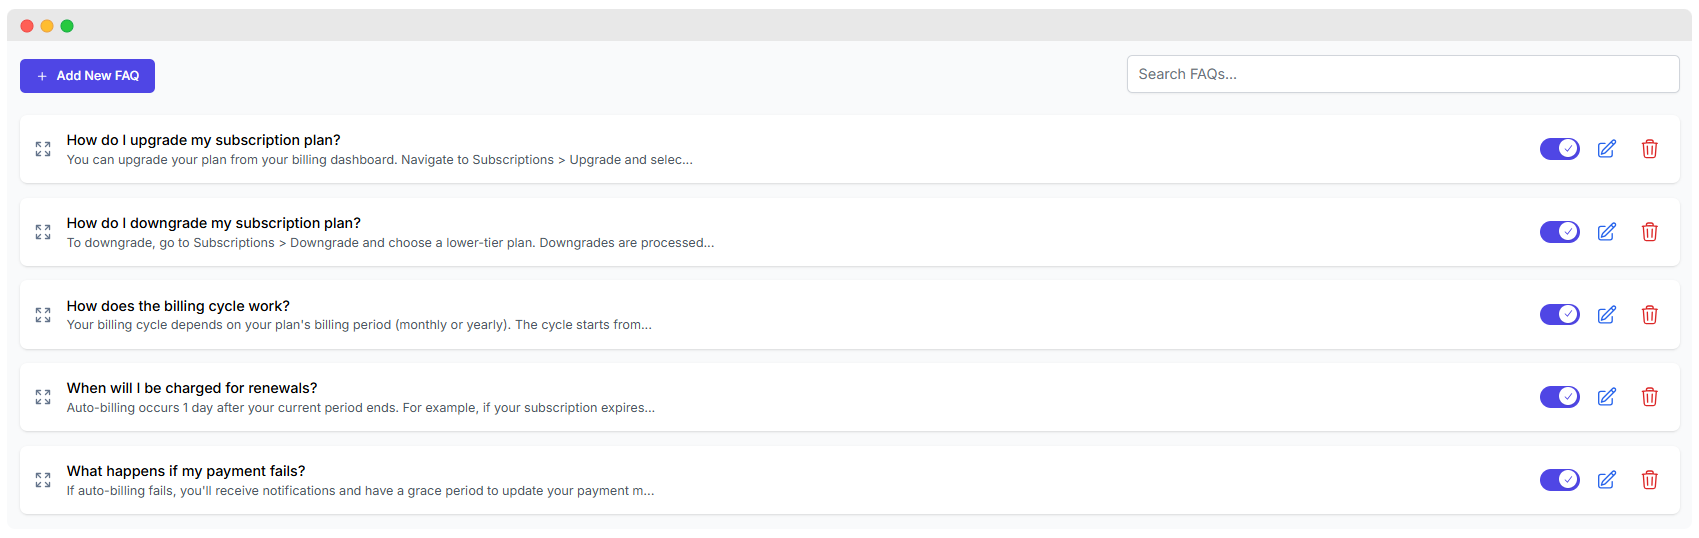
Location: Admin Panel → Setup → FAQ
Sample FAQ List
| No. | Question | Answer (Short Preview) | Visible |
|---|---|---|---|
| 1 | How do I upgrade my subscription plan? | You can upgrade your plan from your billing dashboard. Navigate to... | ✅ Yes |
| 2 | How do I downgrade my subscription plan? | To downgrade, go to Subscriptions > Downgrade and choose a... | ✅ Yes |
| 3 | How does the billing cycle work? | Your billing cycle depends on your plan's billing period (monthly...) | ✅ Yes |
| 4 | When will I be charged for renewals? | Auto-billing occurs 1 day after your current period ends. For example... | ✅ Yes |
| 5 | What happens if my payment fails? | If auto-billing fails, you’ll receive notifications and a grace period... | ✅ Yes |
Features:
- Add New FAQ
- Button located at the top-left corner to add a new FAQ entry.
- Search FAQs
- Search bar at the top-right to filter FAQs based on keywords.
- FAQ Items
- Each FAQ displays the question (bold) and a preview of the answer.
- Visibility Toggle
- Toggle switch to enable or disable public visibility of each FAQ.
- Edit FAQ
- Pencil icon to open the FAQ form in edit mode.
- Delete FAQ
- Trash icon to permanently delete an FAQ.
- Expand FAQ
- Icon to view full FAQ details.
Add / Edit FAQ Form
Form Fields:
| Field | Description | Required |
|---|---|---|
| Question | Text input for the FAQ question. | Yes |
| Answer | Textarea for detailed FAQ answer. | Yes |
| Visible | Toggle to control FAQ visibility. | Default: Visible |
Actions:
- Submit
- Saves the FAQ entry and updates the FAQ list.
- Cancel
- Closes the form without saving changes.
Workflow
Adding a New FAQ
- Click Add New FAQ.
- Fill in the Question and Answer.
- Set Visible toggle as needed.
- Click Submit to save.
Editing an Existing FAQ
- Click the edit icon (pencil) on the desired FAQ.
- Update fields as required.
- Click Submit to save changes.
Deleting an FAQ
- Click the delete icon (trash) on the FAQ.
- Confirm deletion (if prompted).
Toggling FAQ Visibility
- Use the toggle switch to show/hide FAQs on the public FAQ page.
Searching FAQs
- Use the search input to filter FAQs by keyword.
User Interface Details
- FAQ answers are previewed with truncation for quick scanning.
- The interface supports responsive design for desktop and mobile devices.
✅ Pages
The Page Management feature in WhatsMark SaaS allows you to create and manage static or dynamic pages for your platform. This is ideal for pages like About Us, Privacy Policy, Terms of Service, or custom informational content.
1. Page List View
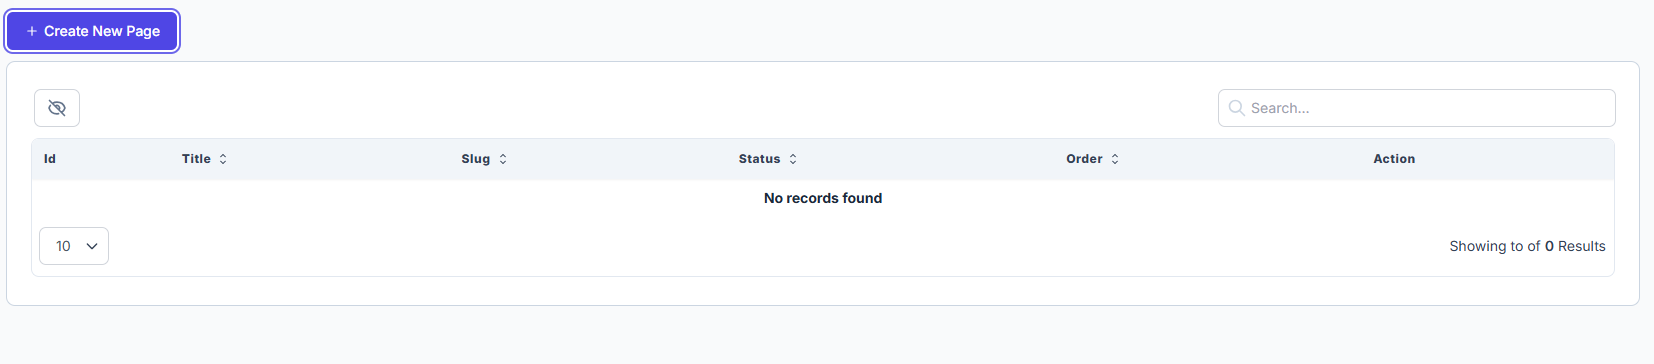
Location: Admin Panel → Setup → Pages
Description: This interface shows all created pages in a searchable, sortable table.
| Column | Description |
|---|---|
| Id | Unique identifier of the page. |
| Title | The name/title of the page. |
| Slug | URL-friendly version of the title used for routing. |
| Status | Indicates whether the page is active or inactive. |
| Order | Determines the order in which pages appear in a menu or listing. |
| Action | Provides options to edit or delete the page. |
🔘 Create New Page button at the top-left opens a modal form to add a new page.
2. Create New Page Modal
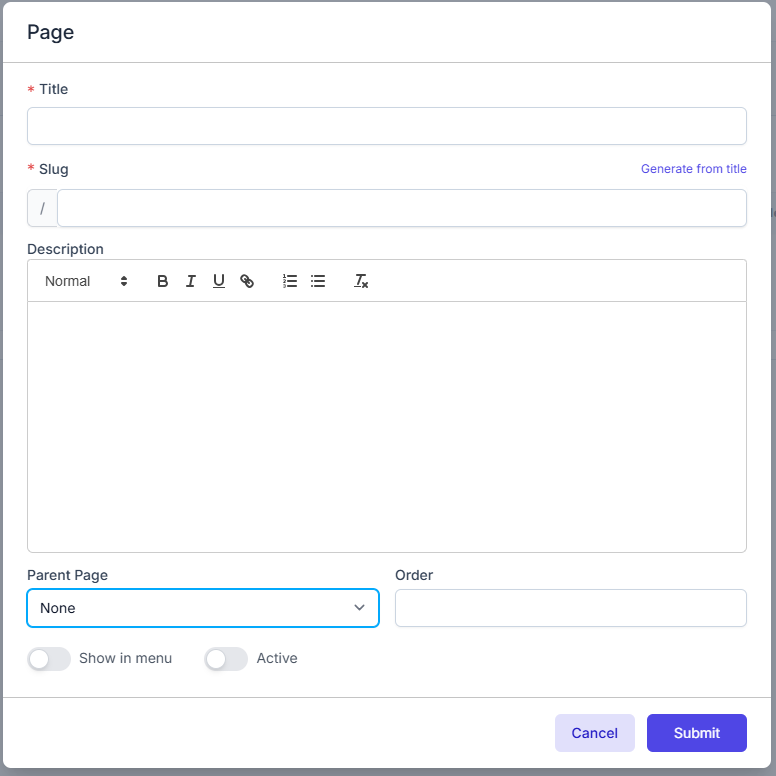
Description: The modal appears when clicking on + Create New Page. It allows input for all necessary fields to define a page.
Form Fields & Controls
| Field | Required | Input Type | Description |
|---|---|---|---|
| Title | ✅ Yes | Text Input | Title of the page. |
| Slug | ✅ Yes | Text Input | Auto-generates from the title or can be manually edited. |
| Description | ❌ No | Rich Text Editor | The content/body of the page with formatting tools. |
| Parent Page | ❌ No | Dropdown | Select an existing page as the parent (for hierarchical structure). |
| Order | ❌ No | Number Input | Determines the order of display in a list or menu. |
| Show in menu | ❌ No | Toggle Switch | Enable if you want the page to appear in the website's navigation menu. |
| Active | ❌ No | Toggle Switch | Marks the page as published or unpublished. |
Action Buttons
| Button | Action Description |
|---|---|
| Cancel | Closes the modal without saving. |
| Submit | Saves the page to the system and refreshes the list. |
Example Workflow
To create a Privacy Policy page:
- Click + Create New Page.
- Enter Title:
Privacy Policy. - Click Generate from title to auto-fill the Slug.
- Fill in the Description.
- Enable Show in Menu and Active, if needed.
- Click Submit.
✅ Email Templates
System templates are triggered by different user or platform actions (e.g., registration, password reset, subscription updates). Customizing them allows for consistent branding and personalized messaging.
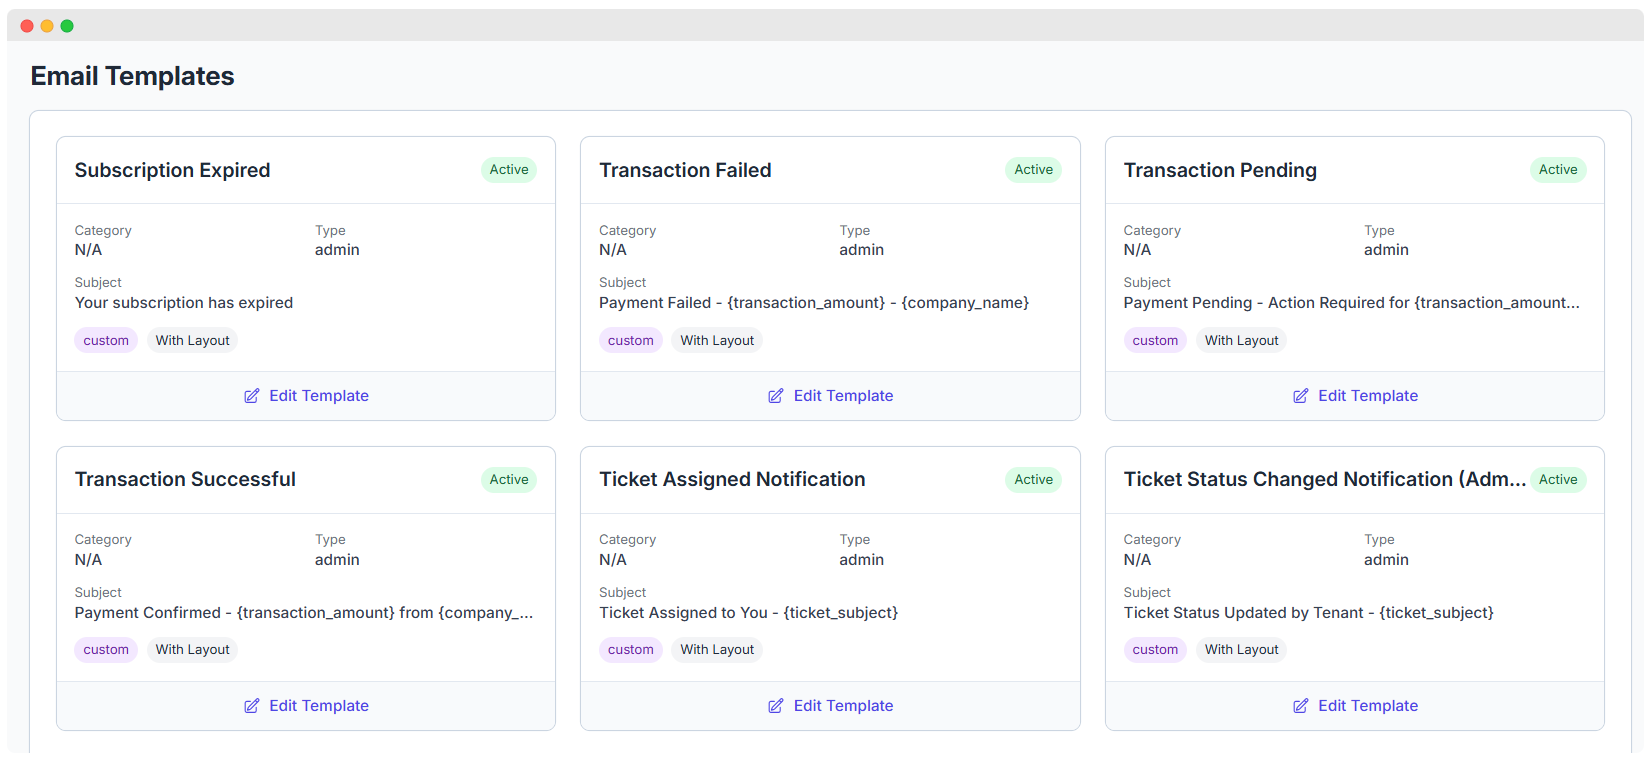
Common Email Templates
| Template Name | Triggered When... |
|---|---|
| Welcome Email | A user signs up or is invited to the system |
| Password Reset | A user requests to reset their password |
| Email Verification | After registration or email change to verify ownership |
| Subscription Notice | Subscription events like plan changes, renewals, or cancellations |
| Invoice Receipt | After successful payment or billing update |
| System Alerts | Important messages like account issues, admin alerts, or warnings |
| Trial Expiration | Reminder before or after the free trial ends |
Template Customization Options
| Feature | Description |
|---|---|
| Edit Email Body | Use HTML or Markdown to write the message. Includes styling and layout customization. |
| Edit Subject Line | Define a custom subject line for each template to improve email open rates. |
| Dynamic Variables | Insert placeholders that automatically populate with user-specific data. |
| Preview Mode | See a live preview of the template before saving it. Helps avoid formatting errors. |
| Language Versions | Add templates in multiple languages. The system will automatically select the right version based on user preference or locale. |
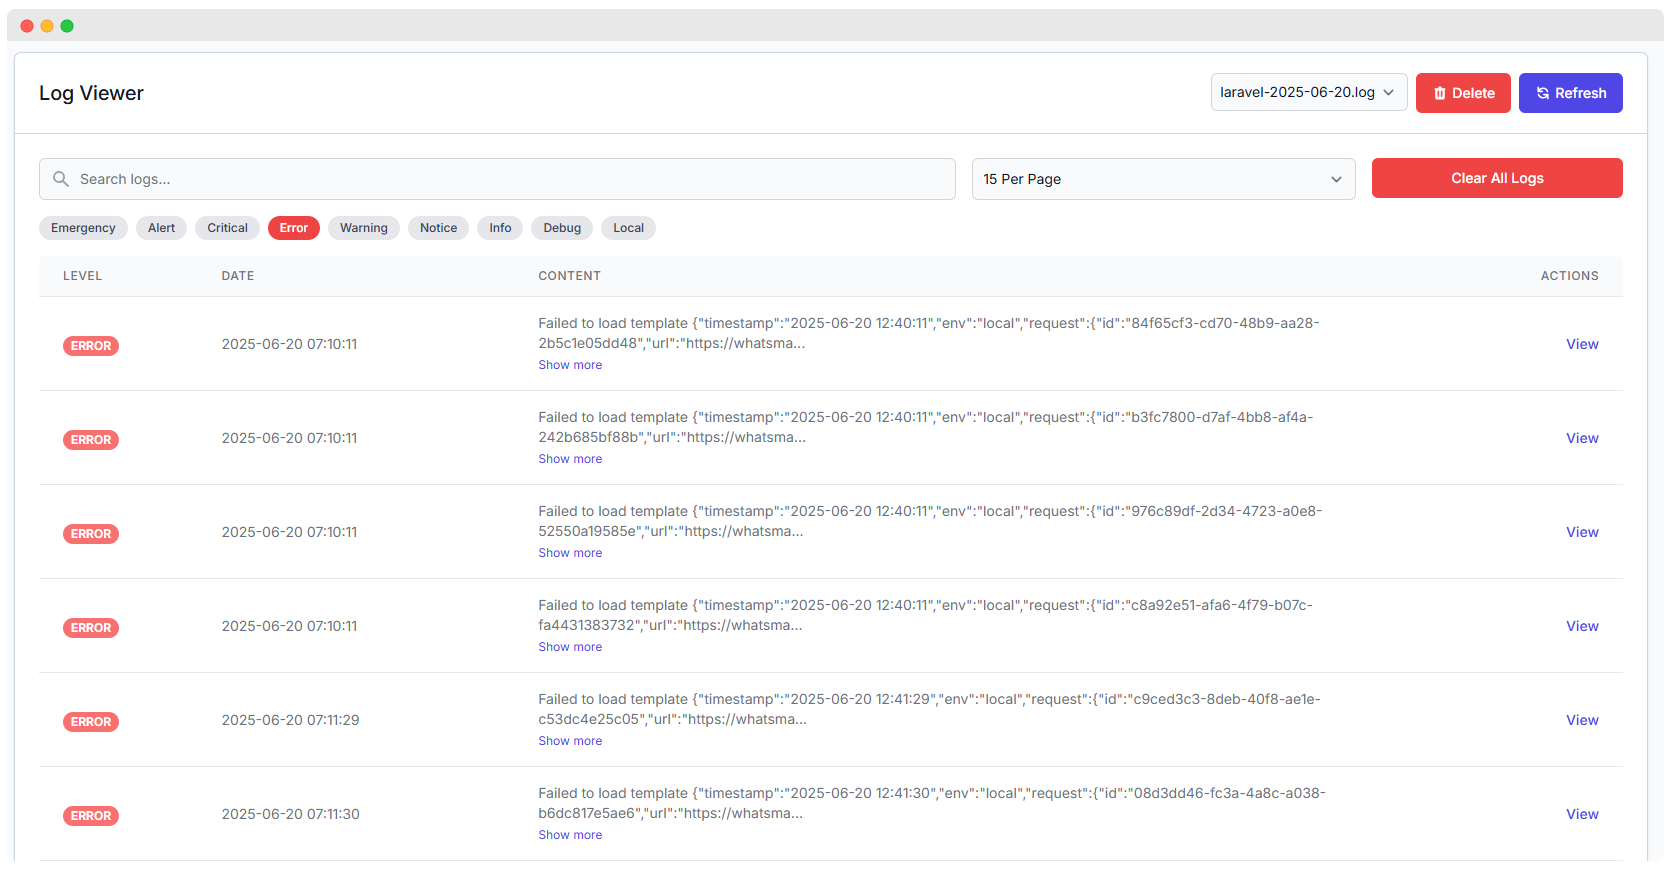
✅ System Logs
Severity-Based Filters
| Level | Description |
|---|---|
| Emergency | System is unusable. Requires immediate attention. 🛑 Example: “Server crashed and cannot restart.” |
| Alert | Action must be taken immediately. 🚨 Example: “Database connection dropped unexpectedly.” |
| Critical | Critical conditions that threaten core functionality. ❗ Example: “Failed to load payment gateway keys.” |
| Error | Runtime errors that should be investigated but don’t halt the system. 🧨 Example: “Webhook timeout” or “API failed to respond.” |
| Warning | Something unexpected occurred but the system continues to function. ⚠️ Example: “Deprecated config used.” |
| Notice | Normal but significant events. ℹ️ Example: “New admin user created.” |
| Info | Informational messages for general application events. 📋 Example: “User logged in successfully.” |
| Debug | Detailed debug information for developers during testing. 🔍 Example: “Variable $user contains null.” |
| Local | Custom tag to show logs relevant only to local/development environments. 🧪 Example: “Testing mode active.” |
Log Entries Overview
| Field | Description |
|---|---|
| Level | Severity classification (e.g. ERROR, DEBUG, INFO). |
| Date & Time | Timestamp of when the log was generated (e.g., 2025-06-20 07:10:11). |
| Content | Brief description or a truncated JSON message of the error or system message. |
| Actions | A View button to examine complete log details in a modal window. |
| Pagination | Select how many entries to display per page (e.g., 15 Per Page). |
View Log Entry Details
When clicking on the View button, a modal displays detailed content from the selected log.

This type of error usually indicates a network timeout or DNS resolution failure during a webhook/API call.
Log File Management Options
Manage and maintain your logs effectively with the following actions:
- Refresh – Updates the view to show the latest entries.
- Delete – Deletes the selected log file (use with caution).
- Clear All Logs – Erases all logs in one action for cleanup and space recovery.
- Log File Selector – Switch between logs using the dropdown (e.g.,
laravel-2025-06-20.log).
Log Actions Explained
Each log entry listed in the log viewer provides an "Actions" column where you can perform detailed operations:
View
- Clicking the View button opens a modal window showing the full log entry.
- It includes:
- Timestamp
- Log Level (e.g., ERROR, WARNING)
- Environment (e.g.,
local,production) - Full content of the log (API response, webhook error, exception stack, etc.)
- This feature is especially useful for debugging failed webhooks, API timeouts, or template rendering issues.
✅ Modules
The Modules Management feature allows administrators to view, activate, deactivate, and manage modules in the WhatsMark SaaS platform. It provides a clear overview of all installed modules and options to upload new modules.
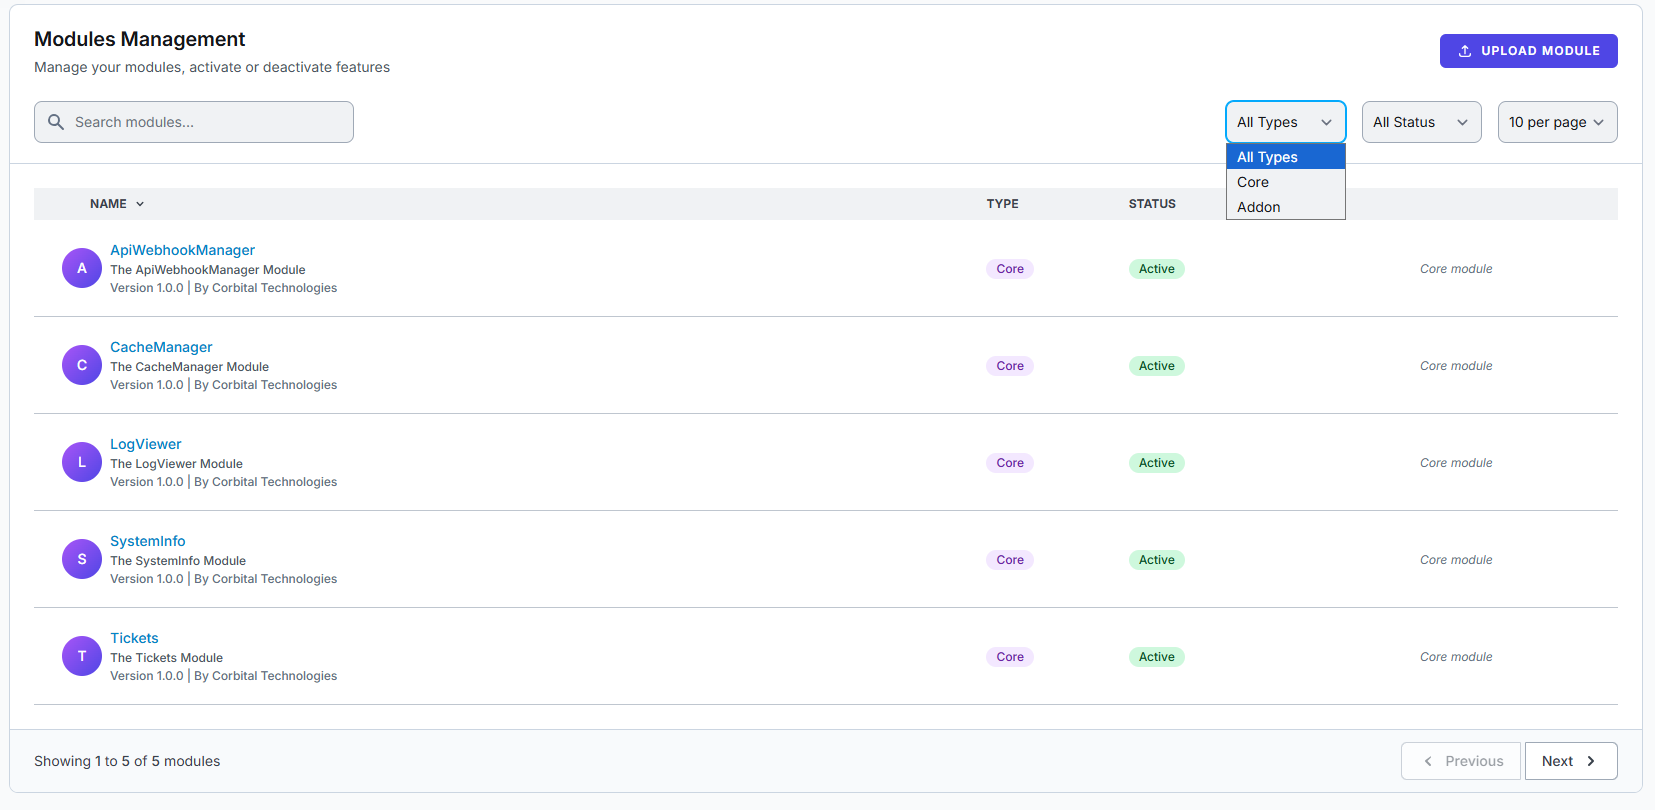
Location: Admin Panel → Setup → Modules
Interface Overview
Search & Filters
- Search Modules: Quickly find a module by typing its name or keywords.
- Filter by Type: Filter modules by
All Types,Core, orAddon. - Filter by Status: Filter modules by their activation status (
Active,Inactive). - Pagination Control: Select how many modules to display per page (e.g., 10 per page).
Module List Table
| Column | Description |
|---|---|
| Name | Displays module name as a clickable link, with a brief description and version info. |
| Type | Shows if a module is Core (essential) or Addon (optional extension). |
| Status | Indicates whether the module is currently Active or not. |
Each module entry includes:
- Module name and link
- Description (e.g., The Tickets Module)
- Version and author details (e.g.,
Version 1.0.0 | By Corbital Technologies) - Badges for type and status
- Category note (e.g., Core module)
Actions
- Upload Module button: Opens the interface to upload new modules.
- Pagination for navigating multiple pages of modules.
Example Workflow
- Use the search box or filters to find specific modules.
- Click module names to view details or change status.
- Use the Upload Module button to add new modules.
Install New Module
The Install New Module interface allows administrators to upload new module packages to extend WhatsMark system functionality.
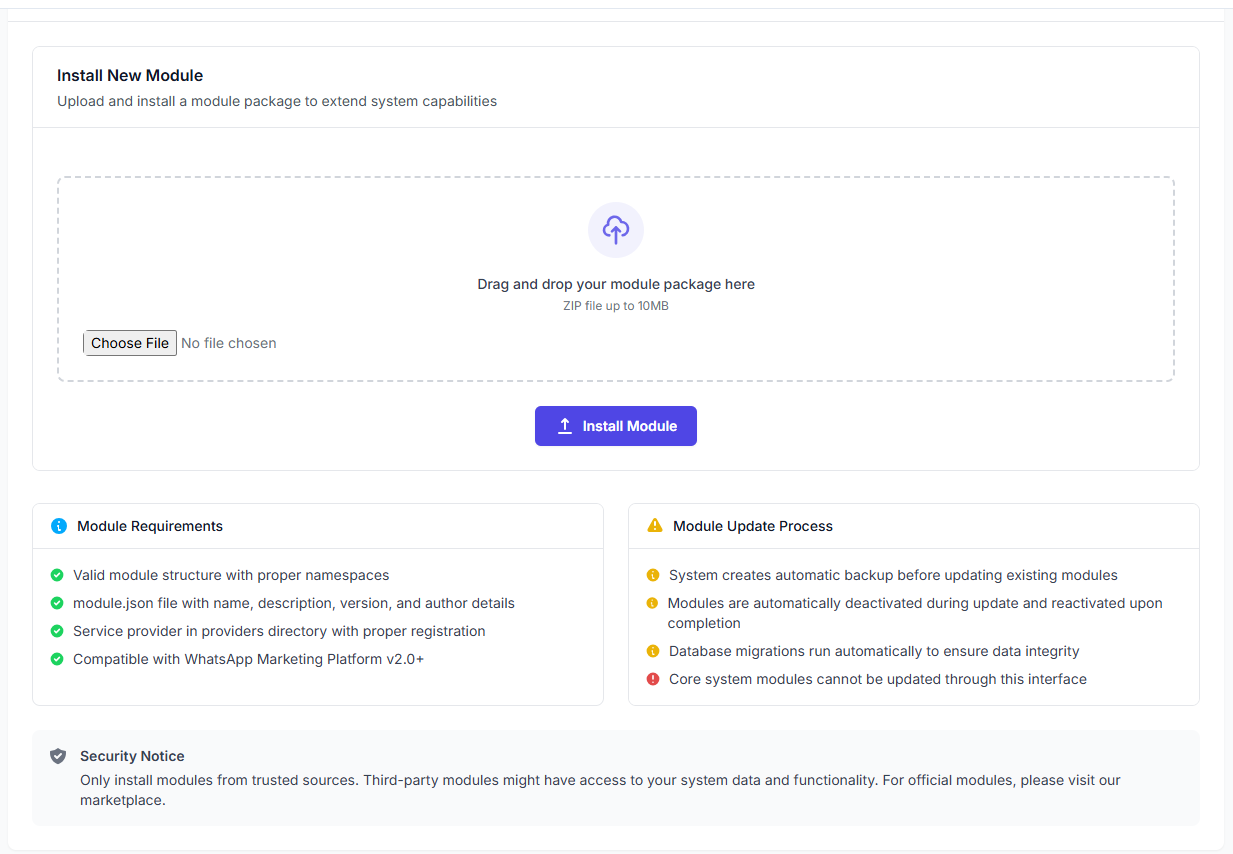
Interface Overview
Upload Module Package
- Drag & Drop Area: Drag your ZIP module package here. Max size: 10MB
- Choose File Button: Browse and select the module package from your computer.
- Install Module Button: Upload and install the chosen module.
Module Requirements
- Proper module structure with namespaces.
module.jsoncontaining:- Name
- Description
- Version
- Author details
- Service provider class correctly registered in the
providersdirectory. - Compatibility with WhatsApp Marketing Platform v2.0+.
Module Update Process
- Automatic backup is created before updating modules.
- Modules are deactivated during update and reactivated after completion.
- Database migrations run automatically to maintain data integrity.
- Core system modules cannot be updated via this interface.
Security Notice
- Only install modules from trusted sources.
- Third-party modules may access system data and features.
- For official modules, use the WhatsMark marketplace.