Custom Field Creation
This guide explains how to create, configure, and manage Custom Fields in WhatsMark SaaS. These fields allow you to collect personalized data through contact creation forms and can be edited or reused as needed.
Overview
Custom Fields enhance contact management by letting you add custom attributes like "Company Name", "Customer Type", or "Referral Source". These fields can be:
- Shown in contact creation forms
- Marked as required
- Displayed in contact tables
How to Create a Custom Field
- Go to: Setup > Custom Fields > Create Custom Field
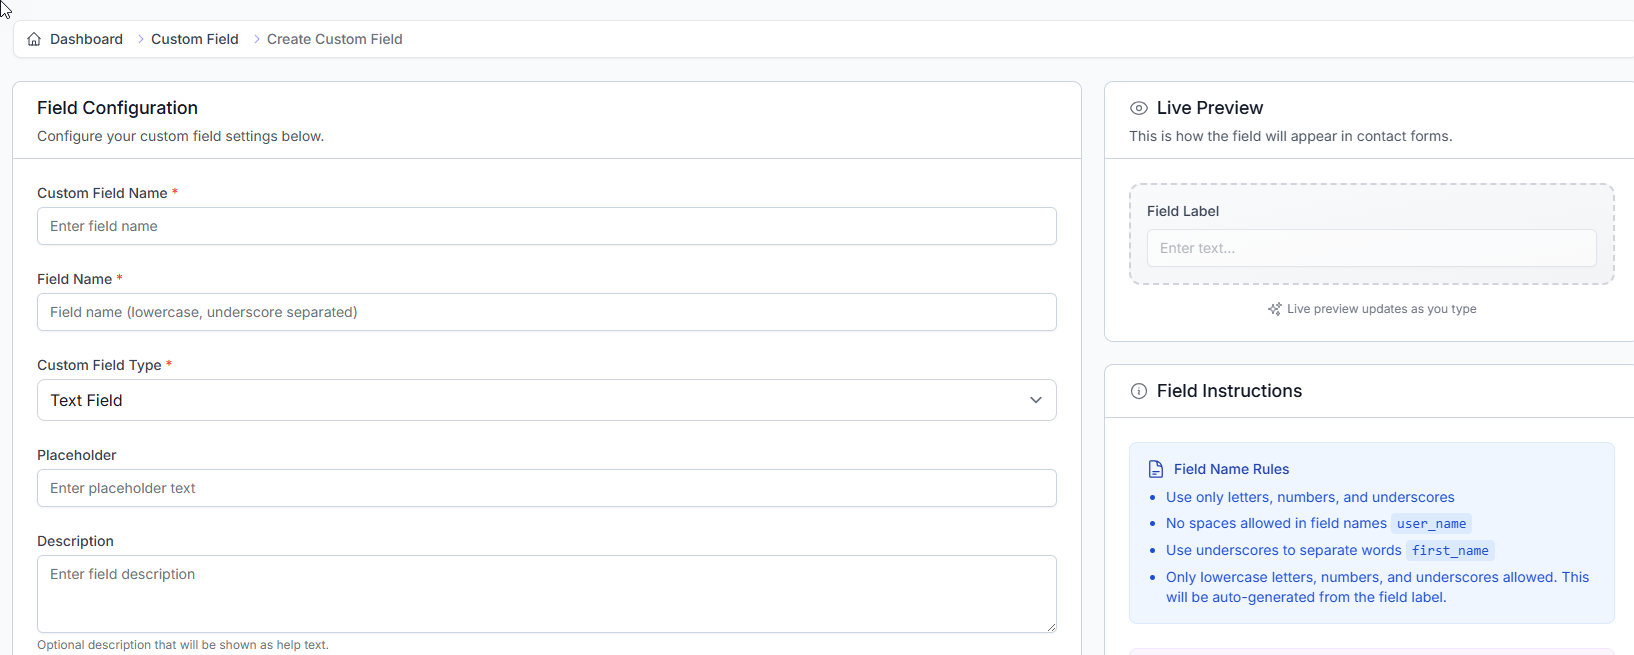
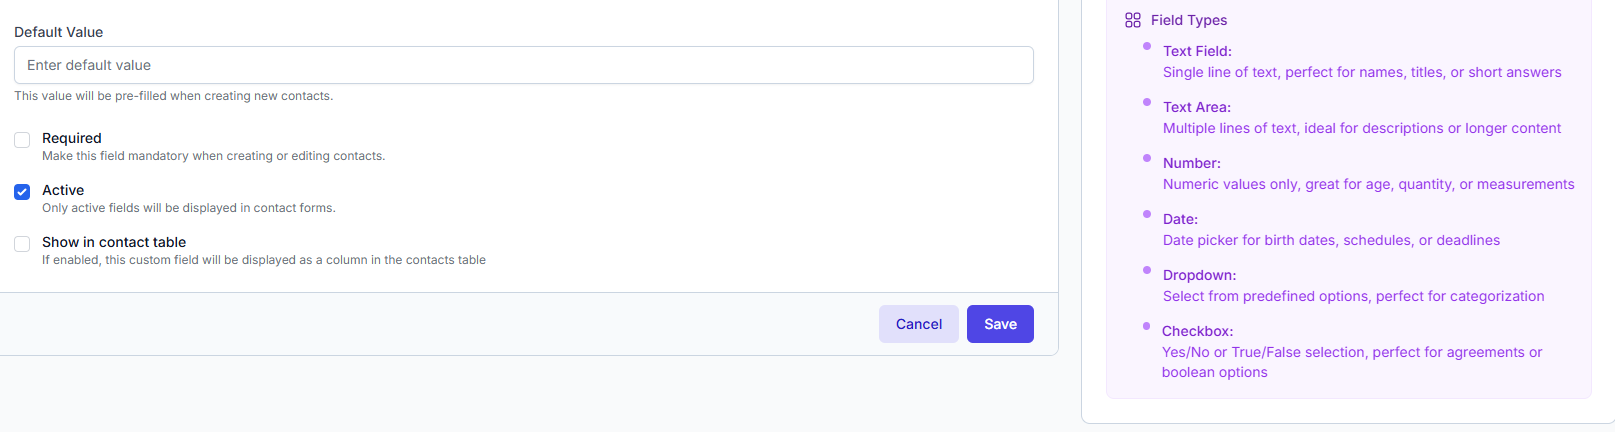
- Fill out the Field Configuration form.
| Field | Description |
|---|---|
| Custom Field Name | The label shown in the contact form (e.g., Company Name) |
| Field Name | Used internally; lowercase with underscores (e.g., company_name) |
| Custom Field Type | Choose the type of input (text, number, dropdown, etc.) |
| Placeholder | Optional text shown inside the input box as a hint |
| Description | Optional help text displayed under the field in the form |
Field Instructions
These are the rules for the Field Name:
- Use only letters, numbers, and underscores
- No spaces allowed in field names →
user_name - Use underscores to separate words →
first_name - Only lowercase letters, numbers, and underscores allowed
This will be auto-generated from the field label
Field Types
| Type | Description |
|---|---|
| Text Field | Single line of text, perfect for names, titles, or short answers |
| Text Area | Multiple lines of text, ideal for descriptions or longer content |
| Number | Numeric values only, great for age, quantity, or measurements |
| Date | Date picker for birth dates, schedules, or deadlines |
| Dropdown | Select from predefined options, perfect for categorization |
| Checkbox | Yes/No or True/False selection, perfect for agreements or boolean options |
Additional Settings
| Option | Description |
|---|---|
| Default Value | Pre-filled value shown when creating new contacts |
| Required | Make this field mandatory for new or edited contacts |
| Active | Only active fields are shown in contact forms |
| Show in Contact Table | Displays this field as a column in the contacts table |
Live Preview
As you type, a Live Preview on the right shows how your field will appear in the contact form.
The preview updates automatically as you make changes.
Save or Cancel
- Click Save to finalize the custom field.
- Click Cancel to discard changes.
Once fields are created:
- They will appear in the contact creation/edit forms
- Can be edited or deleted from this list view
- Will reflect changes immediately across the app (if active)
Viewing Custom Fields
After creating custom fields, they will be listed on the Custom Field page.
Navigation
Setup > Custom Fields
Custom Field List View
This section displays all previously created custom fields in a structured table format.
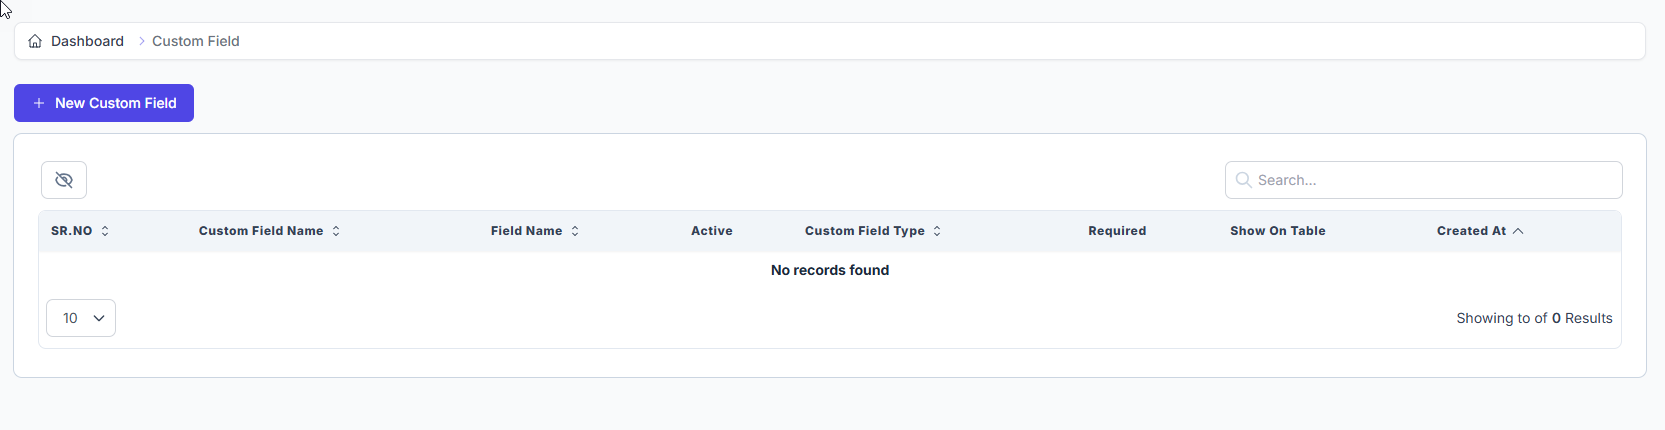
Table Columns Explained
| Column | Description |
|---|---|
| SR. NO | Serial number for easy reference |
| Custom Field Name | The display name used on the contact form |
| Field Name | The internal field identifier (lowercase, underscore format) |
| Active | Indicates if the field is currently active and usable in forms |
| Custom Field Type | Shows the type of field (e.g., Text Field, Date, Dropdown) |
| Required | Displays whether this field is mandatory when adding/editing contacts |
| Show on Table | Indicates whether this field is visible as a column in the contact list/table |
| Created At | Timestamp showing when the field was created |
Note: When no custom fields are created, the message
"No records found"will be displayed in the table.
Search & Pagination
- Search Bar: Located on the top-right of the table, this allows you to filter custom fields by name or type.
- Pagination Dropdown: At the bottom-left, use this to change how many results are displayed per page (e.g., 10, 25, 50).
Editing a Custom Field
To edit an existing custom field:
- Go to
Setup > Custom Fields - Click the Edit icon next to the desired field
- Update the settings and click Save
Some options (like field type or field name) may be locked after creation.
Example: Creating a "Company Name" Field
| Setting | Value |
|---|---|
| Custom Field Name | Company Name |
| Field Name | company_name |
| Field Type | Text Field |
| Placeholder | Enter company name |
| Description | Optional: Enter the full company name |
| Default Value | - |
| Required | |
| Active | |
| Show in Contact Table |
Using Custom Fields as Merge Fields v3.0.0
Once a custom field is created and set to Active, it becomes available as a merge field across WhatsMark. Merge fields let you insert real contact data dynamically into any message — so instead of typing a customer's name manually, the system fills it in automatically.
How Merge Fields Work
Every active custom field gets a merge tag based on its Field Name:
@{field_name}For example, a field with Field Name company_name becomes @{company_name}. When a message is sent, WhatsMark replaces the tag with the actual value stored on that contact.
Only active fields appear
A custom field must have Active toggled on to show up in the @ merge field picker. Inactive fields are hidden from all dropdowns.
How to Insert a Merge Field
In any supported area, type @ in the text input. A dropdown will appear listing all available merge fields — both built-in contact fields and your custom fields. Click one to insert it. 

Built-in Contact Merge Fields
These are always available regardless of custom fields you create:
| Merge Field | Value inserted |
|---|---|
@{contact_name} | Full name of the contact |
@{contact_first_name} | First name only |
@{contact_last_name} | Last name only |
@{contact_email} | Contact's email address |
@{contact_phone} | Contact's phone number |
@{contact_city} | City |
@{contact_country} | Country |
@{organization_name} | Your organisation / business name |
@{staff_firstname} | Name of the agent handling the chat |
Custom Field Merge Fields
Any active custom field appears in the same @ picker alongside the built-in fields. The merge tag format is always:
@{field_name}Using the "Company Name" example from above — Field Name company_name — the merge tag would be:
@{company_name}If the contact has Corbital Technologies stored in that field, the sent message will read Corbital Technologies in place of the tag.
Where Merge Fields Can Be Used
| Area | How to use |
|---|---|
| Chat (Live Chat) | Type @ in the message compose box to pick a merge field and personalise your reply |
| Message Bot | Type @ in the Reply Text field — the bot will insert the contact's value when sending |
| Template Bot | Press @ in the dynamic merge fields section after saving — fills template variables with contact data |
| Bot Flow | Use merge fields inside Send Message nodes to personalise automated flow replies |
| Campaign Manager | Type @ in Body Variables to map template [variable] slots to contact data |
| Bulk Campaign | Same as Campaign Manager — use @{field_name} in variable inputs |
| Ecommerce Module | Merge fields are available in order notification message templates |