AApanel Installation Guide 🚀
Important
AApanel uses a different file-ownership model compared to cPanel or CloudPanel.io. This sometimes causes file permission errors after uploading or extracting the script.
This is not a script issue — it's AApanel's default behavior. Following this guide will fix it permanently.
This guide ensures a clean and smooth installation on AApanel.
Why AApanel Needs Special Attention
AApanel often extracts or uploads files under the root user, while PHP-FPM runs under www or www-data. This user mismatch causes common errors like:
- ❌
Permission denied - ❌
Storage not writable - ❌
Unable to create symlink - ❌
Logs not being generated - ❌
Queue failing
Step 1: Create the Website in AApanel
- Open AApanel → Website → Add Site
- Set your domain name (e.g.,
yourdomain.com) - Choose the following settings:
- PHP version: 8.1+ (recommended: 8.2 or 8.3)
- Database: MySQL
- Create FTP: Optional
- Click Submit to create the site
After creation, note your installation path:
/www/wwwroot/YOURDOMAINStep 2: Upload the Script
You can upload the WhatsMarkSaaS script in two ways:
Option A: Using File Manager
- Open AApanel → Files
- Navigate to
/www/wwwroot/YOURDOMAIN - Upload the
.zipfile - Right-click and select Extract
Option B: Using SSH
cd /www/wwwroot/YOURDOMAIN
unzip whatsmarksaas.zip
TIP
Make sure to extract/upload files inside the domain directory, not in a subdirectory.
Step 3: Fix File Ownership ⚠️ (Most Important Step)
AApanel often extracts files under the root user, but PHP-FPM runs under www or www-data. This mismatch causes all permission errors.
For CentOS / AApanel Default (user: www)
chown -R www:www /www/wwwroot/YOURDOMAINFor Ubuntu/Debian (user: www-data)
chown -R www-data:www-data /www/wwwroot/YOURDOMAINImportant
Replace YOURDOMAIN with your actual domain path (e.g., demo.example.com)
Step 4: Set Proper Folder Permissions
Laravel needs write access to specific directories:
/storage/bootstrap/cache/public/uploads(if using file uploads)
Run the following commands:
chmod -R 775 /www/wwwroot/YOURDOMAIN/storage
chmod -R 775 /www/wwwroot/YOURDOMAIN/bootstrap/cache
If your script handles file uploads:
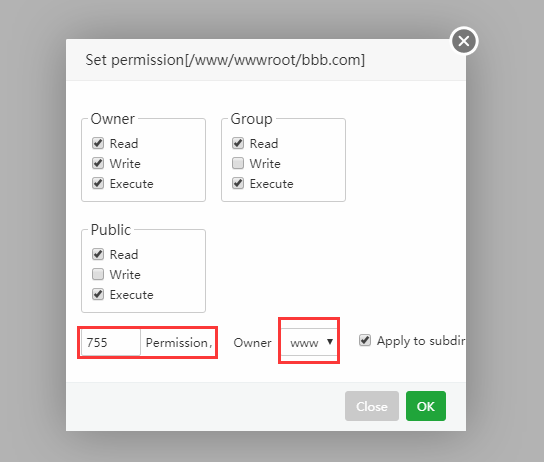
chmod -R 775 /www/wwwroot/YOURDOMAIN/public/uploadsSet Permissions via AApanel GUI (Alternative Method)
You can also set permissions through AApanel's File Manager:
- Navigate to your domain folder
- Right-click on
storageorbootstrap/cachefolders - Select Permission and set to
775
Step 5: Configure PHP Settings
- Open AApanel → App Store → PHP Settings → Select your PHP version
- Click Install Extensions and enable the following:
Required Extensions:
- ✅
fileinfo - ✅
pdo_mysql - ✅
openssl - ✅
mbstring - ✅
zip - ✅
curl - ✅
exif - ✅
bcmath - ✅
sockets
Recommended Extensions:
- 🔹
opcache(for better performance) - 🔹
redis(for caching and queues)
Go to Disabled Functions tab
Remove these functions if listed (Laravel needs them):
proc_openputenvpcntl_*(all pcntl functions)
Click Save and restart PHP-FPM
Step 6: Set Correct Document Root
Ensure your website points to the public directory:
/www/wwwroot/YOURDOMAIN/publicHow to Set Document Root:
- AApanel → Website → Select your site
- Click Site Directory
- Set Running Directory to
/public - Click Save
Step 7: Using Web Installer
If your script includes a web-based installer, visit:
https://yourdomain.com/installFollow the on-screen prompts to complete the installation.
Step 8: Setup Cron Jobs
WhatsMarkSaaS requires cron jobs for scheduled tasks.
Add Cron Job in AApanel:
- AApanel → Cron
- Click Add Cron
- Configure as follows:
Type: Shell Script
Name: WhatsMarkSaaS Scheduler
Execution Cycle: Every minute (*/1 * * * *)
Script Content:
cd /www/wwwroot/YOURDOMAIN && php artisan schedule:run >> /dev/null 2>&1- Click Save
Setup Laravel Horizon (if using queues)
Refer to the Supervisor Setup Guide for detailed configuration.
Step 9: Restart PHP & Nginx
Always restart services after installation:
- AApanel → App Store → Installed
- Click Restart next to:
- PHP (your version)
- Nginx or Apache
Alternatively, use SSH:
# Restart PHP-FPM
systemctl restart php-fpm-82  # Replace 82 with your PHP version

# Restart Nginx
systemctl restart nginx

# Or Apache
systemctl restart httpd
🧩 Final Notes
- ✅ AApanel is powerful but requires manual permission correction because its extraction system sets ownership to
root. - ✅ Once ownership & permissions are fixed using the steps above, WhatsMarkSaaS runs smoothly.
- ✅ Always use the
wwwuser (orwww-dataon Ubuntu) when running Artisan commands. - ✅ Regularly check logs at
storage/logs/laravel.logfor any issues.
Additional Resources
Need Help?
If you still face issues after following this guide, please:
- Check the FAQ section
- Review
storage/logs/laravel.logfor error details - Contact our support team