Tenant Dashboard
The Tenant Dashboard gives you a centralized view of your WhatsApp marketing and support activity:
- Contacts: View and manage your customer database
- Message Automation: Manage bots and templates
- Campaigns: Create and track marketing campaigns
- Analytics: Measure performance, delivery, and growth
- Live Chat: Engage in real-time customer conversations
- Usage Tracking: Monitor your subscription plan and usage limits
Previews
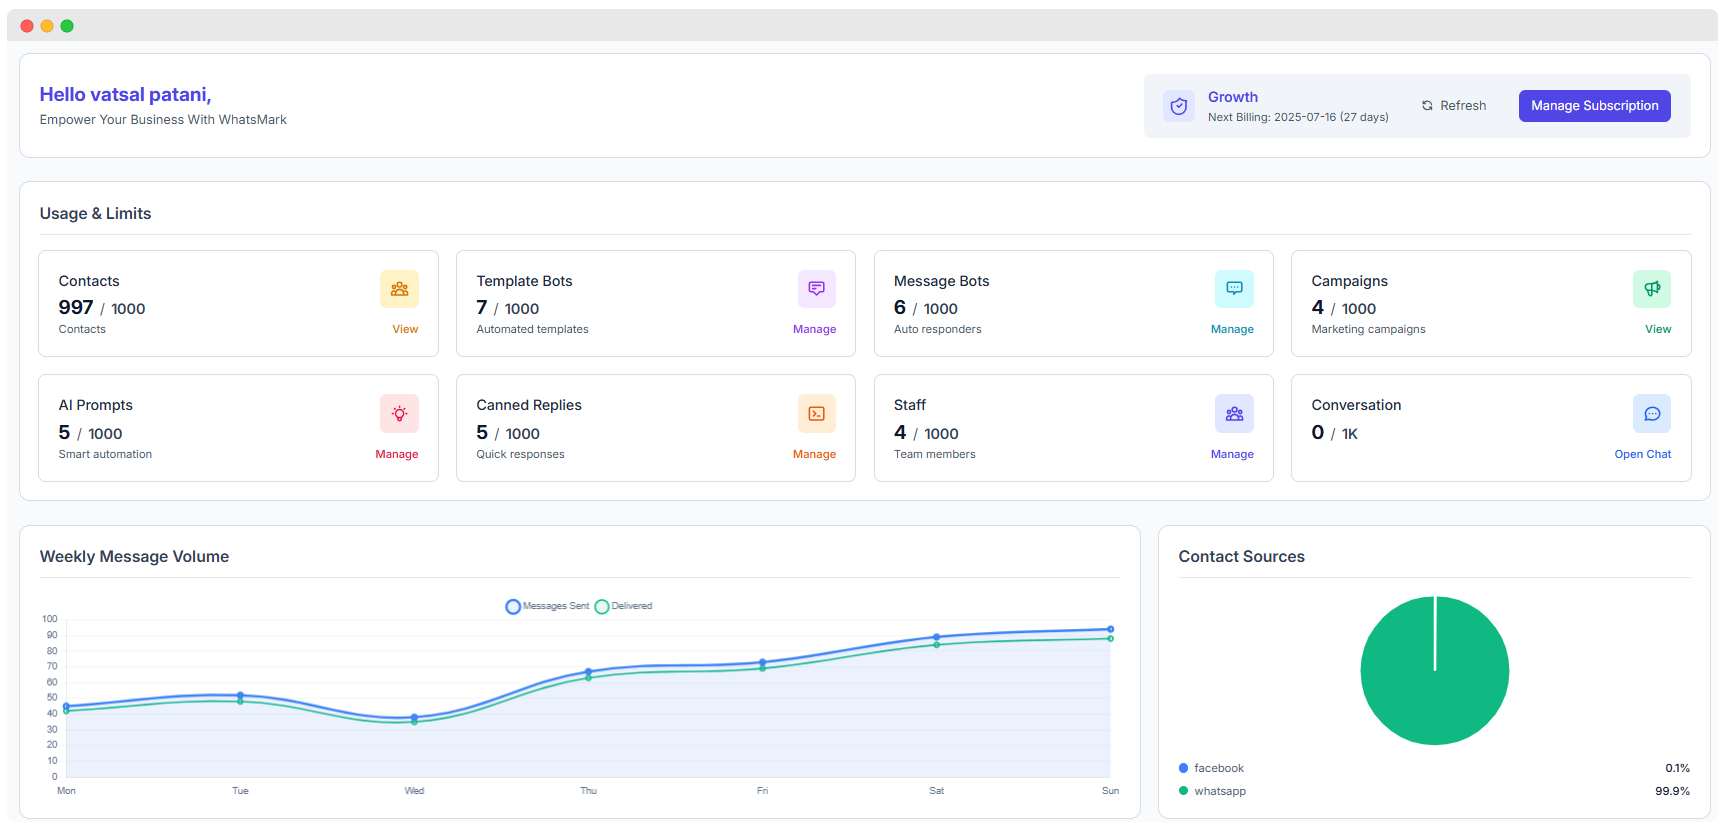
Dashboard Widgets
The tenant dashboard is built with widgets — modular data panels you can show or hide to focus on what matters most. Widget visibility is saved per user and does not affect other team members.

There are 5 widgets available on the tenant dashboard:
Usage & Limits
The most important widget — shows your current consumption vs the plan limit for every feature:
| Feature | Display example |
|---|---|
| Contacts | 18 / 100 |
| Template Bots | 2 / 100 |
| Message Bots | 5 / 100 |
| Campaigns | 6 / 100 |
| AI Prompts | 2 / 100 |
| Canned Replies | 6 / 100 |
| Staff / Team Members | 7 / 100 |
| Bot Flow | 17 / 100 |
| Conversation | 8 / 1K |
Limits are determined by your active subscription plan. A limit of -1 means unlimited.
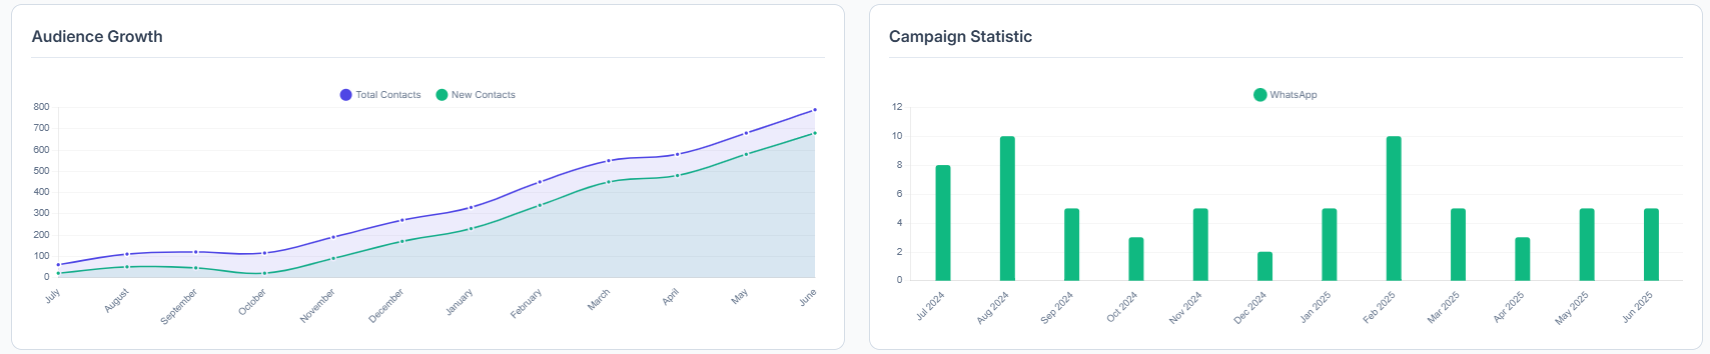
Audience Growth
A chart tracking how your contact list has grown over time — useful for understanding acquisition pace month over month.
Contact Sources
A breakdown of where your contacts came from (e.g. manual imports, bot captures, WhatsApp, Facebook, integrations). Helps you identify your best acquisition channels.
Weekly Message Volume
A chart comparing Messages Sent vs Messages Delivered over the current week — lets you monitor WhatsApp delivery rates at a glance.
Campaign Statistic
A summary of recent campaign performance showing sent, delivered, read, and failed counts — a quick snapshot of your marketing results.
Subscription info in the header
The dashboard header always shows your current plan name and next billing date (e.g. "Unlimited Plan — Next Billing: 2027-03-11, 322 Days"). You can click Manage Subscription directly from there. For Lifetime plans, no billing date is shown since there is no renewal.
Dashboard Controls
At the top of the dashboard there is a widget control bar:
| Control | Location | What it does |
|---|---|---|
| Widget Checkboxes | Top-left | Toggle individual widgets ON or OFF. Unchecking hides the widget; your preference is saved automatically. |
| Dashboard Options | Top-right (blue button) | Opens the full widget panel to manage all widgets at once. |
| Hide Widgets Area | Top-right link | Collapses the entire widget section for a clean view. Click again to show it. |
| Reset Dashboard | Top-right link | Restores all widgets to their default state — useful if you have hidden something by mistake. |
| Refresh | Header area | Reloads all widget data without a full page refresh. |
How to show or hide a widget:
- Go to your Tenant Dashboard (first page after login).
- Look at the top-left checkboxes — one per widget. Checked = visible, unchecked = hidden.
- Click a checkbox to toggle the widget instantly.
- Alternatively, click Dashboard Options (top-right) to manage all widgets from one panel.
Accidentally hidden everything?
Click Reset Dashboard at the top-right to restore all widgets to their default visibility.
Core Tenant Features
Contact Management
Contact Limit Tracking: Monitor real-time usage (e.g.,
997 / 1000contacts used).Bulk Import Options: Upload contacts via CSV, third-party integrations, or manual entry.
Audience Segmentation: Create dynamic groups based on tags, behavior, or profile fields.
Engagement Tracking: View message activity per contact (opens, clicks, responses).
Preference Management: Enable opt-ins, opt-outs, and DND (Do Not Disturb) controls for compliance.
Rich Contact Profiles: View conversation history, campaign responses, and notes per contact.
Learn more: Learn more about Contact Management →
Template Bot Management
Custom Template Creation Design rich-text templates using dynamic fields and media attachments (limit:
7 / 1000templates used).WhatsApp Approval Workflow Submit templates directly for WhatsApp review and monitor approval status in real time.
Multilingual & Categorized Templates Organize templates by language and purpose (e.g., Order Updates, Reminders, Promotions).
Performance Analytics Measure open rates, click-throughs, and usage stats for each template.
Template Moderation Modify rejected templates and resubmit with reasons or improvements.
Learn more: Learn more about Template Bot Management →
Message Bot Automation
Auto-Responder Setup Instantly reply to customer messages with pre-set responses. (Usage:
6 / 1000bots configured)Conversation Flow Builder Design structured message sequences using flowcharts or drag-and-drop tools to guide users through a process or funnel.
Keyword-Based Triggers Define specific keywords to trigger replies, offers, or lead collection prompts automatically.
FAQ Automation Automatically address common questions like pricing, order tracking, or store hours without human intervention.
Business Hour Responses Set different bot behaviors based on business hours (e.g., "We're currently offline, but we'll reply soon").
Learn more: Learn more about Message Bot Automation →
Campaign Management
Campaign Limits: Manage up to
4 / 1000active campaigns.Scheduled Campaigns: Plan and automate message sending at optimal times to maximize engagement.
A/B Testing: Test different message variants to identify the most effective content and approach.
Performance Tracking: Monitor delivery rates, open rates, click-throughs, and overall campaign engagement.
Personalization: Use dynamic contact variables (e.g., names, locations) to tailor messages for higher relevance.
Learn more:Learn more about Campaign Management →
AI-Powered Automation
AI Prompts for Automation: Utilize AI-generated prompts and templates to automate responses (limit:
5 / 1000).Natural Language Processing (NLP): Understand customer intent and respond naturally in conversations.
Intelligent Response Suggestions: Receive AI-powered suggestions for replies to improve accuracy and speed.
Context-Aware Conversations: Maintain context over multiple interactions to handle complex queries smoothly.
Continuous Learning: The AI learns from past interactions to improve responses over time.
Learn more:Learn more about AI-Powered Automation →
Canned Reply
Canned Replies Storage: Save up to
5 / 1000pre-written replies for reuse across conversations.Response Categorization: Organize replies by topics or categories for easy retrieval.
Instant Access: Quickly insert canned responses during live chats or automated workflows.
Personalization: Customize replies dynamically using variables (e.g., customer name, order details).
Team Sharing: Share quick responses with all team members to maintain consistent communication.
Learn more:Learn more about Canned Replies →
Staff
Add Team Members: Invite and manage up to
4 / 1000team members.Role-Based Permissions: Assign specific roles and access levels to control what each team member can view and edit.
Team Activity Monitoring: Track member actions, logins, and interactions to ensure productivity and compliance.
Conversation Assignment: Delegate specific customer conversations to individual agents for focused support.
Performance Tracking: Measure team metrics such as response times, resolution rates, and engagement levels.
Conversations
Real-Time Conversation Management: Handle live chats with customers instantly. (Usage:
0 / 1000active chats)Multiple Agent Support: Allow several team members to participate and collaborate on conversations simultaneously.
Conversation History Tracking: Maintain detailed logs of past messages for context and reference.
File and Media Sharing: Exchange images, videos, documents, and other media within chats seamlessly.
Customer Information Integration: Access and display relevant customer details during conversations to personalize support.
Learn more:Learn more about Live Chat & Conversations →
Analytics & Reporting
Gain valuable insights into your WhatsApp marketing efforts with comprehensive analytics and reporting tools.
Weekly Message Volume
Track and analyze your messaging activity on a weekly basis to optimize outreach:
Messages Sent: Monitor the total number of outbound messages sent each week.
Messages Delivered: Track how many messages were successfully delivered to recipients.
Performance Trends: Compare message volumes week-over-week to identify growth or decline.
Peak Activity: Identify the days and times when message traffic is highest for better scheduling.
Audience Growth Tracking
Understand how your contact list is growing and engaging with your campaigns:
Total Contacts: Monitor the overall size of your contact database over time.
New Contacts: Track how many new contacts are added during each period.
Engagement Metrics: Analyze the ratio of active versus inactive contacts to gauge engagement levels.
Growth Velocity: Measure the rate of contact acquisition month-over-month to identify trends.
Contact Source Analysis
Discover where your contacts come from to optimize acquisition channels:
WhatsApp: Contacts added directly through WhatsApp (e.g., 99.9% in sample data).
Facebook: Contacts imported from social media platforms like Facebook (e.g., 0.1%).
Other Sources: Contacts acquired through website forms, imports, referrals, or other methods.
Source Performance: Evaluate the quality and engagement rates from each acquisition channel to focus efforts effectively.
Guide to Tenant Registration Process
Before you can start sending messages or launching campaigns, you need to register your tenant account and activate your subscription.
Step-by-Step Registration Workflow
Visit the Landing Page Access the official SaaS platform where tenant accounts are created.
Choose a Subscription Plan Select from available tiers based on your usage needs (e.g., number of contacts, campaigns, bots).
Register Your Tenant
- Fill in your company name and contact details
- Set your login credentials
- Submit the registration form
Complete Payment Choose one of the following payment methods to activate your subscription:
- Offline Payment
- Stripe Payment Gateway
- Razorpay Integration
Wait for Activation After payment is confirmed, your tenant account will be activated by the system or admin.
Watch a Visual Walkthrough
Want to see the process in action? Click here to watch the registration guide on YouTube
This tutorial walks you through tenant setup, payment, and feature configuration.
Frequently Asked Questions
Will hiding a widget affect my data?
No. Hiding a widget only removes it from view — your data is never deleted. You can show it again at any time by checking its checkbox or clicking Reset Dashboard.
Can I hide a widget for all team members at once?
Widget preferences are saved per user, so each team member controls their own dashboard independently. There is no setting to force-hide a widget for everyone.