Stop AI v3.0.0
The Stop AI feature lets you instantly silence the AI Personal Assistant for a specific conversation so you can step in and respond personally. Unlike Stop Bot, which pauses automation flows and template bots, Stop AI targets only the AI assistant that auto-replies on your behalf.
Module required
The Stop AI button only appears in a chat when the AI Assistant module is active on your account and that chat has an AI assistant currently running on it.
First-time setup?
You must configure the AI assistant settings before the Stop AI button appears. → Jump to Settings
How It Works
| Step | What happens |
|---|---|
| You create a Personal Assistant | Give it instructions, a knowledge base, and choose OpenAI or Gemini as the provider |
| Assign it to a Message Bot | The bot links the AI to any chat it handles |
| Assign it to a BotFlow | The flow links the AI Assistant node to any chat it handles |
| Customer sends a message | The AI generates a reply, waits for the configured delay, then sends it |
| You or the customer stops it | Click Stop AI in the chat menu, or the customer sends a stop keyword |
Using Stop AI in a Chat v3.0.0
Step 1: Open the Chat Where AI Is Active
Go to your Chat page and open the conversation where the AI assistant is currently responding. AI-generated replies come in automatically — that's how you know an assistant is active on that chat.
Step 2: Click the Three-Dot Menu and Select "Stop AI"
In the top-right corner of the chat, click the three-dot menu (⋮). You will see a Stop AI option. Click it to immediately stop the AI assistant from replying in this conversation.

Stop AI only appears when
- The AI Assistant module is active on your account, and
- The current chat has an AI assistant running on it
If neither condition is met, the button will not be visible.
Step 3: AI Stops — You're Now in Control
The AI immediately stops generating replies for this conversation. You will see a notification: "AI stopped successfully". You can now respond to the customer manually.
No auto-restart
Unlike Stop Bot, there is no auto-restart timer for Stop AI. Once stopped, the AI stays off for that chat until the next time the bot triggers a new AI session for that contact.
Step 4 (Automatic): Customer Sends a Stop Keyword
If you configured Stop Assistant Keywords in settings (e.g. "stop", "human", "agent"), any incoming message containing one of those words automatically pauses the AI for that chat — no action needed from you.
Example
A customer types "I want to speak to a human" — since "human" is in your stop keywords, the AI immediately stops and waits for a real agent to take over.
Configure AI Assistant Settings
This is a one-time setup. Once saved, these settings apply to all assistants you create.
Step 1: Go to Application Settings → AI Integration
From your WhatsMark sidebar, go to Application Settings and click AI Integration. This connects your AI provider and enables the AI writing-helper button in the chat compose box for your agents.
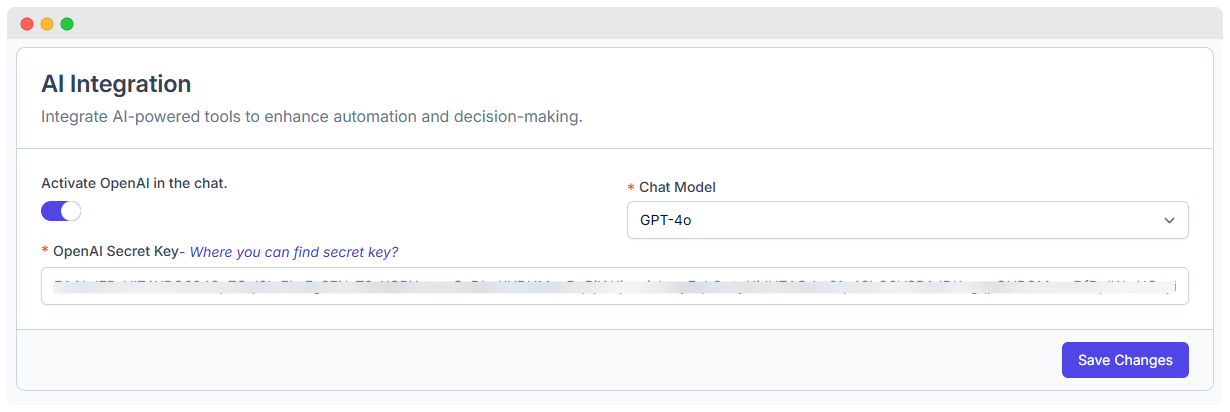
| Field | Purpose |
|---|---|
| Activate OpenAI in Chat | Enables the AI writing-helper (Change Tone, Fix Grammar, etc.) in the message input for agents |
| Chat Model | The OpenAI model used for the writing helper (e.g. GPT-4o) |
| OpenAI Secret Key | Your API key from platform.openai.com |
INFO
This page configures the writing helper for your agents. The AI Personal Assistant that auto-replies to customers is configured in the next step.
Step 2: Go to Application Settings → Personal Assistant v3.1.0
Still inside Application Settings, click Personal Assistant in the sidebar. This controls how the AI assistant behaves when auto-replying to customers.

| Field | Purpose |
|---|---|
| Stop Assistant Keyword | Words a customer can type (e.g. "stop", "human", "agent") to automatically pause the AI for their chat |
| Assistant Footer Message | A short note appended to every AI reply, e.g. "Powered by WhatsMark AI" |
| Message Delay | Seconds the AI waits before sending its reply — makes replies feel more natural (0 = instant) |
| Out of Knowledge Base Reply Limit | Number of times AI will reply when it cannot find an answer in its knowledge base. Once this limit is reached, AI automatically stops and chat returns to normal bot flow. Set to 0 for no limit — AI will keep replying indefinitely |
| AI Provider | Choose OpenAI or Google Gemini (or both) and enter the respective API key |
Out of Knowledge Base Reply Limit
- 0 — No limit — AI keeps sending fallback replies even when it doesn't know the answer
- 1 or more — AI sends fallback reply that many times, then automatically stops and chat returns to normal bot flow
Example: Set to 3 — AI sends fallback reply 3 times when it doesn't know the answer, then automatically disables itself for that chat.
API key validation
When you enter a new API key it is verified in real time. An invalid key will show an error — make sure it is correct before saving.
Step 3: Create a Personal Assistant
Go to Personal Assistants in the sidebar and click Create New Assistant. Fill in:
- Assistant Name — a label to identify it (e.g. "Sales Bot", "Support Bot")
- Description — a short summary of what the assistant does
- System Instructions — the rules and personality the AI follows when replying
- AI Provider — OpenAI or Gemini
- Documents (optional) — upload PDF or text files as a knowledge base so the AI answers specific questions accurately
Active / Inactive toggle
Each assistant card has an Active toggle. You can turn an assistant off without deleting it — inactive assistants won't reply to any chats, even if assigned to a bot.
Step 4: Assign the Assistant to a Message Bot
Go to Message Bot and open a bot (or create one). In the bot settings, go to the Personal Assistant tab and select the assistant you created. From this point on, any chat handled by this bot will have the AI assistant auto-replying to incoming messages.
AI Writing Helper for Agents
When Activate OpenAI in Chat is enabled, your agents see an AI button in the chat compose area. This is separate from the Personal Assistant — it helps agents write better replies faster.
| Tool | What it does |
|---|---|
| Change Tone | Rewrites the draft as Professional, Friendly, Empathetic, or Direct |
| Fix Spelling & Grammar | Cleans up errors in the typed draft |
| Simplify Language | Makes the message easier to understand |
| Custom Prompt | Applies one of your saved AI prompt templates |
INFO
This button only activates when you have typed something in the message box. It rewrites your draft — it does not auto-reply to the customer.
Tips & Best Practices
- Write clear system instructions. The more specific your instructions (tone, scope, what to avoid), the better the AI performs. Vague instructions lead to unexpected replies.
- Set stop keywords customers expect. Words like "stop", "human", "agent", or "help me" are good defaults — lets customers opt out of AI replies naturally.
- Use the response delay. A 2–5 second delay makes AI replies feel more natural and less robotic.
- Upload a knowledge base. If customers ask FAQs, upload a document with the answers — the AI will use it for accurate, specific replies instead of guessing.
- Monitor token usage. Each assistant card shows tokens used (input + output). Keep an eye on this to manage your API costs.
- Check the Active toggle. If an assistant is set to Inactive, it won't reply to any chats — even if assigned to a bot.